Showing posts with label Canvas. Show all posts

Wednesday, December 18, 2013

Fearless Canvases with Prima and Tim Holtz

Hi there, Flock!  Genie here today, madly crafting amidst all the holiday baking and get-togethers.  I have two more canvases that I made as gifts today.

Ok, truth:  I made the first one and loved it so much that I made a second so that I could keep it all for myself.  *blush*
These were so super simple!  I used a couple of 12x12" canvases and put down a rough base coat.  All of the paint used for this project is Tim Holtz Distress Paint in the holiday 2013 collection.  You should definitely contact suzanne@flamingoscraps.com for a SUPER deal on special ordering these bad boys.  I really love this group of colors!!  The top canvas was rough coated with pumice stone and iced spruce, and the bottom canvas painted with evergreen bough.  I wanted just a little more distressing, so I added some bubble wrap stamping; on top, in evergreen bough and the bottom in ripe persimmon.  I let that mostly dry, and then used a ruler to sketch in a 2x2" grid.  I was going for a bit of a distressed look, so I didn't worry about making the lines even widths or even when the marker went through some damp paint.  I found this awesome quote (for those that don't know, I've been a professional studio/wedding photographer for just over 13 years now) and pulled out my Prima wood icons and played with them to determine placement.  I decided on one row of different colored cameras; love the contrast.  The cameras on the top canvas were painted with pine needles and aged mahogany, and the cameras on bottom with ripe persimmon and dusty concord.


I was going for a messy, distressed look, so I didn't worry about getting the paint even or completely covering the wood.  I'm sorry that these detail shots are a little blurry.  Michigan's been in the middle of a snow storm all weekend and I wasn't able to get very good light.  The typewriter font and ink are from my stash.

Thanks for looking, and I'll be back soon!

Thursday, September 12, 2013

Tribute Canvas for John

Tribute Canvas for John

How excited I was to get my Flamingo Scraps Warehouse Sale Combination Box with all the wonderful goodness.  When I saw the Teresa Collins Now & Then collection, I knew that this was just what I was waiting for my Tribute Canvas for my cousin.  


I started with a 12 x 12 canvas and applied a coat of gesso. I then painted the canvas and sides with Tim Holtz Distress Paints (available via special order - just contact Suzanne). I mixed Weathered Wood, Broken China, and a few drops of Tarnished Brass to get the color I liked. After the paint dried I mixed Liquitex Modeling Paste with a Vintage Photo Distress Paint (available at Flamingo Scraps) and applied to the canvas using a mask (stencil). 

While that was drying, I printed pictures and icons that best described my cousin.  On the little icons I used Glossy Accents to make them like charms.  I mounted the pictures using Teresa Collins Now & Then Collection as the back ground.  Now & Then Collection was perfect for the masculine feel of this canvas.  I tore, distressed and inked the edges of paper using Prima Chalk InkEdger as well as Tim Holtz Distress Ink. I found a Teresa Collins stamp set that I had with sentiments that fit perfect.

You all know that I like bling and I was faced with a dilemma…..what is man bling? Gears! Keys! Nuts!  Bolts!  Metal objects! Burlap! Cork! And of course light bulbs! Prima Tiny Junk Yard Findings, Tim Holtz idea-ology goodies, Maya Road Burlap Red Rose (for love), Fancy Pants cork heart and a few stash items cured the dilemma. By the way, Flamingo Scraps has Tim Holtz and Prima man bling, as well as Maya Road Burlap Roses.


 Mod-Podge was my choice to mount the pictures and sentiments.  I used Mod-Podge and Glossy Accents to adhere the man bling.

I hope you enjoy my very first project as a design team member for Flamingo Scraps.  Remember to check with Flamingo Scraps for the products I incorporated into my Tribute Canvas.  Check back often, Flamingo Scraps is getting new CHA products in every day. 

Wishing you a wonderful rest of the week! 

Luann

Note: I’m sending my Tribute Canvas to John’s mother.  I pray that this will be part of her healing process and it was of mine.  This is also a tribute to Dad...he is the one with holding John in the center.

Tuesday, April 30, 2013

A She Canvas

Hello Flockinistas!

Melissa, here, with my latest and greatest project! I've been DYING to try my hand at some She art, and I've finally taken the plunge and give it a try. First, I decided that I wanted to make a 12x12 canvas and prepped it with regular body gesso. Then, I decided I wanted to add some additional texture, and used thick body gesso in a few spots and used a Lego (from my kids' toy bin) to a few random spots.


Finally, I had to prepare a base, and used Heidi Swapp Color Shine in teal and chartreuse to start. Then, I used Tim Holtz Distress Paint in Broken China, Peeled Paint, Forest Moss, and Picket Fence to add some fun variation with masks and distress stamps.


I used the Christy Tomlinson She Art line by Pink Paislee, specifically the 6x6 paper pad, the cardstock accents, the paper doll tissue paper, and the rub on doilies, then layered on a resin frame and blue bird by Websters Pages, then used a key charm by Websters Pages to go with my "She holds the key to many futures" phrase. To make the rays of the sun, I cut up a cream ruffled bloomers by Websters Pages... I really love how that turned out!


I'm pretty sure this won't be my last She art canvas, especially now that there is product out there to make it easier! This girl, though, is going to be a gift for my son's teacher on Teacher Appreciation Day (I thought the phrase would fit especially well for that, no?)


So there you go! I hope that this post provided you with inspiration of your own to make a She art canvas or a page for your book.

Until next time!
Melissa

Friday, March 22, 2013

March Flamingo Four

It's time for another Flamingo Four! This month, three other designers and I worked with these products:


          1)  4x4 canvas
          2)  6x6 paper pad - Pink Paislee "Indigo Bleu"
          3)  Wendy Vecchi Art Parts - Pocket Watch
          4)  Maya Road Acrylic People key chain


Abigail's Take

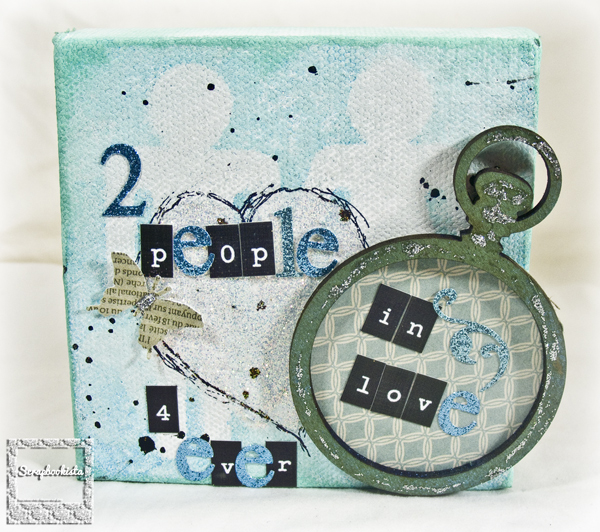
I have to admit, I am not a fan of the whole potty people stick figure trend. But, wait til you see what I made with them! I was gonna give it as a gift, but now I want to keep it!

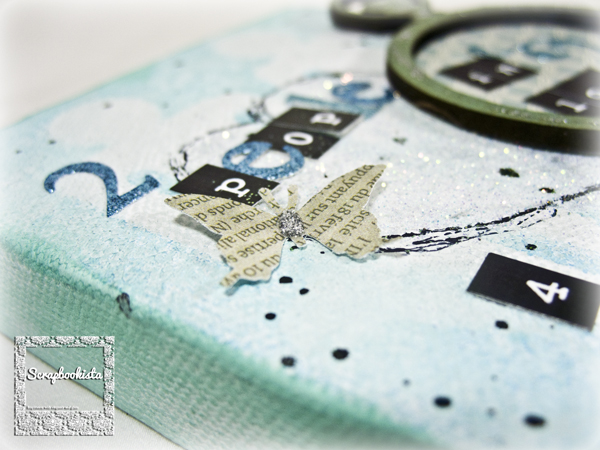
The first "challenge" with this project was that it is tiny! 4x4 inches is not a lot of space! The first thing I did was use the potty people stick figures as masks for a color mist. I laid them strategically where the man and woman were holding hands. Then I used a piece of paper as a mask and I cut a heart shape out of it. I laid that down over the canvas and used a liquid glue to cover the heart area. Then I sprinkled some translucent glitter on it to make a sparkly heart. I was a little surprised at how much the glitter covered. I was wanting the potty people stick figure's hand holding to show through a lot more.  I decided to outline the heart a little more just so it would stand out. I spattered some black ink over the canvas and rubbed some teal ink around the edges.

Scrapbookista----Flamingo-Four-March-2013---2

The next thing I did was mist the chipboard pocket watch. I used the same mist as on the canvas, but it came out a lot different because of the original color. I also added a little bit of glitter glue to the pocket watch to add some shine and glam. The paper behind the watch blends nicely with all the colors and ties things together.

Scrapbookista----Flamingo-Four-March-2013---4

I love the butterfly resting on the edge of the heart!  I made this with a punch and a sheet of printed words in the paper pack. So many cute ones to choose from but I loved this one with the text on it soooo much!

Scrapbookista---Flamingo-Four-March-2013---3


Erin's Take

When I first saw items and pondered what to do, I thought of the people as a family, so it took it from there.  I painted my mini canvas with a distressed look of paint colors (blue, green, yellow, white, and brown) with the same feel and tones as the papers I used, and them let it dry completely.

I used a green and a purple alcohol inks to color the people, making the adults more mottled looking by touching them more times with my felt dauber.


I used the same paint colors (the lighter ones) on the pocket watch as on the canvas, then used the blue distress ink over it when it dried to give it an even more distressed feel.


I then assembled the people and the watch onto the canvas (with zip dry glue), then added the family tag stickers and the twine.


I love this little mini canvas!  I now have a special place for it in my scrap room up on the wall.


Melissa's Take

When I saw this month's Flamingo 4, I immediately thought the people needed clothes, and the paper was perfect for that. The big challenge for me was what kind of clothes to make... enter my new bookshelf that I've got out wedding photo and honeymoon photo album displayed at the top and I knew immediately what to do!

I dressed the smaller figures from the key chain to look like a bride and groom, painted the pocket watch shape with some Weathered Wood Distress Paint, and backed it with paper. The canvas was painted with gesso, and a square of the Indigo Bleu paper was glued to it. I then added the Weathered Wood paint to the edges and glued the pocket watch shape down, the people on the pocket watch, and added the "est. 2003" because that's when my husband and I were married.


I really love the way I did the bride's dress, with border punched layers that I curled upwards to give dimension, and the bow tie on the groom. Isn't it just adorable?


In the end, it looked great on my bookshelf! It adds some personality to an otherwise boring arrangement, and the size is perfect!


Cindy's Take

As usual, there were some tricky components in this set of items!  The 4x4 canvas makes a natural base, but its small size means that it would be very difficult to fit the other items onto it.  But a solution came to me quickly this time.  I love when that happens!  

I cut a yellow piece of the paper to just under 4x4 then dug through my stamps.  I found a Fiskars "enjoy..." stamp and a Scenic Route "TODAY" and stamped them together on the upper left hand corner of the paper.  I used matte Mod Podge to attach the paper to the canvas. While I was waiting for that to dry, I painted the pocket watch black.


I took apart the key chain and selected the woman.  I peeled the protective film off the acrylic, then put the acrylic back on the chain for a future use.  I put spray adhesive all over the protective film and pressed it to a sheet of type paper.  Then I fussy-cut out the shape.  I pulled out two different prints - a blue for her dress and yellow floral for her hair.  I cut the hair by using a scallop circle punch, then shifting the shape and punching the other side.

 
I layered these together and let them dry.  Then I used the Mod Podge to add a few more shapes to the canvas.  When that was dry, I turned the canvas over and attached the pocket watch.

 
Here's my finished project.  Enjoy today - an important reminder for us all.  

 
That wraps up another fun Flamingo Four!  We'd love to see your take. If you make something using the same four supplies as our designers, please let us know and we'll feature it here on the blog. To find the materials we used (and so much more!) visit the store at www.flamingoscraps.com!


Friday, June 29, 2012

Prima - Fairy Belle Canvas

Please meet my beautiful niece, Emily. She is the newest addition to the Gibbs clan, born on June 15. She had her first photoshoot with Aunt Tonya last week, and now to drive everyone crazy with project after project.

I decided to create a canvas to hang in my  living room. There are a lot of mixed media techniques used on this canvas.  I wanted it to feel like a woodsy glen.   I used the Fairy Belle paper from Prima as my accent paper. 


The background has several layers of paint, glimmer mist, texture medium, and crackle medium.  I wanted this canvas to sparkle, but maintain a rustic feel. 


Then a cut out all the flowers from the paper collection to add as a base layer to the canvas. They wrap around the outer edge of the canvas. I added a spray of Prima Lilac Rosebuds (many of which I opened and painted the bulb gold, so that they would favor the magnolias in the paper collection.


 Suzanne shared with me some tiny purple Prima flowers that favor baby's breath. They were so delicate and spindly that I thought they made the perfect filler for the rose spray. Then  I sprinkled a few crystal flower spray around, and dusted the entire thing with golden fairy dust (a.k.a. glimmer mist).

I just love how Ms. Emily looks like she is nestled in a garden with Fairies.

I hope you have enjoyed this project. Thanks for stopping in today.

Monday, June 18, 2012

Maya Road Laundry Room Banner

I have lived in my house for 12 years, and for 12 years, the state of my laundry room has made me crazy!!  I had shelves built and a sink installed, but never got around to painting it.  And then Pinterest and spray paint empowered me!!!  It still isn't finished, but the washer/dryer area is painted in bright, fun colors.  Which led me to tackle another project that had been waiting -- a little bit of home dec to tie the room together!

As soon as I saw the Maya Road Canvas Laundry Day Set, the Vintage Wooden Spools, and the Sew Cute Chipboard, I knew I wanted to make a banner!


I alternated Laundry Day shapes with Canvas Flag Banner pieces and wooden spools strung on narrow ribbon.  The canvas pieces were attached mini wood clothespins.


I had a ball decorating each canvas shape with wash day words and images.  Stymied as to how to make a laundry basket -- I settled on the birdcage from the Tim Holtz Movers and Shapers set -- PERFECT!!!  My most favorite ever Pink Paislee chippie letters and more Maya Road embellies -- Mini Ruler, buttons, Laundry Day Mini Chipboard, and Heart and Hand Chipboard!


I raided my stash for safety pins, charms, and the awesome overall fasteners!  I have had those for years and years, saving them for the perfect project!


My laundry room is now a pleasure to work in -- the valance is a tension rod with Dollar Tree napkins draped on it -- and I am on to the next project!!

Thanks for Looking!

Tuesday, January 3, 2012

Scrappy Mess to Master Piece

Some serious Holiday crafting has been going on in my room the last few weeks. Between Tim's 12 tags of Christmas, Cards, and some last minute gifts, I have had scraps up to my elbows. I wanted to share with you guys today a tip for turning those scraps into a work of Art.

I started with an 8x10 naked canvas (you could do any size). Then I used my Ranger Glue 'n Seal to decoupage the scarps onto the untreated canvas. Just looks like a giant mess right now. But notice the chipboard pieces - they will offer some depth later.


Next I covered the entire canvas with watered down Gesso. This will make all the elements one color and make them look as if they belong together. Be careful not to apply the Gesso too thick - you still want to be able to see the patters from the different styles of paper. I also added a thin coat of White Metallic Acrylic paint and then lightly sprayed Lindy's Stamp Gang's Creme Brulee Cream to the finished piece to give it a sparkle. So you may ask - "Why add all of those pieces if you are just going to cover them up?" - well, it's simple, I'm after texture. While it is hard to see in the photograph - the text and the music notes are still visible in places. But the Mess looks like a uniformed mess at this point.


Next I wanted some contrast for all this white. So I took an old cardstock frame from Daisy Dee that was dated 2004, and I covered it in black gesso and bead gel. When it was dried, I used my finger to rub same white metallic paint over the frame to bring out the texture of the bead gel. Then I spritz it with the Lindy's Stamp Gang Creme Brulee Cream.


Next I assembled a beautiful spray of Prima's Christmas lights Crystal Sprays, White Flowers, and butterflies around my frame. Notice that even though the flowers and frame have covered the canvas - you can still see the textures of the pieces that were adhered to the canvas backdrop. These textures give depth to the canvas and offer something new every time you admire the piece.


Next I decided the frame seemed empty so I cut a Tim Holtz bird cage from black chipboard and embossed it in silver with the music note stamp from Stampendous. During the 12 tags of Christmas, Tim Holtz shared a technique for using shrink plastic with UTEE (Ultra Thick Embossing Enamel). So I cut the bird at 8 inches from the Home Accents Cricut Cartridge from Shrink plastic and when I dipped it into the UTEE it shrunk to about 4 inches making the perfect crystal center piece for my canvas.


To finish the piece off, I used a Dylusions stamp from Dyan Reaveley, that says "A Friend knows the song in your heart" - the rest of the phrase was removed. I stamped it onto thick packaging and embossed it with white embossing powder. Placed it in the bottom right hand corner of the frame and called this Masterpiece finished.


I have a step by step from start to finish video available on my YouTube Channel, click here to watch it.

Thanks for stopping in today,

Related Posts with Thumbnails