Showing posts with label moxxie. Show all posts

Monday, August 29, 2011

Making Do

Imagine if you will... I was working on a layout about our July 4th.  I had the perfect patterned papers, pictures, and chipboard stickers.  It was all laid out- the finishing touch would be three stars, arranged in a visual triangle.  I knew just what stars I would use (some funky self-adhesive ones from BasicGrey).  When I went to get them.... uh oh.  Only two left.

Darn it!  Time to make do.   I found a random piece of chipboard and cut out a star shape, mimicking the style of the ones I wanted to match.  The color was different, so I painted all three pieces "Country Twill"- a color that looks like raw chipboard.  I inked the edges and added the stars.

My star isn't exactly the same as the BasicGrey two, but it's close enough.  Can you guess which one I made?

From Flamingo Scraps: Moxxie patterned paper, BasicGrey chipboard stars
Other: We R Memory Keepers patterned paper, Bazzill cardstock, EK Success punch, Folk Art paint, Reminisce stickers
Inspired by: Shannon Zickel, scrapbooks etc. August 2011

Mine is the large one.  I'm happy with it.  Pretty good for making do.

Thursday, September 23, 2010

Guest DT Cindy deRosier: Using Your Handwriting

My grandmother was a scrapper (long before such a word existed!). She died in 2004, just six weeks before my wedding. I miss her very much and am sad that my son Trevor never got to know her. However, through her scrapbooks, Trevor can learn about the lives of his great-grandparents. Her scrapbooks are a true treasure - not only for the amazing pictures, but because she journaled in her own handwriting.

Your handwriting, love it or hate it, is unique to you. There is no better way to include yourself on your scrapbook page than using your own handwriting. I'd like to share a few tips to make it easier to include your own handwriting on your layouts.

Use a light box
If you have difficulty writing in a straight line, you could obviously draw or stamp lines directly onto your page and follow those. But there's another very easy way to get lines on the page that won't show and don't need to be erased. Simply put a lined index card (or any other lined paper) under your project, turn on the light box, and the lines will easily show through.

This picture shows how well the lines show through when the light box is turned on.


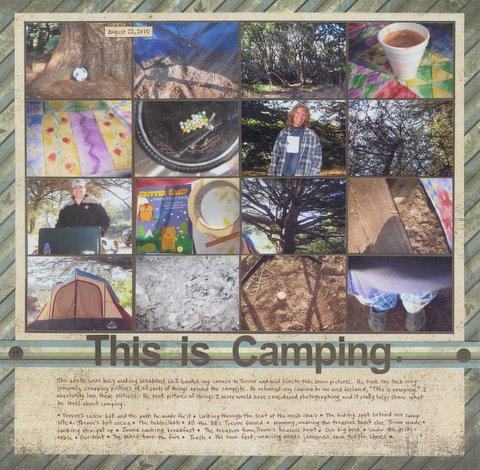
And here is the completed layout.

Products used: pp- Moxxie, cs-Basic Grey, pen-Stampin' Up

Journal on paper strips
I've heard a lot of people say they don't like journaling by hand because they're afraid of messing up their layout. The great things about using paper strips is that since you're not journaling directly on your layout, you can't mess it up. If you happen to make a mistake on a paper strip, you only have to rewrite that one strip.

By the way, this 2-pager has 33 pictures on it. That's a new personal record!


Products used: pp-BoBunny, cs- Bazzill, leaf-Prima, pen-Zig, paint-Folk Art, ink- Color Box, grungeboard- Tim Holtz
Journal individual words
If you like the idea of paper strips, but want something even easier that you absolutely cannot mess up, try journaling individual words.

Products used: cs-Bazzill, pp and ribbon- unknown (very old kit from Costco), pen-Zig, ink- Color Box, grungeboard- Tim Holtz

I hope you're inspired to try a few of these ideas. Happy scrapping!


To see more of Cindy's work, please visit her gallery!

Monday, June 28, 2010

Friends Mini Album using a Moxxie Die Cut Paper Pack!

Flamingo Scraps has these FABULOUS packs of Moxxie 6x6 Die Cut Paper Packs in a variety of palettes -- 12 double sided sheets per pack -- simply made for a snazzy 6x6 mini album.  And inexpensive too at $3.49 a package!

I chose to work with the Jewel pack as, coincidentally, it follows closely the Pantone Fall Color Palette!
My base was a black mini album with binder ring pulled from the depths of my stash (along with some other goodies)!

This album is going to be donated to a charity crop, so I thought FRIENDS was a perfect title!  The gorgeous flower and butterfly on the cover are Prima Andorra -- both in one package, what a bargain!!  A few swipes of Tim Holtz Distress Ink altered these beauties to just the right colors.  I used Distress Inks, Glimmer Mist, Distress Stickles, and Distress Paints on most every page and embellishment to blend and alter to the desired shades.


Here is the album fanned out to show both sides of the pages!  Embellishments include Prima flowers, lace, felt devines, and bling, and misc. ribbons including strips of burlap!  

This page shows the use of distress mediums to highlight, blend, and alter embellishments to compliment the colors in the paper pack. Note the Prima felt devine in the pic on the left was trimmed to fit and altered from its original white with distress ink!


 This page makes use of a nearly forgotten vintage embellishment from my stash with a Prima flower vine, spilling out the top, in shades of grey/silver/ pewter -- showing up more and more as THE new neutral! 


The photo on the left details the embellishment of the binder ring with ribbons, tulle, burlap, and some fabulous metal accents --  a vintage key, and washers from the hardware store -- in the same neutral metallic range.

Give these fab Moxxie papers a try and don't be hesitant to use those distress inks, stickles, paints, and Maya Mist and Glimmer Mist to alter embellies to coordinate with your choices! 


Related Posts with Thumbnails