Showing posts with label Tonya Gibbs. Show all posts

Monday, March 3, 2014

Ustream Tonight with Tonya Gibbs

Hi everyone,

It's the first Monday of the month and that means it is time for Tonya Gibbs live on Ustream!

Tonya is going to teach some mixed media techniques. So pull out those Gelatos and Pitt Pins,  cause we are going to do a mixed media tag using products from Faber Castell Design Memory Craft  and the new March release Dies from Die-Namites Dies.
 
Make sure you join the crowd early to chat with Tonya http://www.ustream.tv/channel/gibbst
 
Class begins at 8:30 p.m. EST.  


We will do our best to record the class for those who can't make it live.
 
Hope to see you there!
 

Monday, December 2, 2013

Ustream Tonight - December Daily Part 2

Set your alarm clocks because tonight is Part 2 of the December Daily Ustream  at 8:30 p.m. est.  We are going to begin construction of week 1, and start building a few embellishment clusters that will be used in future days.  Each week I will do a post on my blog and the Flamingo Scraps Facebook wall  showing what I did for the week. This will make it easy for you to follow along.

Links you need to follow to keep up:
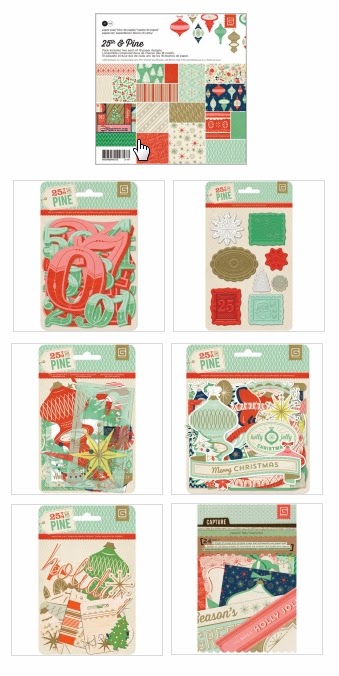
We are using the beautiful 25th & Pine from Basic Grey for this year's journal. Kits are available at Flamingo Scraps  for $29.99.

http://flamingoscraps.com/product/tonya-live-ustream-class-25th-pine-december-daily-kit/


If you missed the November Ustream, make sure you watch the recordings. We built our covers in that class.  I have added them plus a few extra video tutorials to a YouTube play list for easy reference.  Be sure to check this play list for new videos each week. 

> Click here to begin watching.

As always we will do our best to record  the live shows. 

Hope to see you there!

Tonya
http://www.psychomomscrapbooks.blogspot.com


Monday, September 9, 2013

Ustream - Tonight Sept. 9 at 8:30 pm est.

Flamingo Scraps presents Tonya Gibbs live tonight on Ustream as she creates with the new Basic Grey Persimmon Line availble now in the store!

Class begins at 8:30 est at http://www.ustream.tv/channel/gibbst.  Join the crowd early!

We will be celebrating our 1 year anniversary on Ustream, and promise lots of fun.

We will do our best to record the class, but are at the mercy of Ustream.


Friday, August 2, 2013

August 5 - Live Ustream

Join us Live on Monday night - August 5 on Ustream at 8:30 p.m. est

I'm going to make a layout using Marion Smith Designs new release "Mad Tea Party ". These papers are in print now and scheduled to ship to Flamingo Scraps in September.


We hope you can join us live, but as always we will try to record the show in case you miss it.
 
Hope to see you in the chat on Monday night!
 
Thanks for stopping in today,
 
Tonya Gibbs


Friday, May 31, 2013

Ustream - June 3, 2013

Please join Tonya Gibbs & Flamingo Scraps on Monday, June 3 at 8:30 est on Ustream as Tonya creates a layout using this sketch shared by Flamingo Scraps Designer, Melissa Williams, earlier last week. 


This sketch is going to get a masculine twist when Tonya uses Heidi Swapp and Pink Paislee papers and embellies from Flamingo Scraps

Make sure you join the crowd, http://www.ustream.tv/channel/gibbst early.

There will not be a kit this month. As always, we will do our best to record the show for those who can't make it live.

Monday, May 6, 2013

May Ustream Class & Kit

I hope you can join us on Monday, May 6 at 8:30 EST for a live Ustream class with Tonya Gibbs. The class is free to join, but if you want to create the project with Tonya, a kit is available for sale at Flamingoscraps.com.
 
Bookmark the Ustream Channel Address http://www.ustream.tv/channel/gibbst
 
 
The kit is $25.99 and includes:
 
 
1 Maya Road Clutch Purse Chipboard Album
6 12×12 sheets of Pink Paislee Hope Chest paper
¼ package Hope Chest Paper Goods (ephemera)
1 Hope Chest butterfly clip
1 piece sewing pattern tissue
1 18” length Maya Road TuTu Tulle, Vintage Beige
1 18” length Maya Road TuTu Tulle, Seafoam Blue 1 18” length Maya Road Small Organza Rose Trim, Sand
1 18” length Webster’s Pages Petite Ruffled Trim, Gold
1 Maya Road Burlap Rose, Cream
1 FabScraps Chipboard Little Girl
½ package Jenni Bowlin Flatbacks, Reader
Assorted Prima Flowers
Flatback pearls, fasteners, trinkets


Here is a walk through video of the kit:


We will attempt to record the class for those who can't watch it live.

Friday, February 8, 2013

Secret Crush - Layout

Thank you to everyone who participated in our Ustream on February 4.  If you missed it, you can watch it here. Save the date for our next class on March 4, at 8:30 EST.
 
Today, I'd like to follow up with a layout that I created with some of the other products in the Pink Paislee's Secret Crush Line.  All of these products are available in the store while supplies last.   Many of these products used on this layout were included in the class kit. This layout was a fun way to use up those extra pieces.
 
Kenny and I  met in high school, dated for about 5 years, and on February 10, we will celebrate our 23rd Wedding Anniversary.  The ephemera pack and and the photograms in the Secret Crush line reminded me of my high school crush, so I decided to take that approach to the layout. 
 
Flamingo Scraps: Pink Paislee Secret Crush Paper, Ephemera Pack, Note Cards, Cardstock Stickers,  Photograms, File Folder tabs; Heidi Swapp - Color Shine Tinsel; Fab Scraps Chipboard - Decorative Hinge.  Other:  Tim Holtz Tissue Tape - Sketchbook, Tiny Attacher ; Gesso; Martha Stewart Doily Border Punch; Stamp'n Up Envelope Die.  
 
I remember my high school love notes to Kenny were always decorated with hearts,  arrows, XOXOXO,  lips (some were kissed),  and those  "True Love Always" grids with our initials were all over them. I would spend every class period writing him a note, so I could give it to him when we changed classes.  I still have the notes he wrote back to me.  They are tucked away in a shoe box at the top of my closet.  He found them the other day and began reading them. He was shocked I still had them after all these year. I have to admit, I blushed a little while he re-read them.
 
My mission was to make my layout match those love notes.  I started with a 4x6 photo of him I took last year. I layered the stickers, file tabs, hearts and arrows around the photo making sure all the love titles were visible.   I dry brushed gesso in some places to break up all the "pink", and I also added a gessoed border to the photo.  Tim Holtz Tissue Tape from his Sketchbook Collection offered spots of  "romantic script" to this sea of white and pink.   


For my journaling, I decided to use a piece of scrap from the paper collection to make an envelope.  I used a Fab Scraps decorative hinge chipboard cut that was sprayed with the new Heidi Swapp Color Shine Tinsel to anchor the thin arrow on the left.  I also sprayed the tinsel onto the background and let it drip down the paper. For the title, I used some fabric Thickers in pink that I got from Flamingo Scraps a while back. Since we have been together for so long, I decided the title should be "My Love Story".


I love how  this layout reminds me so much of those notes I wrote so many years ago. 
 
If you make a project using this line, please share it on the Flamingo Scraps Facebook page.  Be sure to tag me in the post so that I see it. I love to see your creations.
 
Thanks for stopping in today,
 
Tonya Gibbs


Friday, February 1, 2013

February 4, Ustream

I hope you can join us on February 4, 2013 at 8:30 EST on Ustream Live as Tonya Gibbs creates this cute treat dish with Pink Paislee's Secret Crush and Maya Road's Chipboard pieces.


There are a limited number of kits available for the Feb 4th class!

Each kit contains supplies to make three treat baskets, with some leftover for Valentine cards, decor, or tags and with two full size Color Shines and a Prima Chalk Ink Edger!

To purchase a kit, contact Suzanne at flamingoscraps@yahoo.com. Kits are $41.99 with free domestic shipping!

Kits include:
4 - 12x12 Sheets Secret Crush Paper
1 - pkg Secret Crus Ephemera
1 - pkg Shot through the Heart Chipboard
1 - Scalloped Heart Chipboard Album
1 - Heidi Swapp color Shine Tinsel
1 - Heidi Swapp Color Shine Primrose
1 - Prima Distress Chalk Ink-Old Rose
Assorted Flowers
Assorted Maya Road Trinket Pins
Seam Binding


Make sure you join the Ustream crowd - http://www.ustream.tv/channel/gibbst

Thanks for stopping in today,

 
Tonya Gibbs

Thursday, January 3, 2013

Jan. 7 Ustream Class

Happy New Year! 

I hope you can join us on January 7 at 8:30 EST on Ustream as Tonya Gibbs creates a masculine layout using Pink Paislee's Portfolio Collection and Heidi Swapp's Vintage Chic.  Do you struggle with "negative space" on layouts?  In this class we will create a  layout from start to finish, and discuss tips for keeping the "negative space" while still having eye catching photos with lots of layers.

Make sure you join the crowd early.
Ustream Channel: http://www.ustream.tv/channel/gibbst


We will not offer a kit for the month's class.  However, most of the supplies used can be found on FlamingoScraps.com and are 35% Off for the Tenth Day of Christmas!  Use Coupon Code day10! 

Supplies In Stock at Flamingo Scraps: 
Heidi Swapp - Vintage Chic Collection - 12x12 Double Sided Paper - Just Dots
Heidi Swapp - Color Magic Collection - Notes - Resist Journaling Tags

Pink Paislee - Portfolio Collection - 12x12 Double Sided Paper - Unbelievable
Pink Paislee - Portfolio Collection - Ephemera Pack
Pink Paislee - Artisan Collection - Resist Elements - Borders
Pink Paislee - Artisan Collection - Resist Chipboard Shapes - Stars


Supplies Which Can Be Special Ordered From Flamingo Scraps:
Sizzix - Tim Holtz - Bigz Die - Alterations Collection - Die Cutting Template - Tiny Tabs and Tags
Tattered Angels - Heidi Swapp Collection - Glimmer Mist Spray - 2 Ounce Bottle - Silver Sugar Advantus - Tim Holtz - Idea-ology - Tiny Attacher with 100 Tiny Staples

Monday, August 20, 2012

Forever In My Heart

Saturday I received word that my friend Liz had passed away after a long battle with Leukemia. She was a follower of mine on YouTube and we had chatted a lot online. I had spent quite a bit of time getting to know her through the last few years. Liz  was one of those people that despite her problems, she was always positive and fun. She had an infectious spirit about her, that was a testimony of her faith.

My way of dealing with emotional things is through Art. I love to create as I talk to God and meditate on my feelings. I find that it helps me to focus my energies and clear my head. I feel like God is guiding the creativity, instead of myself.

Brittany, my daughter, saw that I was emotional, and she joined in to help me create this piece as a tribute to Liz. It was so nice to have her finger paint with me.

From Flamingo Scraps:   Prima Build A Swirl Stamps, Ranger: Distress Ink - Picked Raspberry, Claudine Helmeth Matt Medium. Other: Paint, Molding Paste, Hymnal, Sizzix Wings die Cut, Faber Castell PITT artist pens in light Cobalt Turquoise, and Black, Windser Newton Irrodescent Medium.


Liz will forever be in my heart, and written around the heart are some thoughts I had of Liz and the way she lived her life.  The clouds are made with molding paste, and the wings were cut from a sizzix die from hymnal pages I used "Beyond the Sunset" and "Sweet By and By", Then blended them into the canvas with irredescent medium.

Do you create when you are feeling emotional?  I felt at peace when this was finished, and Liz got her "Momma Tonya Original."

Thanks for stopping in today,


Tuesday, August 14, 2012

Distress Markers - How To

I have had a ball playing with my distress markers.  I decided to make a card for my niece's 7th birthday that is the first week of Sept.
I colored two images of the Ms. Anya Hats from - The Greeting Farm, and cut pieces of her out and popped them up on pop dots to giver her more depth.  She was colored with the Tim Holtz Distress Markers, then placed on a sheet of the Celebration's Paper from Webster's Pages.  

From Flamingo Scraps:  Webster's Pages Celebration 6x6, Trims, Roses, Tim Holtz Distress Markers.  Others: Making Memories #7, Baker's Twine, Washi Tape, The Greeting Farm -  Ms. Anya Hats, and Inkadinkadoo - Birthday Stamp.


For a complete step by Step of me coloring Ms. Anya.  Please watch this video.


Here is a video of me making the card:


Monday, August 6, 2012

Distress Markers - With Flowers

I love playing with my Tim Holtz Distress Markers.
I wanted to share with you today a simple tutorial on how to use these markers to recolor your white mulberry flowers.
Supplies needed: I'm using the Prima Cabbage Roses, Tim Holtz Worn Lipstick Distress Marker, a broad tip water brush (you can substitute a paint brush and water), and a heat gun.


Using the brush tip - begin painting stripes on the flower. 

There is no need to completely color the flower.  Leave some of the base color showing like I have in the next photo.  


Using your water brush begin spreading the color around the surface of the flower.

I love how this technique leaves your flower variegated and more naturally colored.

You can let the flowers dry natural or use a heat gun to dry them quickly.  Another added touch - is to singe the edges with the heat gun by placing the gun close to the flowers.  This will make the flowers look aged.


Thanks for stopping in today,


Monday, July 30, 2012

Scrap Cards

I've been making cards with scraps again, and I know a few weeks back I shared a few projects I've made lately with the Fairy Belle and the Sunkiss papers from Prima.  Today I thought I would share with you the cards I made from the scraps.


I find that making cards with my scraps is so rewarding.  Since I participate in a lot of swaps I usually stuff one of these in the box before I mail it.    What do you do to control the scrap population?
Thanks for stopping in today,

Friday, July 13, 2012

Oldies But Goodies - Tools of the Past

With CHA right around the corner – I know there are going to be heart stopping products that will become must haves.  We will replace yesterday’s must haves with these latest and greatest products.  It is a vicious cycle.  We have a lot of money invested in these tools, and they are still very useful.  I found myself resurrecting a few of them this week, and thought I would share with you how I showed them some love.

1.     Eyelet setting hammer  -  Remember having to BANG BANG BANG your eyelets into your projects.  Then the Crop-a-dile, from We Are Memory Keepers, was released and the hammer was tossed to the side.  Recently, I pulled the little hammer out of hiding and used it to distress a wooden cigar box. 


2.    The Grommet Setter from Making Memories had my toes tingling.  I HAD TO HAVE IT! It was like the coolest thing with the ginormous flower grommets.  I recently pulled it out to set an Eyelet too big for my crop-a-dile.  Also - Now that I'm thinking about it, I may just use it again this week to add a few of those flowers to a canvas. SO FUN.


3.     Dekled Edge Scissors  - GASP – you say.  Well, if used properly, these scissors can be a lot of fun.  I wanted a really tattered edge on an envelope  and decided to use these scissors.  I’ve also used them to cut fun shapes for mixed media projects.


4.     The old old Sizzix Dies remember the ones with crazy frames – no one ever shows them love anymore.  However,  I’ve been going through my stash of dies lately and found some great oldies to include in my mixed media projects and journals.   Example:  This frame was so popular,  but I haven't used it since 2007.  I recently cut some packaging with it, then dry embossed it and used alchol inks to give it new life.


5.     Remember this guy? I never could get this to cut properly. I have hurrled that little tool into the air so many times out of frustration.  I recently used the cutting plates as a stencil to spray interesting patterns on a project in my art journal.    Take your distress applicator tool and use the sides of the stencils to make beautiful borders on your journal pages.


Do you have tools that you have put away and forgotten about?    I challenge you to pull them out and find a new use for them.

Next week I want to explore products of the past that are making their way into my current proejcts.
Thanks for stopping in today,

Thursday, July 5, 2012

Once Upon A Springtime - Cigar Box

I guess you could say I've been on a Fairy kick lately.  Graphic 45's Once Upon A Springtime is one of my all time favorite paper collections.   I have been wanting to alter a cigar box with it for a long time now.   This past weekend I finally had the chance.


From Flamingo Scraps: Graphic 45: Once Upon A Spring Time: Pixie Post and Once Upon A Spring Time, Ranger: Claudine Hellmuth Matt Multi-Medium and Forest Moss Distress Stain, Prima: Rose buds, Mini Roses and Trellus Roses; Tattered Angels:  Gold Glimmer Mist, Mist Fits Glimmer Chalks. Other:  Floral Vine, Gelly Roll Clear Star Pen.

The base of the box was painted with the Ranger Forest Moss Stain then I sprayed Gold Glimmer Mist on top so that it has a nice shine to it.  I cut out the book and Fairies from the paper collection and flanked it with some Roses from Prima. Then I fussy Cut Fairies and birds from the paper collection and nestled them into the floral spray.

I love the way this box turned out, and I hope that my friend likes it too.

Thanks for stopping in today,

Friday, June 29, 2012

Prima - Fairy Belle Canvas

Please meet my beautiful niece, Emily. She is the newest addition to the Gibbs clan, born on June 15. She had her first photoshoot with Aunt Tonya last week, and now to drive everyone crazy with project after project.

I decided to create a canvas to hang in my  living room. There are a lot of mixed media techniques used on this canvas.  I wanted it to feel like a woodsy glen.   I used the Fairy Belle paper from Prima as my accent paper. 


The background has several layers of paint, glimmer mist, texture medium, and crackle medium.  I wanted this canvas to sparkle, but maintain a rustic feel. 


Then a cut out all the flowers from the paper collection to add as a base layer to the canvas. They wrap around the outer edge of the canvas. I added a spray of Prima Lilac Rosebuds (many of which I opened and painted the bulb gold, so that they would favor the magnolias in the paper collection.


 Suzanne shared with me some tiny purple Prima flowers that favor baby's breath. They were so delicate and spindly that I thought they made the perfect filler for the rose spray. Then  I sprinkled a few crystal flower spray around, and dusted the entire thing with golden fairy dust (a.k.a. glimmer mist).

I just love how Ms. Emily looks like she is nestled in a garden with Fairies.

I hope you have enjoyed this project. Thanks for stopping in today.

Thursday, June 21, 2012

ReInking Distress Pads

I have had a few people ask me in the past how to re-ink a stamp pad.  We all know that if you add too much you get a soupy mess.  If you don't add enough -  well - you know!

While I can't speak for all stamp pads (since it is specific to manufactorer standards), I can speak for the Ranger Distress Pads. 

I recently took a class with Tim Holtz and he gave a demonstration on the mystery of how much ink to use and technique for refilling your Distress Inks.

First it is important to understand the ink pads themselves. Dye based ink pads are made of felt that is compressed and then laminated with a fabric topper. The fabric keeps the felt together. The felt helps to "suspend" ink.  Think of a sponge you fill it with water and it appears dry until you press it and the water bubbles to the top.   This is exactly how the ink pads work. The ink is suspended in the pad until the stamp presses it and the ink floats to the top and is applied to the surface of your stamp.  With that said -  the Ink will not absorb into the pad without the pad being pressed.

Here are the simple steps:
Verify that you are using the correct ink for the right pad (you laugh that I say this, but my walnut ink lid was on my tea die pad and let's just say I now have 2 walnut pads).


Second the Ranger Reinker bottles are designed SO THAT THE DROPPER holds the perfect amount of ink needed to reink 1 pad.   Fill the dropper with ink and apply all over the top of the pad as demonstrated below...


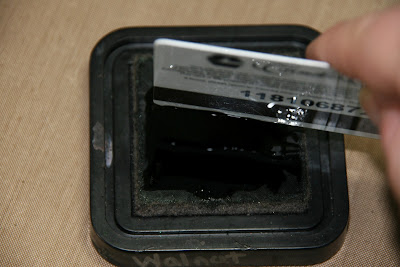
Next -   Use an old gift card/credit card and scrape the ink into the pad.  You need to apply pressure, and move down the pad, then across the pad until all the ink is absorbed.  This may take a few minutes and seem hopeless at first! 


This is what your pad will look like when all the ink is absorbed.  Notice there are a few drops of ink around the lid? 


Simply wipe around the perimeter of the pad with a baby wipe or moist paper towel. Return the lid to the top.   Your ink pad is now re-inked.  Tim suggests heavy used pads be re-inked every six months to a year. 


One other helpful hint:

There is a myth that ink pads should be stored face down, so that the ink flows to the top of the pad rather than the bottom.  Since we learned at the beginning of this blog that the ink is suspended inside the pad - we know this myth to be false.  You may store your inks in any direction you like for the type of storage system you have.

Thanks for stopping in today - hope this helps!


Thursday, June 14, 2012

Father's Day Wallet

I was out blog hopping yesterday and Heidi Swap had the cutest project on her home page.  She made a cute little Father's Day wallet.  I decided that this wallet would be perfect to include in another mini album, in a pocket on a scrapbook page, or as a gift card holder for my husband.

So here is my version:
I wanted mine to have a "grunge & mixed media" tone so I settled on kraft card stock for my base.  I painted some of the panels with red paint and patina Rub & Buff for some. I pulled out distress stains, distress inks, and archival inks and went to town.  For texture & patterns,   I used the "Ultimate Grunge" Stampendous stamp set from Tim Holtz.  The cool thing is you are only limited by your imagination. I decided I needed a little more pop, so I added black magic paint (metallic black) from Folk Art to packing bubble wrap and used that as a stamp. I sprinkled a few tiny quotes and elements as embellishments, and sewed buttons to flaps for a closure.


This view shows the flap opened - I used my Dymo Press Label maker to type this quote "A Dad Puts Pictures Where His Money Used to Be."


On this view you can see how the wallet starts to open  - I used my Pink Paislee Daily Junque stamps that I got from Flamingo to create a small pocket.   The photo is my Daughter, Brittany, in her High School play - The Little Mermaid.


In this view, you can see that I added pictures of my husband with each of our children.  I tried to include memorable pictures from this past year throughout the wallet.


I even included a picture of our dog, Angel who has been in the family for 12 years.   This view is the wallet completely opened.  It is  fun to see the changes in our children in just a few months time.  I placed Tim Holtz Tissue on all of the creases on the inside (make sure you glue under the tissue tape so it stays down), and then stitched over the top of that with my sewing machine.


This is a view of the back of the wallet. 


So how do you make it?
I have a video that explains everything...


Thanks for stopping in today,
Related Posts with Thumbnails