Thursday, October 31, 2013

Chic Coffin - Happy Halloween!!

 I love Halloween for the fun you can have with the dark and macabre, shakes things up a bit.  So with that in mind......

Happy Halloween everyone!!

I made a little present coffin box and dressed it up with a little shabby chic-ness, why not dress up dark and sinister ;).  The coffin opens up and cackles at you, so I thought why not decorate it (it was just plain wood).


I sprayed the entire box with 3 colors of Heidi Swapp Color Shine (Georgia peach, Black Velvet, and Chartreuse).  I layered the misting (letting some dry before adding on another layer of spray), plus I also added in some layers of Claudine Hellmuth Studio paint (in similar colors of green, orange, and black).  I then let it all dry before adding on the Halloween Washi tape - Beware of what might lurk inside!!


 Here you can see I used a stencil (you can special order items like the stencils, paint, etc from Flamingo Scraps) to added a layer of Claudine Hellmuth gesso mixed with slow drying medium to create texture.  After it all dried hard I sprayed with the color shine colors again.  I then added in my Prima flower cluster (some also sprayed with color shine to match - the black and green flowers are sprayed ones), and my cute little black spiders from my stash.

You can find most of these supplies over at Flamingo Scraps!!


Now to just enjoy the goodies inside - all while the little coffin cackles at you for eating your sweets!!

Supplies
Wood Coffin
Flowers - Prima
Mist - Heidi Swapp
Mediums and Paint - Claudine Hellmuth
Spiders
Washi Tape
Stencil - Studio Calico
Enjoy!!

Wednesday, October 30, 2013

Mixed Media Gifting

Hey, Flock!  Genie here, and I'm starting to think about making Christmas gifts for my friends and family.  I probably should have started months ago, but I guess I'm just not that prepared.  ;)
If I can bear to part with it, this mixed media wood block will go to one of my aunts.  I come from a very crafty family, and we have quite a few talented sewists.  This idea has been bouncing around in my skull for a while, and the lovely colors in the Webster's Pages Spring Garden collection that came in my Flamingo Scraps Combination Warehouse Box were just what I needed to bring it to life.  A complete list of products used will follow.
 
 
I started with a 12x12 wood block and haphazardly placed a few pieces of an old pattern on it with Mod Podge (when I use a pattern up, or lose pieces, or whatever, they go into a drawer to be used in mixed media--I love the look!).  I tore a few pieces of the Webster's Pages and added those right on top, working them into the patterns for a lovely blend.
 
 
I mixed some teal Color Shine mist with some of the Mustard to make green, which I splattered on the Maya Road chipboard pieces with a paintbrush and then spritzed lightly on the surface of the patterns and papers.
 
 
It took some work to get the gorgeous, amazing, lovely, fabulous...(Oh, how I love those Webster's Trims!!) on the page, but with time and a LOT of Mod Podge, they stuck.  ;)  I wrapped some twine around my chipboard spools, stuck those down, added my text, and a Webster's fabric flower, and I was done.  I really love the simplicity and muted color palette of this one!  Thanks for looking, and I'll see you soon.  :)
 
Items used:
From the box, I used some lovely Webster's Pages papers, trims and twine, from the Spring Market collection.
From my stash:  alphabets, wood block, pattern pieces, and art mediums.

Tuesday, October 29, 2013

Pumpkin Pops - Fun use for your Heidi Swapp Mists!!

Every year for Halloween, I am always on the lookout for a cute little gift I can give to my kids' friends (school, neighbors, etc).  I have seen the ghost pops so many times (take a sucker and wrap a white paper towel the sucker, tie a black ribbon around the bottom, give it eyes, and you have a ghost) that i thought of trying to switch it up a bit.  I thought of pumpkins.  Invert them, make them orange, and poof pumpkin pops.


You could give these out as kid gifts, teacher gifts, as place cards for a table setting, and as plain pumpkins they work for Thanksgiving too!!
 

Pumpkin Pop Tutorial

1) Supplies - Some form of a sucker (sphere not flat), paper towel, quick drying craft glue, tape, twine, black pen, green pen, orange mist, black mist, green mist, cardboard, and a flower.

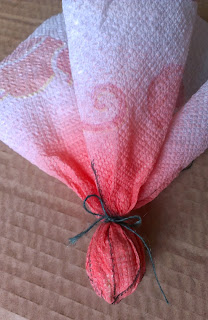
2) Open up the paper towel or napkin to make a large square.  Spray the center with orange mist.  I used Heidi Swapps color shine in Georgia Peach.  Let it dry completely.


3) Using a black pen or marker draw in the lines as seen below, make sure you napkin is dry first.  This creates the seems or ridges in your pumpkin.


4) Tape down the tops and secure the wrapper of the sucker before you cover it.  This helps the pumpkin not have lumps later, plus it gives the kids a bit more fun trying to open them up to eat them, lol.


5) Cover the sucker with the colored napkin and secure the bottom with twine, I used green, but any color you want will work.


6) Cut off the excess paper towel, but be careful not to cut off your twine or it will fall apart.  


7) After looking at the "pops" I thought the handle of the sucker acted as the stem of the pumpkin, and those are green.  So I colored the stick part with Chartreuse Color Shine and a green marker.  You should do this step before you wrap the napkin onto the sucker, so you don't mix your colors.


8) These would be cute just like they are at this point, but I thought pumpkins are not held stick "stem" down, but rather with the stem pointing up.  Alas suckers can't stand up on their own, so it needs a base!  Cut out squares of cardboard from a box, hey why not use the box your flamingo scraps goodies came in!!  Tear off the tops of the cardboard to expose some of the ridges.  Spray the cardboard in your choice of Mist   - black and green were my choices. I then glued down a flower to each of the squares and sprayed the same color again to the flower would match. The flower just acts as a "nest" so the sucker will not topple over when it is glued on to the base.


 9) Glue down your pumpkin pop to the center of the flowers, hold the stem for a sec so they will not fall over.  Leave your pumpkins "natural" or draw faces on them to make them Jack-o-lanters.  I even added a tag to one of the stems to make it a label with washi tape and wrote a name on it.


You can find the paper craft supplies at Flamingo Scraps, so head on over today and get yourself a fun Halloween treat!!


Supplies Used
Twine
Napkin
Pen
Washi Tape

Enjoy!!

Monday, October 28, 2013

Up and Away Easel Card with Nirvana from Marion Smith Designs

This project I decided to use Nirvana from Marion Smith Designs and make a cute Easel Card that I had seen on YouTube. I have seen these before and thought they were so cute so I am adding the link to mybutterflykisses12 tutorial here. This was so fun to create with this line!! I only used 3 sheets of paper and have plenty left. I have thought with this I could make a 4X4 mini album to stick in the drawer that pulls out. I had taken Tim Holtz Creative Chemistry 102 and used some of his techniques on this.

Here is the whole view of my creation.


I also decided that I wanted to make it a bit steam punk so I took black thread and sewed the strings on the hot air balloons.


Here is a view from the top.


Here the drawer open. I have thought with this I could make a 4X4 mini album to stick in the drawer that pulls out.

I also used Nirvana Typography Stamp Set by Marion Smith Designs on this sign.


Here is a list of products used:
Prima Chalk Ink Edgers — Set of 40 Original Colors!!!- I used Knotted Wood and Teal Damask
Prima Tiny Junkyard Findings Vintage Trinkets — Sampler
Seam Binding – Cream
Grid Acrylic Stamp Blocks — Tim Holtz Collection
Prima Classic Orange Roses
Studio Calico Wood Veneer Banners
Prima Classic Daisies Cream
Tim Holtz Distress Paints- Peeled Paint, Broken China and Salty Ocean on the handle of the door
Lindy's Stamp Gang Tiffany Lou Blue and Cream Brulee Cream

If you see something in that I have used on this and it is not in the store...be sure to drop Suzanne a note and ask her if she can get it for you.
Make sure you stop by Flamingo Scraps for all your crafting needs. And do not forget that the store has Warehouse Boxes for sale. Packed full of goodies!!
Flamingo Scraps Warehouse Sale Box — Paper Box
Flamingo Scraps Warehouse Sale Box — Embellishment Box
Flamingo Scraps Warehouse Sale Box — Combination Box

Have a great week!!
Ramona
Designs~By~Ramona

Friday, October 25, 2013

4 Products + 4 Designers = The Fantastic Flamingo Four !!!

It's that time again ! Time for the FANTASTIC Flamingo 4! I love to see what everyone comes up with each month. I call this the "bonus blog" post because you get four great new creative takes all at one time. For the October F4 , our designers, Erin, Melissa, Luann, and Cheryl were given these four items to get down and scrappy with.
1)  Prima "Rondelle" Designer Paper
2) Prima Banner Clip
3) two Prima flowers
4) Manila Tag (small)

Enjoy the creative journey, and let us help inspire you on your next crafty endeavor.


Luann’s Project


When I saw all the lovely papers I thought instantly that they would make pretty barrettes. I was right! I got out the barrette supplies and Mod Podge matte finish.  I cut the paper a little larger than the barrette so I could fold under. Slather the Mod Podge front and back.  While it was still tacky to touch I sprayed with Heidi Swapp Color Shine in gold or mustard.  Using a flower punch I made little flowers to go with the F4 flowers and I had to give them a little spray of Heidi.  I used my Prima Edgers for a highlight colors.  .


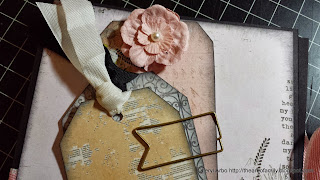
Originally, I thought about using the tag as flowers.  Then inspiration and I started playing.  I love humming birds and flowers.  Don’t you just the dimensional of the flowers?  Again, I used my flower punch with scraps from the barrettes.  I attached the cute paper clip and I will use it for the sediment.

I hope you like my challenge project with F4 items. Hope you will give making the barrettes a try.


CHERYL'S PROJECT
Hey guys...this is Cheryl. Today on the Flamingo Scraps Designer Team, there are four of us all working hard using the same scrappin goodies and doing our own thing making something pretty! We were given a generous supply of Prima "Rondelle" Designer Paper, a Prima Banner Clip, two Prima flowers, and a small manila tag to create our project. Our challenge was to see how each one of use uses the same materials. At first I debated on making a card, but having all of these nice papers, I wanted to create something where I could show off several of these pretty papers. So, I decided to make a A2 size card portfolio.


I started off with a piece of black 12" x 12" card stock, trimmed it down to 8.50" x 11".  It was scored at 5.25" and 5.75" on the 11" width and 6" and 6.25" on the 8.50" width. I trimmed away the 1/2" middle section from the bottom short end up to the top score line.

Using an assortment of patterns from the Prima Rondelle collection, I cut two at 5" x 5.75", two at 2" x 5", and one at 1/4" x 5.75". After inking all of the edges using Prima's Black Coal Chalk Ink, adhesive was applied to the back of each piece and adhered to the front cover and inside flaps.


Turning it over, I marked a 2.25" line above the top score line along the 11" width. From there I added a strong adhesive along this drawn line and then after folding a 30" piece of ribbon from my stash in half to find the center, I laid the center of a ribbon on the 1/2" area and attached it to the front cover of the portfolio.

At this point I creased my score lines and from the inside I brought both flaps forward and secured the outside edges with a tiny brad as a closure.

I covered the tag with another paper piece of the paper, and then cut two additional tags out from the collection, along with two other papers for two additional mats on the cover, and then tied some ribbon from the Seam Binding Sampler on the tags and used the Prima flowers to embellish the cover and I was done.


This was a fun project to make and a great gift idea to hold four handmade cards. This was a lot of fun and hopefully I have inspired you to make one for your cards.

As always, I appreciate subscribers of my blog, here. Also, like and subscribe to Flamingo Scraps on Facebook here and  be sure to visit the Flamingo Scraps store. Check out all of the latest products from Pink Paislee, Heidi Swapp, Fancy Pants, and Basic Grey.....just to tease you with a few!!
Happy scrappin!.......Cheryl

Erin's Project

I am always in need of cards, for lots of various reasons.  Right now it is a thank you for my son's teacher to show her how thankful we are to her (and the school) about his rough transition since the move.  They are helping him in so many ways, and we are grateful that they are supportive to his needs.


I used 3 different sheets of Prima paper and cut them into 1.5 inch squares.  I then inked and arranged them as seen in the pic.  I matted them onto black, then another Prima patterned paper, then on the card base of kraft paper.    I cut the tag down to make room for the stamp sentiment, which I added the clip and a punched out butterfly from another sheet of the Prima paper.  I added a couple of extra flowers to bulk up the Prima flowers from the kit, then added in the buttons.  I created the leaves and you can see the tutorial I made in a post from last week.

Melissa's Project

This month's Flamingo 4 came so easily for me, and for that I am thankful! I have been scrapping out of a suitcase for about a month now, as my family and I are preparing to sell our house and move to a new one soon. I didn't need much extra to complete this project! All I used in addition to what was sent was a single piece of Kraft cardstock, a couple of stamps from my stash, a Threading Water punch from Fiskars, some Prima black chalk ink, and Tim Holtz distress paint in black soot, available in the Flamingo Scraps store via special order.


I decided to make a non-folding card with a pocket for the tag. The sender could write on the back side of the card, or pull the tag out and write on the back side of it, or tuck a piece of paper in with the greeting to send their own little note! I painted the tag black with the distress paint and then adhered paper to it. I also punched the bottom of the tag with the threading water punch. For the cardstock tag that I added, I stamped it with a flourish stamp at the bottom, and then also punched it. The pocket on the tag is a single piece of patterned paper from the pack, adhered on three sides over another piece of patterned paper I cut to size. I used one flower on the little flourish in the corner of the paper and another on the banner paperclip.


Here's what each piece look like individually:


What awesome projects from four amazing designers! Be sure to follow the Flamingo Scraps blog and "like" our  Facebook page . Don't forget Amazing tutorials from Tonya Gibbs on the first Monday of each month at 8:30 p.m. EDT.You can also follow the link to Tonya if you missed and Ustream shows. They are recorded for those who missed them.  Thanks for visiting, and check out all of the great products in The Store. You'll  be tickled pink!!

Thursday, October 24, 2013

Mini for Mia, Maci, their Mama and Me

Today I have used the 6 x 6 mini pad from Rondelle by Prima from my Warehouse Box available from Flamingo Scraps Pink Bird Bargain Bin. I have chosen to do a chipboard mini album from Maya Road, also in my Warehouse box. You may or may not receive the exact items, but they boxes are loaded with product and will certainly inspire you to create awesome projects! Here is the cover of the mini. Diamond paper was fussy cut around diamond shapes, Say It In Crystals, black, trimmed and added to surround Cameo Tutu embellishment (more details below for cameo and journal ticket).


I started by painting the bare chipboard album with Tim Holtz Distress Paint in Black Soot (available through Flamingo Scraps, special order by contacting Suzanne)
I found it best to allow the paint to air dry, rather then try to help it along with a heat tool, it produces a smoother and more matte finish. I only painted the outside edges knowing I was covering the inside and outside with patterned paper.


I also painted the outside binding, and wanted to cover the rivets holding the three ring binder. I used TH Spun Sugar to paint the white flower trim. Before adhering the pink flowers, I formed a circle of Webster's Tutu trim on the binding to go under the top flower.


From a piece of vintage sheet music I cut a rectangle frame to surround the binder mechanism, glued it in place and dabbed a little more Black Soot paint to blend it to the inside cover, shown on left. 


The inside pages came next, painting with the TH Distress paints. 
L - R Forest Moss, Bundled Sage, Spun Sugar, Victorian Velvet.
The three on the left were still in the drying process, the far right had already fully dried.


Waiting for the paint to dry before adhering the patterned paper to the inside pages, I started working on the embellishments, I used a cameo from my Warehouse Box, dabbing a little Distress Paint on the raised edges to highlight the raised edges, and lightly added some lighter pink to the outer edge. left is untouched. Below is a before and after.


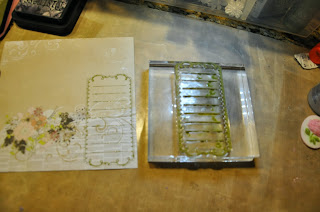
From my stamp stash I embossed a doily stamp on a vintage sheet music page. To mimic the shape of the doily stamp, I stretched the a square stamp into a diamond shape on an acrylic block and embossed this in black also on a piece of the Rondelle paper. (see next photo for comparison)


Stamp as is from carrier sheet.


Stamp stretched and formed to patterned paper under acrylic block.


Journaling block stamped with TH Distress Paint in Forest Moss.
As you can see, paint was on more than just the detail of the stamp, put it did not transfer to the final image.
(Tip: wash your stamp immediately, it dried very quickly when applied thinly!) This was cut out and added to the pocket on the front cover of the mini album.


Inside front cover and first page, embossed doily stamp on music sheet and inked with Tim Holtz Distress Ink, Tattered Rose.


Detail of first page. Fancy Pants Bulb Safety Pin with Tim Holtz Baubles attached to top ring of binder. Detail of embossed doily on vintage music sheet. and Webster's Tutu trim pouf. 


Piece of Webster's Tutu trim threaded through center hole on inside page, glued into place on front and back. All tulle was pulled through to the front, leaving a tail to be glued onto the back.


Inside pages of the remainder of the book, awaiting photos and additional embellishments from a recent photo shoot of two of my Granddaughter, my Daughter in Law and myself just before I moved away from them in NY. I just received the proofs via email last night, excited to get them in the mail! All papers were cut to size, corners trimmed by trimming rounded corners using chipboard as template, edges distressed and then glued into place. Tattered Rose ink used to add a little dimension to each page.


All products used have been listed in the description except stamps were taken from my stash.

Thanks so much for spending a little part of your day with the Flamingo Scraps Design Team today. We love creating for you, and we're always available to answer any questions you might have for any of us!!! Have a great day & Scrappy Smiles! Donna Sullivan aka paperfusionarts 


Related Posts with Thumbnails