Showing posts with label Color Shine. Show all posts

Tuesday, December 17, 2013

Santa's Southern Helper

Hey all!  It's Luann.  I don't know about you, but I have searching for fun and fairly easy decorations for Christmas on the internet, in magazines, and on TV.  I love to buy the special Christmas editions of magazines and wish. Today I have a decoration I was inspired to make by a Christmas oranament I purchased in July and a tutorial I saw in a magazine. 

First off let's start with the magazine tutorial.  Christmas trees made from Carta Bella Winter Fun and Echo Park Merry Christmas lines.  I just love these papers for Christmas.  I found the tutorial in the December issue of Martha Stewart's Living.  For the base I used a  Maya Road wooden spool and a craft stick. Cut a circle using a punch in 3 different sizes (6", 7", 8") and cut it in half. Then spraywith Heddi Swapp Color Shine in gold and tinsel. The stars on top are Cosmo Cricket Glitter Sheets. If you love glitter and hate the mess .....you want these! 
 I finally found a bell dome that would work and a plate charger for the base. Added a little moss, snow, and water (aka Cosmo Cricket Glitter Sheets).

I searched and searched around my scrapping stash and Christmas stash to find a few trinkets and Santa.  Did you see the Prima plane and camera? How about the wrapped presents? I found a tractor and a mini sewing machine to add to the presents.  The little sign is from Heidi Swapp Believe Ephermera.

It looks like Santa is getting ready to load his sleigh!  Oh!......What does my wandering eyes see?  A helper?

It's......It's......Flamingo Scraps' Flamingo - Pinky going out to deliver the Christmas goodies you ordered!


I had a wonderful time making this dome.  I hope you try your hand at one.
Here is a picture of the whole Flamingo Christmas dome.


Wishing you joy and happiness.

Merry Christmas and Happy Holidays!


XO

Luann

Tuesday, December 10, 2013

Mirror Christmas

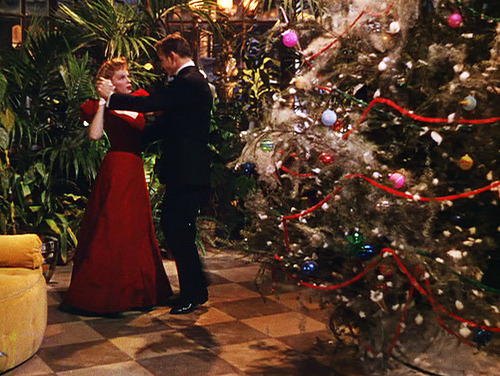
It's beginning to look a lot like Christmas - especially in the North!  They may just get a Bing Crosby Christmas.  Hey all it's Luann and yes I just aged myself.  I can hear the younger people say Bing who?  Please go and google Bing Crosby if you don't know who he is and what he is noted for.  Along those same lines....I love all the Christmas shows that are on this time of year.  One of my all time favorites is "Meet Me In St. Louis" with Judy Garland.  Esther's Christmas Ball dress is the inspiration for my project today.

I found a cute hand mirror at the Dollar Store and I just knew what I had to do.  I used Rub-n-Buff in Patina to tone the silver down.


Prima's Julie Nutting's Mix Media Doll Stamp was just the ticket. When I think of Christmas I think of glitter.  Yep, just the right paper was Cosmo Cricket Glitter Sheets in gold and red to make the dress (look how tiny her waist is).  I colored Esther's face, arms, and hair with Copic markers.  I used my Prima chalk edgers around all the edges. I scanned and made two copies of  Esther (the paper doll).  One was a copy and the other was a reverse copy. I layered the paper dolls and used pop dots to give her dimension.


The flowers were from my stash and touch of  Heidi Swapp Color Shine in gold added a little twinkle.  The little door is a Prima Shabby Chic Treasures sprayed with gold shine.  The crown was made from Mod Podge Crafts and colored with Tim Holtz Distress Paint. You can't go vintage with out a Cameo Stick Pin from Webster's Pages. The little buttons came in my Flamingo Scraps Warehouse Sale Embellishment Box and added a little extra. The rose button is from Glitz. Roses at Christmas are magical.  The little bird and other stick pin are from my stash.


Now for a look at the mirror side. (I was impressed I didn't get a reflection of the ceiling.)


If you have trouble locating the items I used on Esther's Christmas Ball Mirror just give Suzanne a shout via e-mail.  I can honestly say that Suzanne knows the meaning of customer service. You should stop by Flamingo Scraps...there's a fantastic sale going on.

Before I leave I wanted to show a picture of Judy Garland as Esther in her Christmas Ball gown.  I hope you get a chance see "Meet Me St. Louis".


Picture from media-tumblr-google


 Until next time...Enjoy everything about the Holidays! The shopping, the eating, and the best of all being with friends, family, and loved ones.

Luann


Monday, September 23, 2013

Happy Birthday Layout

There were tears, laughter, cake smashing, and good times for all at Catherine's first birthday Party.  We held her party a couple of weeks early so grandparents could come. Unfortunately, with daddy working away from home now, there was not good weekend for him to be able to be there. So, we had a second party for her with just daddy, Cat, Morgan, and me.  

The journaling reads "Laughing, crying, messy frosting face.....all the joys of delving in face first getting frosting everywhere as you devour your smash cake for your first birthday. Grandma Elaine went all out decorating and preparing for your party. Grandma Marty, Erin, Madison, and your brothers were all there.  Aug 2013".  Grandpa Ray and Mommy were there, too. :) She definitely had the series of emotions going on that day.


I used lots of bits and pieces of old collections you can find in the grab boxes at Flamingo Scraps right now.  Parts of Pink Paislee, Prima, Heidi Swapp, and more!!  So head on over to Flamingo Scraps and get some great items!!

Supplies Used
Cardstock


Tuesday, September 17, 2013

Old vintage layout using the Flamingo Scraps Warehouse Box Papers

This layout was made with papers from the Warehouse Sale Box — Paper Box. These boxes are packed full of goodies and you may or may not get the papers used on this layout. It is the Toy Box Collection by Crate Paper. Be sure to check out the other Warehouse Sale Box — Combination Box and the Warehouse Sale Box — Embellishment Box these boxes are filled with all kinds of goodies. And be sure to check out Flamingo Scraps new products from CHA Summer.

I used several different medias on this layout. I actually added some Heidi Swapp Color Shine Tinsel and mixed it with Heavy Gel Medium and then used a stencil from Prima-Crackle.


Next, I fussy cut out one of the black and white graphics from the paper and used my Prisma colored pencils and Gamsol to blend the colors.


I used burlap and cut it in strips to add to the top and bottom of the layout and used Tim Holtz buckles to add some metal.


I also used some Fancy Pants Cork Shapes Arrows inking them up with Prima Chalk Ink Edgers Rusty Bucket. I also used a Tim Holtz Adornments Charms and some Prima Tiny Junkyard Findings Vintage Trinkets — Sampler.

After finishing this layout I thought I have these Melissa Frances 3 Flower Hanger — 4″ and Melissa Frances Double Flower Clip. I love the way they look on the wall and you can interchange your layouts with different ones.

Products Used:
Heidi Swapp Color Shine Gold
Tim Holtz Distress Paint Salty Ocean, Mustard Seed, Mowed Lawn and Picket Fence
Prima Chalk Edgers Rose Bud and Rusty Bucket
Golden Heavy Gel Matte
Prima Distress Tool
Tim Holtz Distress Ink Vintage Photo
Distress Crackle Paint Rock Candy

Hope you like my newest creation of my little man. Be sure to stop by Flamingo Scraps for all the newest products on the market.


Designs~By~Ramona

Wednesday, September 11, 2013

Deco Flower

I was at JoAnns finding crafts for my boys to do for the summer, and I stumbled upon some great finds. One was this cardboard flower. It is about 2 inches thick and 8 inches tall, and it was 70% off!! 


Here you see the original flower, very simple and just begging to be decorated!!


I attacked this like a paper mache or decoupage craft. I smeared craft glue over the entire flower then opened up two decorative napkins and pressed them over the entire flower. I tore off the excess tissue, added more glue, and added more tissue layers until the entire flowers was coated with tissue front back and in all the little crevices. I then tore some of the other scrap papers and glued them on for more layers. Then I cut out some of the cute little animals from paper. I sprayed the entire flower with a light mist of Heidi Swapp Mustard Color shine before added in the little animals.


Here you can see the back side of the flower. The back side only has the tissue paper, so no torn paper or animals for layers.


I added a little bow tie in pink trim and sunset burlap flower from Maya Road and bling from Prima thus creating my little table decoration.


Supplies Used

Tissue, ribbon, papers - Other
Flower - Maya Road
Leaves and Bling -Prima
Mist - Heidi Swapp
Ink - Prima

Enjoy!!

Tuesday, September 3, 2013

It's all about me!

Well, my project is, this week, anyway. I was a little stumped on what to make. I mean, I've done pages and home decor projects and canvases and cards. I've done a December Daily and sketches and everything I can think of. So, I scoured around for inspiration and found this tutorial by Misty Rushlow on the Moxxie blog and decided that would be the way to go. So, I made a file folder mini. It's not exactly a card, and it's not exactly a mini book. It's sort of in between, and I really was excited about how it turned out!


To complete this project, I used a few goodies from the Flamingo Scraps store, and maybe even a few you will find in the Flamingo Scraps warehouse box! I specifically used Pink Paislee Mistables paper (which I am addicted to lately), Websters Pages Coral Chevron Trim, some random Prima flowers, a Melissa Frances Oval Frame, some Maya Road envelopes and alphabets, Heidi Swapp Color Shine in Tropicana Teal, Primrose, Sweet Cherry, Black Velvet, and Georgia Peach, and some other random alphas that I had lying around, plus some Jenni Bowlin pearl flowers. 


I don't know if this is complete, as I find it pretty difficult to scrapbook about myself in a journaling aspect, but I was able to get it most of the way done. I love that this album has pockets on the inside that I can add ephemera and other things that I've collected over the years to. I haven't done that yet, but I just may!

Here's a peek at the inside:


I added photos of myself as a baby, a child, my engagement photo with my then-fiancee-now-husband, and a recent family photo. Each of the envelopes has a bit of journaling on paper that follows prompts, like "My Favorite Things," "My Fears," "When I Grow Up..." and "If I knew then what I knew now..."

When's the last time you scrapbooked yourself? This week, I challenge you to do just that, and make sure you include a recent photo, as well! I know, personally, I don't get out from behind the camera often enough, and I'm sure many of you don't, either! 

Until next time,
Keep scrappin'!
Melissa

Thursday, August 29, 2013

All about the feathers!

Well, at least it seems like the scrapbooking industry is, lately. There are all kinds of different feather products out there, and I decided it was time for me to jump on that feather bandwagon, as well, using the Jenni Bowlin Cardstock Feathers available in the Flamingo Scraps store! Here's what I came up with:


I really have a love of Emily Dickenson, so when I saw this quote from one of her poems, I decided it would be a perfect way to showcase the feathers and make a wall hanging for my scrap space. 


That letter treatment is something else! To get this effect, I painted the canvas with various shades of blue acrylic paint, using my brayer. Then, I used some bubble wrap and Tim Holtz Distress Paint in Black Soot, Picket Fence, Broken China, Salty Ocean, Weathered Wood, and Chipped Sapphire (all available via special order) to stamp the bubble wrap in layers. After it all dried, I cut the text out with vinyl letters on my Silhouette (though you could do this with plain old alpha stickers, as well) and painted it all over with gesso. After letting the gesso dry, I sprayed it with Heidi Swapp Color Shine in Primrose and Tropicana Teal. Once that all dried, I peeled the vinyl letters off to reveal the original background. To make them stand out more, I simply outlined them with a black Sharpie marker.  The black border is also done with a chisel tip Sharpie marker. 


The feathers are just glued on with some glossy accents carefully ran along the spine and pressed down onto the canvas. I'm really pleased with how this project turned out!

What have you used feathers on, recently? I'd love to see your projects!


Friday, August 16, 2013

Use Your Stash Card Challenge

Every once in a while, I run low on cards. It's hard to believe, since I seem to make them in multiples anytime I sit down to create them. We have a bunch of weddings and birthdays this month, so I figured I would make a couple of new cards that aren't for mailing. And, as I always seem to do with my cards, I grabbed a few supplies and challenged myself to create something with them. This month, I chose:


Here's what I came up with!


These are all obviously a little more feminine, but there will be plenty of opportunity to make stuff for the men (and boys) in my life, too! So, there you have it! If there's product in the Flamingo Scraps store that you'd like to see put together on a project, leave me a comment here or on the Facebook page, and I'll see if I can put them together! 

Until next time,
Keep scrappin'! 
Melissa

Friday, June 21, 2013

Clean or Dirty?

Good morning, Flockinistas!

Melissa, here, on what will be my tenth wedding anniversary! But, on to the real reason I'm posting about my anniversary on the Flamingo Scraps blog. Well, the answer is simple. My husband has been bugging me for just as long to make a clean and dirty sign for the dishwasher, so that we can know whether it needs to be run or if it needs to be unloaded to make room for more dishes. I figured having it on our anniversary will be a wonderful gift to him.

So, here's what I came up with:


It really looks way more simple than it went together, let me tell you! I started with a chipboard base, like what comes in a paper pack or when you receive scrapbook supplies in the mail from... well... Flamingo Scraps, of course. I cut it down to 6x6 and then painted it with gesso on both sides. At that point, I wasn't really sure what direction I was going. I didn't need to paint both sides, obviously, but I did have to wait for it to all dry. Next I took some Tim Holtz Distress Paint in Broken China, special ordered from Flamingo Scraps, and painted about an inch in on each side and let that dry. I then coated the entire thing with paper Mod Podge, and placed a 5.5x5x5 square of paper from the Pink Paislee Hope Chest collection down and then painted over it all again with Mod Podge, then left it to dry overnight.

The next morning, I did some masking with Prima masks, first the Static 12x12 over the whole thing, using Heidi Swapp Color Shine in Georgia Peach and then with the Checkers 12x12 mask in Tropicana Teal. Both masks are available via special order from Flamingo Scraps! Next, I got out some old foam stamps and used my Tim Holtz Distress Paints (available special order) in Walnut Stain and Spiced Marmalade to make the clean/dirty combo.

I lined each of the stamped letters with black ink and then distress Stickles to make them stand out a little better. 


Last, I poked holes a quarter inch off center on each side and strung some Maya Road twine through it and tied it in a bow. Then, just for some extra dirt on the dirty side, I took a distress stamp in my stash and some black distress ink and added a bit to the edges. Now all it needs is some magnets stuck to the back (I'm going to let the Mod Podge set for another night because it was all still a little tacky as I was finishing up), and it can be flipped as needed. 

So there you have it! Hope you have a wonderful day!

Until next time,
Keep scrapping!
Melissa

Monday, June 10, 2013

Springing into Summer with Hope Chest!

Good morning, Flockinistas! Melissa, here, with a layout sure to wet your springy (and summery) whistle! I made use of the Pink Paislee Hope Chest collection, found in store, along with some other goodies, to come up with a layout to celebrate our (eventual) arrival of spring! It may have taken until nearly the end of May, here in Michigan, but I can't complain about our mild temperatures thus far, and all the rain has made the gardens even better, as well!

Anyway, here is what I came up with in my journey:


Now, before you ask, I did make the background paper myself, and here is how:

First, I laid down the Prima wood grain mask (available via special order), and used some of the Prima Edger Chalk ink in two different browns (you can pre-order the entire color set at Flamingo Scraps, or buy individual inks, as well). Then, I mixed some modeling paste with Heidi Swapp Color Shine in Chartreuse and used another Prima mask (Checker - also available via special order) and spread the modeling paste mixture with it. 


Don't you just love the texture it adds to the page?


For the main focus of the page, I used some Webster's Pages Ruffled Bloomers in cream, more Prima Chalk ink to stamp the title with some old foam stamps from my stash (sadly, this is the first time I'd used them and I've had them for a while!), a crocheted flower topped by a flower-shaped paperclip (shaped paperclips have been a re-emerging trend, and you can find some in the Flamingo Scraps store, as well. I recommend the Prima Sampler pack!). I used some Maya Road trinket pins and a Studio Calico Polaroid Frame, as well as a Webster's Pages Love Birds charm and added some stitching with my sewing machine for even more texture. 

All in all, I am in love with this page, and I hope you are, too! That's all I have for today, so I hope you found some inspiration. 

Until next time, keep scrappin!
Melissa

Friday, May 24, 2013

More sketchy goodness from Flamingo Scraps!

Good morning Flamingo Flock!

With the end of May approaching, I'm finding myself spending less time in my scrapbook space and more time outside, which I love and hate at the same time. I like to make my pages quick and easy once summer hits, and we all know that sketches are one of my favorite ways to speed up the scrapping process. I made one up, especially for Flamingo Scraps, this month, utilizing a combination of 4x6 and square photos (something like an Instagram photo, if you'd like)! 


So, for my take, I used the actual image I took, in black and white, plus the photo I uploaded to Instagram, as well. I'm really loving how this turned out, what with the Teresa Collins Now & Then Collection to give my page its color combo, the background paper masked and misted with Heidi Swapp Color Shine in Tropicana Teal and Sweet Cherry, then masked again with molding paste.  I used some Tim Holtz Distress Stain in Broken China for the larger splatters. My embellishments were a Websters Pages tree charm, a Studio Calico Wood Veneer Banner, a few pieces of Studio Calico Wood Veneers that I got in Sampler Pack 1, and some Maya Road Cording (available in cloud in the store, it can be colored whatever color you'd like to match). I painted the veneers with Tim Holtz Distress Paint (available via special order) in Broken China and Fired Brick, and used some little paper clips to hold my little paper embellishments from the Now & Then Collection in place. 


I just love the bright grunginess of the background. Here's a closer look: 


And I kept the title small, as compared to my sketch, just because I liked the idea of putting it on the banner:


I shared the sketch with the rest of the design team, in case they wanted to join me, and Kathleen came up with this:


Not only that, but Tonya is going to use this sketch on her uStream on June 3rd, so make sure you tune in if you want to see sketch creation in action! 


Thursday, May 2, 2013

Egg Hunt!

Hi Flockinistas!
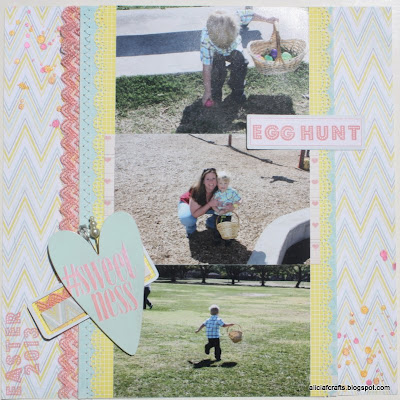
It's Alicia, back again to share a layout using the fabulous new Heidi Swapp "Serendipity" line.  I thought this line would be the perfect thing to go with some of this year's Easter pictures.  My son had FOUR egg hunts this year, so he was a champion hunter by the time Easter morning rolled around!

I love these Serendipity papers!  They are perfect for so many different looks.  I chose the muted colors in the chevron pattern for the background for this layout, and then used my Heidi Swapp Color Shine sprays in Mustard, Primrose and Georgia Peach to make the ink drops in the top and bottom corners.  I then cut the blue patterned paper and used my sewing machine to run a zigzag border down one side, attaching the Webster's Pages Coral Chevron Trim by Alison Kreft.  I cut 1.5 inch strips of the yellow patterned paper and used an edge punch from my stash to give it a little more interest and layered my pictures on top of it all.  I decided to add a small mat of another patterned paper from the Serendipity line under the picture of me and my son to give it a little emphasis.  I used some alpha stamps from my stash and one of the the Prima Chalk Inks in Old Rose to create the Egg Hunt title on one of the Heidi Swapp File tags and the date to the bottom corner.
 Here's a quick look at the ink splatters and the different layers and textures that I was able to create with the different elements.

Lastly, here is a close up of the great layered element that I pieced together and the layers on the page - lots of different textures at play here.  The layered element is made up of some one of the Heidi Swapp Color Pop tags, which I colored the letters by spraying both Primrose and Georgia Peach color shine on simultaneously to achieve the color I wanted.  I layered it on top of a piece of yellow Serendipity paper, some more of the coral trim, and added the blue frame (which was actually had been around the "Egg Hunt" file tag on the backing sheet I pulled the tag from). The chevron pattern in this element is actually part of one of the Heidi Swapp Instaframes that I cut up to just use the patterned portion that matched the background paper.  To finish it off and give it a little more interest, I tucked a few of the Maya Road Trinket Pins in the top of the heart tag.


Head on over to the Flamingo Scraps store and grab some of this great line.  It is perfect for all of your spring projects!

Until Next Time!
Alicia
Related Posts with Thumbnails