Showing posts with label Ranger. Show all posts

Monday, December 16, 2013

Resist Stamp Misting

I love seeing those beautiful background of papers from tons of different companies - they look distressed, dimensional, and gorgeous.  Here I will show you how I made a small 6x6 distressed misted paper for a card using stamps, ink, and mists.


 Resist Stamp Mist Tutorial

1) Supplies - Cardstock (light colored - tan, white, cream), spray mists in your choice of color, ink in your choice of color to correlate with your mists, and acrylic stamps.

2) When picking out your stamps use one that looks like the object you want to stamp, resist spraying will not show the detail of the stamp, just the outline.  I chose a leaf shape (butterflies, hearts, flowers, birds all work great too).  Lay your stamp on the paper flat side down (so there are no gaps between the paper and your stamp, raised parts facing up).  Spray your mist lightly, carefully pick up your stamp, move to a new location on the paper, spray with a different color (start with your lightest color first then move to your darkest color last), keep rotating and spraying until you have the look you want.


 3) I added a few drops of mist from the stamp leftover from misting resist technique to drop onto my paper for a better effect.


4) Pick out a different stamp for contract effect.  I went for another leaf stamp and chose a dark color (brown) for contrast.  I use a solvent ink (like StazOn) for this so it would not bleed into the wet mists.  I used both primary stamps (just applied ink to the stamp) and secondary stamps (stamped 2 times before reapplying ink to the stamp).  Stamp around the page, coming off the paper, across, layer it - remember this is supposed to look distressed and shabby!!


 5) Stamp in your resist spaces you created with the front side of the stamp (fill in the holes).  Pick a color that is similar to your mists (I chose orange) in a distress ink.  Steps 4 and 5 and be done in either order.


6) Now you can chose to do what you like with your new background paper.  You can make your paper as large as a 12x12, or cut it up and use it as your wish!!

You can find these products at Flamingo Scraps!!


Supplies used:


Ink - Ranger
Mists - Heidi Swapp
Flower - Maya Road
Bling - Prima
Twine -Maya Road
Stamps - Prima

Enjoy!!

Wednesday, October 17, 2012

Creating With the Stars!!!!

Today, Flamingo Scraps is pleased to have as our Guest Blogger, one of our FABULOUS customers, Laurie Morris!!  Laurie was fortunate enough to take classes recently with Tim Holtz and Dyan Reavely on their swing through the Sunshine State!!  We asked Laurie to share this fantastic opportunity with all of you!  Take it away Laurie!!

Creating With the Stars!

Two of the brightest stars in my universe, anyway!

In September I took the "Patchwork Pandemonium" class with my idol, Tim Holtz.


It was the only one of Tim's four classes at She Scrapbooks in The Villages that I could get into. Tim is a great teacher,


Mario is a blast,


and everyone had a ball in this 5-hour class. Patchwork Pandemonium teaches several techniques using grunge paper as the substrate and then small pieces of grunge paper which we subjected to various products such as Distress Inks, Crackle Paint, rubber stamps, tissue tape, and more.


As great as "Patchwork Pandemonium" was, my 3-day immersion in all things Dyan Reavely was even more amazing.


This took place at Whim-So-Doodle in St. Petersburg, October 8,9, and 10. With a focus on Ranger Paint Dabbers and Dylusions sprays, we created layered backgrounds that we used for creating small books and tags. Stamps and stencils were employed along with paint and Dylusions spray inks.


Dyan is all about simplicity and getting the most out of every product, so we learned about more than one way to use Dylusions, for example, and how to use all kinds of papers and tags as "mop-ups" to sop up all that colorful goodness and create, almost accidentally, beautiful background bits to be used however we wanted. Dyan's new blank journal takes her inks and paint beautifully. Watercolor paper was used, too, and the way the colors showed on the watercolor paper were divine.


If you love color, you'll love Dyan's way of doing things and you'll love Dylusions.
 
Tim says to embrace imperfection!  Dyan says to live life in color!
 
So say the stars!
 
Laurie

Thursday, June 21, 2012

ReInking Distress Pads

I have had a few people ask me in the past how to re-ink a stamp pad.  We all know that if you add too much you get a soupy mess.  If you don't add enough -  well - you know!

While I can't speak for all stamp pads (since it is specific to manufactorer standards), I can speak for the Ranger Distress Pads. 

I recently took a class with Tim Holtz and he gave a demonstration on the mystery of how much ink to use and technique for refilling your Distress Inks.

First it is important to understand the ink pads themselves. Dye based ink pads are made of felt that is compressed and then laminated with a fabric topper. The fabric keeps the felt together. The felt helps to "suspend" ink.  Think of a sponge you fill it with water and it appears dry until you press it and the water bubbles to the top.   This is exactly how the ink pads work. The ink is suspended in the pad until the stamp presses it and the ink floats to the top and is applied to the surface of your stamp.  With that said -  the Ink will not absorb into the pad without the pad being pressed.

Here are the simple steps:
Verify that you are using the correct ink for the right pad (you laugh that I say this, but my walnut ink lid was on my tea die pad and let's just say I now have 2 walnut pads).


Second the Ranger Reinker bottles are designed SO THAT THE DROPPER holds the perfect amount of ink needed to reink 1 pad.   Fill the dropper with ink and apply all over the top of the pad as demonstrated below...


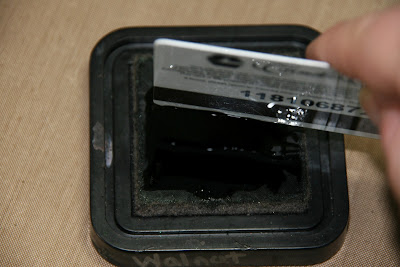
Next -   Use an old gift card/credit card and scrape the ink into the pad.  You need to apply pressure, and move down the pad, then across the pad until all the ink is absorbed.  This may take a few minutes and seem hopeless at first! 


This is what your pad will look like when all the ink is absorbed.  Notice there are a few drops of ink around the lid? 


Simply wipe around the perimeter of the pad with a baby wipe or moist paper towel. Return the lid to the top.   Your ink pad is now re-inked.  Tim suggests heavy used pads be re-inked every six months to a year. 


One other helpful hint:

There is a myth that ink pads should be stored face down, so that the ink flows to the top of the pad rather than the bottom.  Since we learned at the beginning of this blog that the ink is suspended inside the pad - we know this myth to be false.  You may store your inks in any direction you like for the type of storage system you have.

Thanks for stopping in today - hope this helps!


Wednesday, November 23, 2011

Greatful for Family

This weekend we are celebrating Thanksgiving in the United States, and I know our friends abroad have a similar day in their countries. For me, Thanksgiving is a time to slow down, reflect on my life and give thanks for the blessings that God has given me.

I feel so incredibly blessed to have such a strong family unit. My kids and husband are the BEST! We are all so close. Do we argue and fuss? Absolutely, we are "Real, but we also laugh and play together. My husband Kenny and I have been together since high school. We married 21 years ago, and have two AMAZING children, Brittany 17 and Brighton 15.

I wanted to create a layout that shows my gratitude to them and reflect how blessed I feel. Webster's Pages' Sweet Cherry Pie Fly A Kite Paper was the perfect setting for this layout.


From Flamingo Scraps: Webster's Pages: Sweet Cherry Pie - Fly A Kite paper, Lace; Ranger: Picket Fence Crackle Medium; Maya Road: Love Mini Chipbaord Pieces, Rosette Trim; Prima: Fairy Tale Roses, Mini Roses, and Brown Trim 2
Other: I Am Roses: Sunflowers, and Wild Roses; Doily, Antique Book pages, Flower pearls; Sizzix: Tim Holtz Caged Bird Die; Felt birds.

Scattered around the paper are quotes that depict family. Like "The Secret Ingredient to good living is Family", "Fine Feathers Make Fine Birds" and "Embrace Time with the People That You Love"

I accented the photo with layers of lace and trims from some of my favorite companys, Prima and Maya Road. I scattered lots of mulberry flowers in Sunflowers, Roses and some fabric roses too. I aslo included some Prima packaging for a photo matt, Doilees, Antique book pages, Tim Holtz caged bird die from Sizzix, felt birds, and Maya Road Chipboard pieces.

I hope you have an amazing weekend and you find time to be with the people you love!

Thanks for stopping in today,

Friday, September 30, 2011

Mini Album - 4x6 sheet protectors

I love mini albums. I love how you are only limited by your own imagination! I have a lot of people ask me – what type of photos do you put in them, because they are so small? Well, most of my books accommodate wallet sized photos. I usually select the collage printing option at my local photo processing center, and I can usually get 9 wallets on 1 8x10.

One day I was waiting for my photos to process, and I noticed a package of 4x6 plastic photo sleeve refills on sale for $.50 a pack. So I decided to create a mini – embracing the "Simple" design of traditional scrapbook pages but sized at 4x6.


From Flamingo Scraps: Prima, Marion Smith's Vintage Trinkets, all flowers in the book, Holiday Lights Glitter Spray Crystals, Butterfly, Flights of Fancy Paper; Glimmer Mist: Rose Tattered; Tim Holtz: distress inks in Broken China and Walnut
Other: Tim Holtz - Caged bird die cut and Swivle Clasp Charm; Seam binding, Script stamp, White ink.


I used Marion’s Vintage Trinkets with my “HOARDED” last few sheets of Prima’s Flights of Fancy paper for the cover. When I say hoarded – I mean have had for years refusing to use.

For the inside pages I used Prima’s Melody collection with various Prima flowers, stamps and bling. Last week I shared with you how I used the Prima packaging in this book, and I think you will agree, it turned out wonderful when I added photos.

Sorry for the glare on the following photos. I wanted to show how the pages look inside the sleeves.


I think my favorite part of this album is its simplicity. Also - I love how I can take advantage of the page protectors and incorporate larger more dynamic 4x6 photos with the smaller wallets. The paper collection also gives pleanty of journal space.

Thank you for taking the time to visit.

Friday, September 23, 2011

Goosebumps


Today I would like to introduce you to a new product from Tsukineko called GooseBumps. It is a clear texture gel medium that acts as a resist while also providing an “orange peel” like texture to the surface of your project.


For my project sample I used it as a resist with a Prima mask to create a great texture on a mini notebook I’m sending to a friend.

I started with a mini Kraft notebook that I got from a $1 bin at a local craft store.


I used Honey Dew Glimmer mist and Peeled paint distress inks to color the background of my album cover.


Once the base coat color has been applied to the entire surface, cover your work surface so that the over spray does not ruin your table top.


I positioned a Prima mask over the notebook cover then sprayed the GooseBumps over the mask making sure I covered the entire notebook. Immediately remove your mask and wash it with warm soapy water to remove the Goosebumps residue.

Allow the Goosebumps to dry (usually 5 – 10 mins on its own), or you can speed up the process with a heat tool.

This is what your project should look like. You can really see the resist on the project, and this would be great left as is. But adding a little more color will really help you see the texture.

I chose a heavy contrasting color – Aged Mahogany distress ink to resurface my notebook cover. I applied the color using an ink applicator tool.


Use a baby wipe to remove the excess color from the top of the Goosebumps.


You can really see the two toned effect now, and the second color enhances the texture of Goosebumps.

From Flamingo Scraps: Various Lace & Trims, Prima: Screen, Flowers; Tattered Angels: Honeydew Glimmer Mist; Ranger: Crackle Accents, Tim Holtz: Distress inks Peeled Paint & Aged Mahogany; Maya Road: Tickets.
Other: Tsukineko Goosebumps


Then I decorated the cover of the book and it is ready to send off to a friend.

I could see me using this product on frames, cards, scrapbook pages, tags, flowers, and so much more. The possibilities are endless.

Thanks for stopping by,

Friday, September 9, 2011

Glossy Accents

Last week Cindy asked for a post on how to use her Glossy Accents that has been collecting dust since she bought it. So today I thought I would share with you a few examples of how I have used mine.

Glossy Accents & Crackle Accents are essential mediums in my scrapbooking kit. Glossy Accents is a ultra-thick glossy glue medium that can be used as a sealer or as a strong bond adhesive. Crackle Accents is the same as Glossy Accents except it gives the effect of cracked glass when it dries. Both of these products go beyond simple glue & stick.

In this example: I used the Glossy Accents to add the effect of Dew on the flower. I just dripped a few drops and let it dry overnight.


In this example I had some rub-ons that were old and cracked I wanted to use them on this project but I was afraid that they may rub off over time, so I covered them the letters with Crackle Accents and now they look like I cracked them on purpose. They Accents also makes them appear raised for a glossy embossed look without the messy powder and heat tool.


In this example I used the Glossy Accents to adhere the jewels to the ring base giving them a durable permanent bond.

In this example Glossy Accents was used as an adhesive to glue the paper to the back of the fragment charm.

In this example I used the crackled accents on the face of the clock to give it the look for cracked glass but it also protects the paper from tearing during use.

Cindy I’m going to challenge you to break the seal on your Glossy Accents and use it on your next project.

Related Posts with Thumbnails