Monday, September 30, 2013

Trick or Treat!

Hi, Flock, Genie here, and I'm so excited!!  It's fall again!  Cooler temperatures, bonfires, pumpkin patches, cider, hot cocoa, colorful leaves, and, best of all...it's almost Halloween!

Flamingo Scraps is carrying the new Basic Grey Persimmon collection, and the fun fall colors and Halloween embellishments inspired me to finally scrap my girls' Trick or Treat photos from two years ago.  I went for a simple layout with a fun banner and a cluster based on a journal spot. 


The banner was made from 1/2" strips cut from several different Persimmon patterned papers, from the 6x6 Paper Pad, which I cut into triangles.  I played with a few different layouts before I decided on the triple-tier banner.  I doodled around the edges of each triangle, added a doodled line, and then a few Prima Wood Icons.


Finally, I put a journal spot down from the Basic Grey Persimmon Die Cuts and Transparencies pack and added a banner from the same package and a couple of Basic Grey Persimmon Mixed Brads.


Thanks for looking, and I can't wait to see your fall and Halloween themed projects!

Friday, September 27, 2013

Crisp and Fun Fall Projects From the F4 Team

Every month when I look at the F4 projects I think, "Oh! That's cool, I would have done this or that. Hmmm..I could have done that but put this this on it". It's a lot like watching a game show at home and getting all the answers right, but when you actually get onto the show, your brain goes somewhere else.

These are the materials our beloved flock leader gave us to create with this month:

  • A 12x12 piece of double sided  paper,
  • A chipboard truck,
  • A glittery pumpkin,
  • A price tag embellishment.

I am always amazed at what everyone comes up with. Here are the ideas from four of our flock members. Enjoy, and I hope we were able to inspire you as well.

GENIE'S PROJECT :


My 10-year-old daughter's best friend actually gave me this idea. Holding the little pumpkin, she said "You should make a little fall centerpiece!" The idea stuck with me, but I wasn't sure how to incorporate the truck chipboard. Suddenly, inspiration hit. It'll be a pumpkin truck, and I'll fill it full of candy!
It took some trimming and re-trimming, but I finally got a little box made to attach to the truck, using the backing from an old paper stack. I used the truck as a model to cut wheels so it could stand up, and then made a strip to fit the length of the truck. I measured 2" on each side of the "body," scored the corners and then 1/4" in from the sides to make tabs to attach to the truck. I cut a bottom the same way, and then taped and glued it in. I covered my little truck in paper, doodled the window, door, and bumpers, and added a few buttons for wheels and lights. Finally, I thought the 5 cent flair was the perfect finishing touch, attached to a Popsicle stick on the back of the truck.


 RAMONA'S PROJECT :


"Wow!" was all I could say when I saw this month's Flamingo 4 products. Yes, I started out in one direction, but ended up going another.That's what I love about doing F4 projects. You end up creating things with items you would never think about putting together. I am into altering things and junkin' it up a bit, so I made a tag. I'm really happy about how it turned out.

I used my Cameo to make the quote, cut my pumpkin in half so it would fit the length of the truck, and yes, I did jack the truck up a bit. LOL! I used Cream Seam Binding , Vintage Photo Distress Stain, and Tim Holtz Distress Paint in Spiced Marmalade for the bow on the tag. Follow the links below to locate these fab products to add to your next creative project !

Claudine Hellmuth Mediums   http://flamingoscraps.com/product/claudine-hellmuth-studio-kit-mediums/
Heidi Swapp Color Shine http://flamingoscraps.com/product/heidi-swapp-color-shine-georgia-peach/

Seam Binding - Cream  http://flamingoscraps.com/product/seam-binding-cream/


KATHLEEN'S PROJECT :


Every year, when we visit our local pumpkin patch, I always complain that I don't have a frame to put the best photo into and display during the fall season. This challenge was just the answer! I had a cheap unfinished wooden frame that I paid less than $1.00 for in my stash, so the transformation began. I covered the frame with the paper in the kit and TRIED to make the truck look realistic with multiple fall colors of Tim Holtz paints. I cut my pumpkin in half to be able to have two. We've been bringing my grandson to the pumpkin patch since he was six months old, so we established "Pete's Pumpkins" for that year.  I used my chalkboard and gel pens for the writing on the truck. The "Fall" title is from my stash and the sign post is nothing more than a painted toothpick. The orange paper in the photo slot is actually the reverse side of the plaid paper, and it will make a perfect mat for my photo.

Being a true scrapper, I hate to toss out scraps, so I used some of my leftovers to make a group invitation to put onto a bulletin board. I reversed my truck and repainted it, and used one of the pumpkin halves from my frame temporarily. The Trick or Treat bag and the bats are made from paper punches using the reverse side of the plaid paper. My date and journal tag are from my FlamingoScraps Warehouse box.


 DONNA'S PROJECT:


Recipe Mini Album Cover
I first cut my recycled card board (orange packaging) to 5 x 7. It was not perfectly covered. Leaving the bare white core showing, I inked the white portions with TH distress inks, Spiced Marmalade and Peeled Paint, distressed the edges and inked again with with Peeled Paint, then sprayed with Apple Glimmer Mist. 

Next, my patterned paper was cut to 4.5 x 6.5. I distressed the edges and inked with the Peeled Paint ink, again sprayed with the Apple Glimmer Mist and layered over the orange chip board base. I traced the chip board truck onto the orange packaging, layering it behind to add dimension to the Maya Road truck piece.

I painted the bare truck chipboard first with Wild Honey, then around the edges with Spiced Marmalade, allowing each to dry first. I then inked the edges with Spiced Marmalade. In order to use the pumpkin on my cover so it was not just one round piece, I first cut it in half and adhered the flat back to the cover. I took the remaining half and cut that in half, giving me two pieces, which I glued together to resemble a pumpkin pie.

Using the Maya Road stick pins, I inserted the large green as a stem for my pumpkin (I had to trim the pin down with wire cutters, as it was too long for the pumpkin). I added three flowers flower stick pins to the bed of the pick up truck for added interest. The recipe book is bound together using two book rings, allowing me to open and add pages as I collect my pumpkin recipes

The final addition was adding the 45 cent self adhesive price button. 


Well, that's it for another Fabulous Flamingo Four! It just goes to show that you can create wonderful projects using minimal supplies. Join us next month when Melissa, Erin, and Luanne, and Cheryl with get creative with four more mystery items from our Great and Wonderful Flock Leader. Just a reminder, all of the newest and yummiest of CHA products are now in the store from Cosmo Cricket,  Fancy Pants,   as well as the  Basic Grey 25th and Pine. So many new items I can't list them all here!!
Be sure to tune in to Ustream for another great tutorial from our very own Tonya Gibbs, on October 8th, at http://www.ustream.tv/channel/gibbst.  Broadcasts are the first Monday of each month at 8:30 p.m. EDT.

Thursday, September 26, 2013

G45 Easel Album

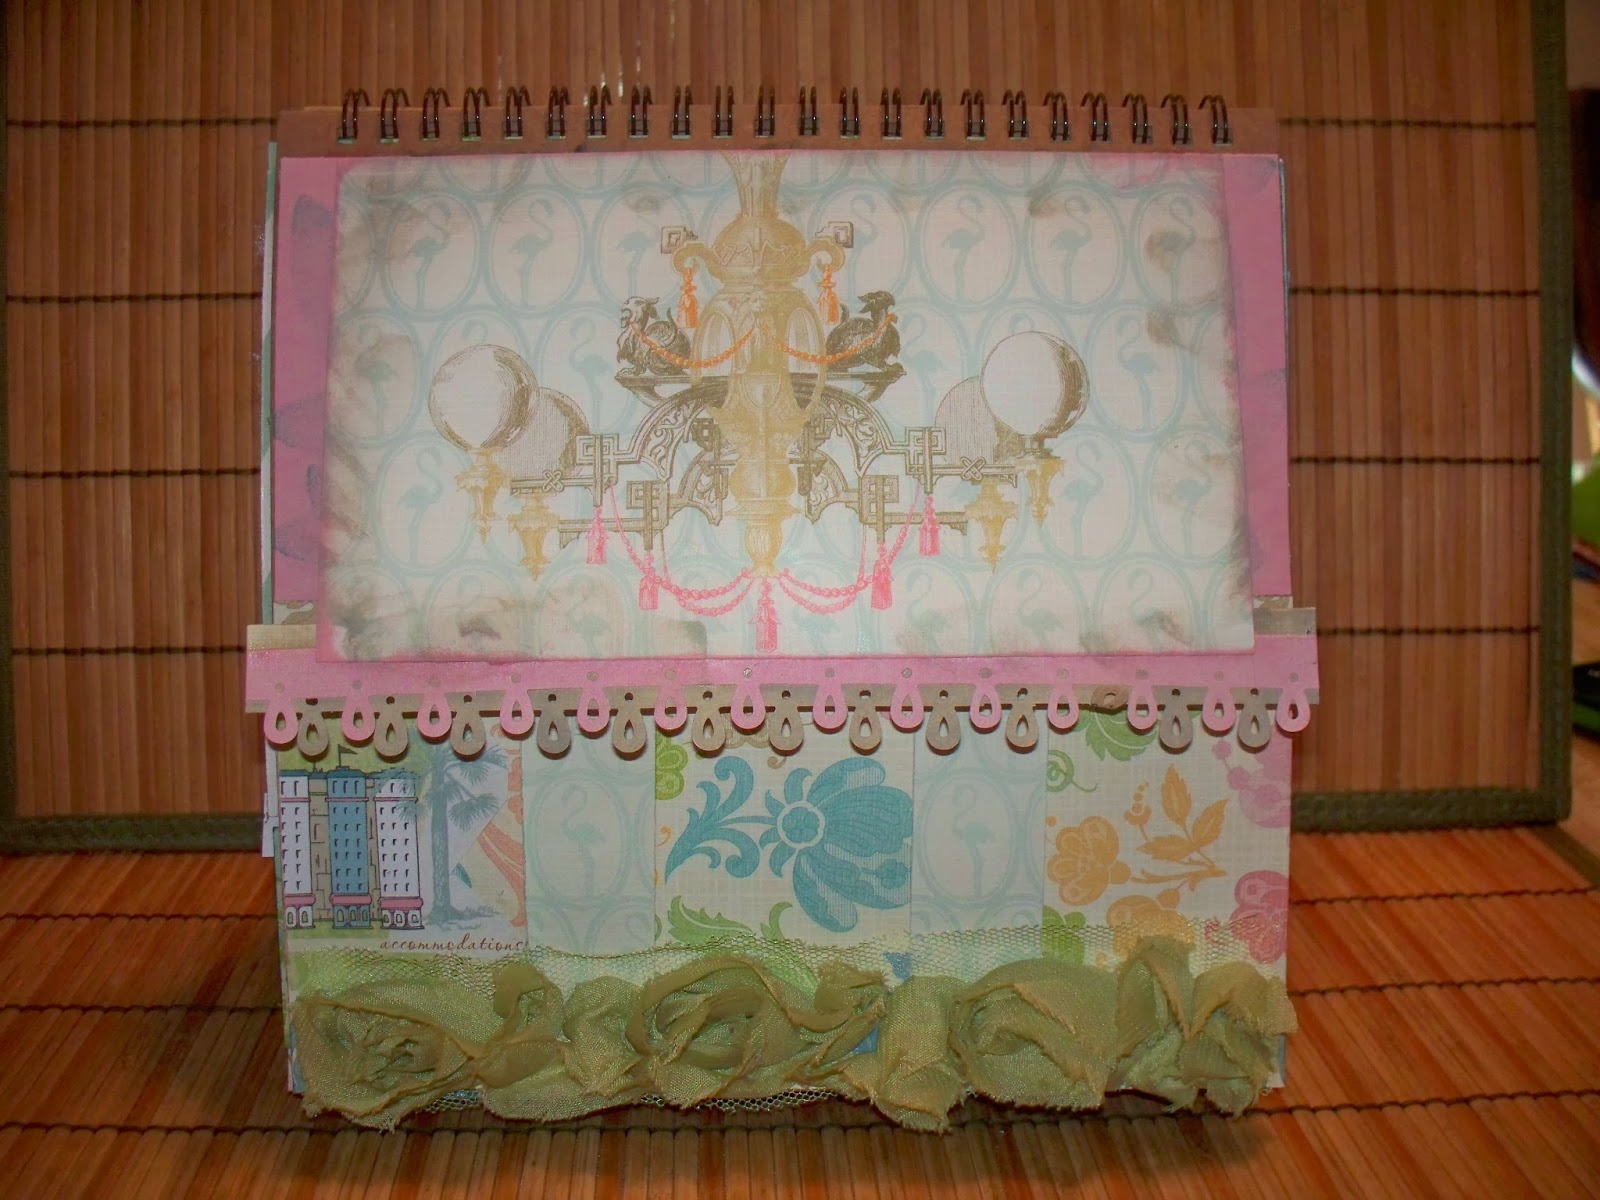
I love to display our vacation photos every year, but I get tired of the same old frames. I decided to mix it up a bit and do something more creative and fun. Not to mention, it's a lot easier to swap out my photos from year to year.

Using a G45 Easel Album I had and some GREAT items from my Flamingo Scraps Warehouse Embellishment Box, as well as the paper box.


 I LOVE the Websters Bloomers, and the Maya Road TuTu Tulle products. Here I just had to use the Flamingo paper from the Websters Palm Beach collection from my warehouse box. I created a pocket that will hold a photo or a journal tag from the sheet of bathing suit squares.


 Every vacation has a beautiful sunset that you just have to show off. My letters are from Maya Road, the Lisa Lowercase collection, the wood veneer scallop trim is Prima and I used Prima Chalk Inks, for added color to my paper.


Lots of fussy cuts give me several options for photos, journal tags, or mementos from a trip. I made a slit in the paper before attaching it to the album so that I could slip in an extra tag. I have lots to say!


I LOVE this paper from the PB Collection. I will use it for the photos of the hotel or any architectural wonders we might see. I used a paper border punch for the trim under the chandelier.


This is the inside of the above page with three rectangles of paper to slip photos behind and I can also add a photo to the floral part on top. The Bloomers used here are Happy Green.

I hope you enjoyed this project that was actually quick, and very fun to make. New items are rolling in daily at the store http://www.flamingoscraps.com. Some of the manufacturers you can drool over are Cosmo Cricket, Fancy Pants, Marian Smith, and Prima - just to name a few! Don't forget to join us tomorrow for another surprise project from the Flamingo 4 (F4) as four of our fabulous designers show you what they made using four like items from the Flamingo Scraps cache of goodness. It's amazing to see how everyone interprets the use of products. Also Tonya will be live on Monday, October 8th at 8:30 p.m. with another Ustream tutorial that's sure to be awesome!

Until next time!
Kathleen

Wednesday, September 25, 2013

Something for Sis


How many of you can't resist a bargain? Even if you don't really need it and is too good to pass up? I always check out the clearance section at any store and found that school supplies are starting to clearance out. So what did I do? I bought four of these in different colors for 25 cents each.


Then I remembered my sister's birthday is coming up and this would be great decorated for her since she is a teacher! I reached into my Flamingo Scraps Warehouse Box and found this awesome chevron paper from Carta Bella Winter Fun line called Snowed In. Cut it to size, distressed and used Prima Chalk Edgers on the edges. I painted the sides and flap with chalkboard paint (to go with the school theme). Then I added trinkets that kinda discribed my sister. The picture frame, bee, key, heart and clasp button were made out the new Mod Podge Molds and colored up with Tim Holtz Distressed Paint and Markers (special ordered from Flamingo Scraps) . I had a blast coloring these molds. The other trinkets are Tim Holtz bingo piece and a tractor button from my stash.

It's a birthday present and with any present you need a card. I love to use tags as cards. I started laying down color using the Tim Holtz Distressed Paint and inspiration from a video by Tonya Gibbs, who is the Lead Educator for Flamingo Scraps Design Team. If you haven't already, you need to check her out!


I then found this digital stamp "Camping" from Saturated Canary that fit a story my sister had just told me. I colored her up with Copics and Distressed Markers. I fussy cut her out and added little sparkle to the fire and marshmallos. Burlap ribbon and charms added a little more charm.


You can't roast marshmallos with out chocolate bars!

The tag and chocolate slide right in the pencil box for a perfect little gift.

 I hope that I inspired you to look out of the pencil box. Wouldn't these make great gifts for Christmas full of chocolates and a tag?
Happy Birthday, Sis!

Until next time!

Luann

Tuesday, September 24, 2013

Happy Anniversary To Me!

It's hard to believe, but tomorrow I will be married for thirty-seven years. Thirty-seven wonderful years with my one and only. I met Rick when we both worked at JC Penney. Honest to God, the first time I saw him, I told one of my friends that also worked there that he was my future husband. Rick would come over to my department at the end of the evening and make small talk . One day he hung around after we closed and said "When are you going to go out with me?" and I responded "When are you going to ask me?" We had our first date at the end of Janauary. He asked me to marry him in May, and we married in September. I have had the most wonderful, blessed life with Rick. We both say our struggling years have given us our most happiest moments. I found a sign and we have it hanging in our living room. "If I had my life to do all over again, I would meet you sooner, so I could love you longer." 

When I saw the "Beautiful Life" paper collection by Laura Passage in the Flamingo Scraps online store, I knew I wanted to make a small mini album for our upcoming anniversary. I wanted to keep it simple with lots of room for pictures and journaling. I started with a 12" x 12" piece of designer paper and cut it down to 9.25" x 11". On the 9.25" width I scored it at 2.50" and 6.75". On the 11" width it is scored at 5/8", 7", and 7.75". After trimming away both two opposite ends on the 5/8" score line and removing both sides starting at the 7" score line to the ends, I rounded the corners of both opposite flaps and folded the center section together using the scored lines, and then brought the 5/8" tab up pressing firmly after applying adhesive.
The liners for the outside and inside cover measured 4" x 1/2", 3" x 4", and 4" x 6 1/8". 

For my inside pages, I used the coordinating solid card stock measuring 12" x 12".  I trimmed five of these to 7" x 9.25" and then scored them on the 9.25" width 2.50", and 6.75". On the 7" width at the 5/8". My liners measured 4" x 6 1/8" and followed the same instructions as the cover.

 Once assembled I used a 1 3/8" circle punch and cut a half circle out from each page for each 4" x 6" mat that was inserted into each pocket.


I inked the edges on all of the liners and mats. On each mat I used a small double hole punch and tied a bow using several pieces from the seam binding sampler. I then used my Bind It All and bound the mini with a brown coil.


I used the plentiful supply of coordinating stickers to decorate the mini using mount tape and then one magnetic closure for the cover.


This was a very easy, non fussy, non complicated, but sweet album to make. The papers were so pretty that other than inking the edges using my favorite Prima Dark Rust chalk ink, the seam binding, the coordinating stickers,  the Heidi Swapp Banners, and Fancy Pants Cork Hearts the paper collection spoke for itself.

I hope you have enjoyed visiting the Flamingo Scraps blog today. While you are here, please subscribe by email. I would also ask that you "like" their Facebook page click here, or if you are interested in buying this paper collection, or anything I used to make this mini, you can find it here in the store.
HAPPY SCRAPPIN!
 Cheryl

Monday, September 23, 2013

Happy Birthday Layout

There were tears, laughter, cake smashing, and good times for all at Catherine's first birthday Party.  We held her party a couple of weeks early so grandparents could come. Unfortunately, with daddy working away from home now, there was not good weekend for him to be able to be there. So, we had a second party for her with just daddy, Cat, Morgan, and me.  

The journaling reads "Laughing, crying, messy frosting face.....all the joys of delving in face first getting frosting everywhere as you devour your smash cake for your first birthday. Grandma Elaine went all out decorating and preparing for your party. Grandma Marty, Erin, Madison, and your brothers were all there.  Aug 2013".  Grandpa Ray and Mommy were there, too. :) She definitely had the series of emotions going on that day.


I used lots of bits and pieces of old collections you can find in the grab boxes at Flamingo Scraps right now.  Parts of Pink Paislee, Prima, Heidi Swapp, and more!!  So head on over to Flamingo Scraps and get some great items!!

Supplies Used
Cardstock


Saturday, September 21, 2013

play ball!

I have TONS of Pink Paislee bits and pieces in my stash - it's probably one of my favorite manufacturers out there, and it really shows because of how often their products are used in my pages!

Today, I have a special weekend edition to share with you the Flamingo Scraps Warehouse Grab Box, because we just can't get enough of it and, if you haven't ordered one already, I'm hoping to convince you today. If you haven't heard it already, there are three different versions of the box to tickle your fancy: the paper, the embellishments, and the combination! Of course, what you get in your box will vary from what I received in mine, but it is chocked full of scrappy goodness, no matter what!

And here's the latest project I came up with that uses the box:


You might recognize this as the Pink Paislee Declaration collection, that I have used on a previous page, way back with my very first Flamingo Scraps post! That time, I used it in its traditional, or themed, sense, with a page about the 4th of July. Today, however, I changed that up and used it on a page about the "Great American Past Time" and scrapped my oldest son's Little League pictures. I really liked the red, white, and blue to convey this "Great American Past Time" feel, and kept the design and layers to a minimum so that the focus was on the pictures. Not only did I use the papers from this line, but also the sticker sheet and alphas that you might see in any of the boxes! Along with the Declaration Line, I used some Fancy Pants Cork Shapes in Heart and Stars to add some dimension to a relatively flat page. I also cut a little baseball with my Silhouette to back his baseball card with his batter facts and positions played that's paper clipped under the team photo. Add a little butcher's twine and small alpha stickers from my stash, and this page was ready to use. You might also notice that I left the background as-is on this page, rather than customizing it like I typically do. This background really didn't need anything else added to it, to be honest! I really tried to find something! 

So there you have it! Have a splendid weekend, and don't forget to order yourself a warehouse box today, before supplies run out!

Keep scrappin'!
Melissa

Friday, September 20, 2013

Peppermint Fairy

I was so excited to get this great Sizzix Garden Fairy collection of dies and stamps -- I fell in love with them as soon as I saw them in the CHA2013Winter release!


Sizzix Bigz XL die -- Available for Special Order
Sizzix wafer thin dies and stamp set --
Available for Special Order
Sizzix wafer thin dies and stamp set --
Available for Special Order


From Garden Fairies to Christmas Fairies and Angels and figures of all kinds, I knew I would find so many uses for these items!!  My favorite project so far is this Peppermint Fairy I made with the Flamingo Scraps Christmas in July Brights Kit, some of which you may be able to find in the Flamingo Scraps Giant Warehouse Box!


I cut two of each body piece from a neutral pattern from the kit and cut one of each piece from chipboard.  I used my Xyron X and 500 sticker makers to sandwich the chipboard between the two pieces of paper, inked the edges, and assembled the body with small brads.  The base of the skirt is diecut with the docraft Doily Die and covered in layers of Maya Road TuTu Tulle and Pleated Tulle and Webster's Pages tulle and feather trims.  The wings are made of a misc feather butterfly and the waist and neckline are highlighted with tiny strips of pink and clear bling.

I have wanted to make something using some of the really wonderful vintage pics I have of my family.  So inspired by Pinterest in particular, I enlarged a picture of my Grandmother Emma, printed it on regular copy paper, cut out the face and adhered it to the chipboard.  A wreath of tiny paper roses completed my fairy!  Well, almost -- I added a banner made from some leftovers from my Tonya LIVE!!! City Sidewalks kit from last fall -- see, we promise you will use everything in Tonya's kits!!!

Product List
Flamingo Scraps Christmas in July Brights Kit
Pink Paislee City Sidewalks Paper Garland 
Maya Road Tulle
Webster's Pages Trim
Sizzix Garden Fairy Dies and Stamps (special order)
docraft Doily Die  (special order)
Xyron Sticker Makers
Distress Stickles
Misc Bling
Misc Flowers
Misc Feather Butterfly
Misc Baker's Twine
Chipboard
Misc Small Brads
Vintage Photograph

Thanks so much for looking!!!

Thursday, September 19, 2013

Warehouse box, texture, and baby...Oh my!

Hello, Flock!  Genie here today, with my first official Design Team post.  Squee!!!
When my warehouse box arrived, these Pink Paislee Portfolio papers and embellishments begged me to use them to scrap this photo I had just received of my cousin's new baby boy.

The soft ivories and blue, with touches of mustard, really worked with this gorgeous black and white photo.

I started out by laying down some texture using light modelling paste and a Heidi Swapp mask.  While that dried, I fussy cut some elements from the Portfolio papers.  I knew I wanted to go with lots of layers and a few banners, and I really loved the play of zig zags and stripes in the papers.  I love how the light modelling paste is only semi-opaque when used in a thin layer.  It adds such amazing texture without feeling thick and heavy.  I also used some of the new Cosmo Cricket Glitter Sheets in my layering here.  They are self-adhesive, very easy to cut, VERY glittery, and there is no fallout from the glitter (yay for not having glitter all over my desk!).

I used one of the Pink Paislee Artisan Elements Borders with a little ink on top of some of my fussy cutting.  I layered in a little washi tape from my stash, a Pink Paislee tag from my warehouse box (did I mention that not only can you get a combination box, but also a paper box or embellishment box?)  The chipboard and wooden stars came from the box and from my stash.

Last (but not least!), I had to come up with a title.  Something about this photo made me think of the lullabye from "Lady and the Tramp."  I think it was the stars I was adding left and right.  Anyway, "Little Star Sweeper" sounded just right, and I hand-wrote "la la lu" above.  My final touch was a piece of twine with a bow around the photo.
Thanks for looking!
Related Posts with Thumbnails