Showing posts with label Heidi Swapp. Show all posts

Monday, December 16, 2013

Resist Stamp Misting

I love seeing those beautiful background of papers from tons of different companies - they look distressed, dimensional, and gorgeous.  Here I will show you how I made a small 6x6 distressed misted paper for a card using stamps, ink, and mists.


 Resist Stamp Mist Tutorial

1) Supplies - Cardstock (light colored - tan, white, cream), spray mists in your choice of color, ink in your choice of color to correlate with your mists, and acrylic stamps.

2) When picking out your stamps use one that looks like the object you want to stamp, resist spraying will not show the detail of the stamp, just the outline.  I chose a leaf shape (butterflies, hearts, flowers, birds all work great too).  Lay your stamp on the paper flat side down (so there are no gaps between the paper and your stamp, raised parts facing up).  Spray your mist lightly, carefully pick up your stamp, move to a new location on the paper, spray with a different color (start with your lightest color first then move to your darkest color last), keep rotating and spraying until you have the look you want.


 3) I added a few drops of mist from the stamp leftover from misting resist technique to drop onto my paper for a better effect.


4) Pick out a different stamp for contract effect.  I went for another leaf stamp and chose a dark color (brown) for contrast.  I use a solvent ink (like StazOn) for this so it would not bleed into the wet mists.  I used both primary stamps (just applied ink to the stamp) and secondary stamps (stamped 2 times before reapplying ink to the stamp).  Stamp around the page, coming off the paper, across, layer it - remember this is supposed to look distressed and shabby!!


 5) Stamp in your resist spaces you created with the front side of the stamp (fill in the holes).  Pick a color that is similar to your mists (I chose orange) in a distress ink.  Steps 4 and 5 and be done in either order.


6) Now you can chose to do what you like with your new background paper.  You can make your paper as large as a 12x12, or cut it up and use it as your wish!!

You can find these products at Flamingo Scraps!!


Supplies used:


Ink - Ranger
Mists - Heidi Swapp
Flower - Maya Road
Bling - Prima
Twine -Maya Road
Stamps - Prima

Enjoy!!

Tuesday, November 19, 2013

What's in the Match Box?

Hello,

It's Luann with the answer to the question you all are just wanting to know. What is in the Match Box that I blogged about on October 2nd.  Did you see the clue?
http://flamingoscraps.blogspot.com/2013/10/anyone-have-matchbox.html


Did you guess.....


Yep, bathroom tissue roll centers. (My husband kept asking why I was saving them!) Ever since I saw Arlene's Butterfly Kisses blog where she made a mini using them, I wanted to give it a try. BTW:  Who knew that they come in  different sizes?

I squished the rolls in half and used my bone folder to help crease the edges. I put them under a very heavy book for a few days.  I painted the outside and about a fourth of the way down on the inside using my Tim Holtz Black Soot Distressed Paint. I added a couple swipes of the Bronze and Broken China to break up the black.  Then I used a little Heidi Swapp in gold to make them sparkle. I also used Prima's Chalk Edger for added color.  Next came the grommets.  This was fun!


Then on to decorating the mini album.  Keep in mind that to fit in the match box you should use flat embellies.  Also, this is another way to use up your scraps.  I used the scraps from Theresa Collins Now & Then and Carta Bella Winter Fun for the background and journal cards.  For the embellishments I colored up Prima Wood Icons, Tim Holtz Idealology, Mod-Podge Molds, Prima Flowers, Cosmo Cricket Glitter Sheets (I used as the tabs for the pull out journal cards.), stash lace, binding tape, stash items, and charms. 


And here is the complete project! 


I know that my snow family is glad I got replaced the matches!


Until next time! 

Luann


Note:
Got the fun inspiration for my snow family from Bitz of Me blog (Suzanne Dean).


Friday, November 8, 2013

It's Beginning To Look A Lot Like Christmas!

Hi this is Cheryl. I am sitting here typing while looking out the window. It is a beautiful fall Texas day. Nice and sunny. Not too hot or too cold. Just right for open windows and a nice cool breeze to blow through the house. I made a pot of chilli this morning and it has been simmering on the stove all day. We all need to enjoy these autumn temperatures. Ol' man winter will soon be upon us.  All of our treasured fall decorations will be taken down this month and we will be soon decorating for  Christmas. I love this time of year and I love making my own cards typically in November and scrapbooking my families Christmas memories at a winter retreat in January.


Today for my project for Flamingo Scraps, I thought I would do a Christmas page. I can never have too many premade pages for all of the pictures we take each year. To start off I used a white 12" x 12" base, layered with a 11" x 11" piece of black card stock. I then added a small 6.50" x 10.75" piece of red card stock. I also used a snowflake border punch along two sides of this and added a double photo matt on the bottom that measures 3.25" x 10" and a Heidi Swapp paper frame.


Using ribbon from my stash, I tied a simple knot bow on the bottom of the red card stock and cut two trees from the Fancy Pants Corrugated Paper Collection and adhered these over the ribbon.


 I also added a journaling strip and die cut from the Echo Park Merry Christmas collection. From there I added a few Christmas diecuts and images on the page. Also, I saved the snowflake negative pieces and used these to decorate my trees and added four photo corners to the edges of my base layer. A simple, but sweet Christmas page to add pictures to later.


I hope you have enjoyed my project for today and that I have inspired you to get started on your Christmas pages.  As always I thank you for visiting the Flamingo Scraps Blog. If you would like to check out the online Flamingo Scraps store, please click here to get started shopping!

Happy Scrappin! .........Cheryl

Thursday, November 7, 2013

Playing with Patterns

For today's project I have chosen to create a Heidi Swapp 12 x 12 layout with her Serendipity collection. The photos are of Leila's first birthday, my youngest granddaughter.


There are so many fun patterns in this Collection, I challenged myself to use as many as I could combine. Embellishments are also available in super fun "polaroid" type frames, and other fun photo stacks, with coordinating patterns and epoxy words, "sweet" and "so sweet" are two shown in the photo below, you may find them in your Warehouse Sale - Combination Box!!! I added a binder clip with a small snippet of ribbon from my stash. The cork shaped, adhesive back arrow is from a Fancy Pants assortment pack of sizes and shapes. It has been painted with Tim Holtz Distress Paints, Broken China (available through a special order you can place right here with Suzanne from Flamingo Scraps) and faux stitched with a permanent black marker, and an epoxy sticker glued to the top. Leila's name is die cut letters, painted with the Distress Paint, Picked Raspberry


Below, I used a frame sideways, after cropping out the balloons in her photo, I added heart shaped "balloons" with an assortment of hearts from the Fancy Pants hearts and stars. The cork shapes were first painted with Tim Holtz Distress Paints (Broken China, Mustard Seed, and Picked Raspberry. Remember, to ask Suzanne from Flamingo Scraps to special order just for you!) The paints covered the cork shapes in just one quick coat, faux stitched with a permanent fine line marker, adding an epoxy butterfly sticker to the largest one. 


To keep the frame and the cork stickers the same height, first I carved a little section out of the adhesive foam behind the heart (see photo below) and inserted the end of the painted twine into each heart. On the back of the frame I glued strips of the twine to raise the frame and I tucked the opposite end of the twine underneath to resemble balloon strings. This kept all the elements for this photo at the same height and reduced the bulk on the page.


Her invitation was a perfect match with the papers. I decided to include that also. It was a single card that did not open. I added a piece of the pink paper from the Serendipity paper pack, and fussy cut around it, when closed it does not show. I will journal my thoughts for Leila inside this card.


Thanks for looking and sharing your day with the Flock! 

Scrappy Smiles!


8 )
Donna Sullivan 

Thursday, October 31, 2013

Chic Coffin - Happy Halloween!!

 I love Halloween for the fun you can have with the dark and macabre, shakes things up a bit.  So with that in mind......

Happy Halloween everyone!!

I made a little present coffin box and dressed it up with a little shabby chic-ness, why not dress up dark and sinister ;).  The coffin opens up and cackles at you, so I thought why not decorate it (it was just plain wood).


I sprayed the entire box with 3 colors of Heidi Swapp Color Shine (Georgia peach, Black Velvet, and Chartreuse).  I layered the misting (letting some dry before adding on another layer of spray), plus I also added in some layers of Claudine Hellmuth Studio paint (in similar colors of green, orange, and black).  I then let it all dry before adding on the Halloween Washi tape - Beware of what might lurk inside!!


 Here you can see I used a stencil (you can special order items like the stencils, paint, etc from Flamingo Scraps) to added a layer of Claudine Hellmuth gesso mixed with slow drying medium to create texture.  After it all dried hard I sprayed with the color shine colors again.  I then added in my Prima flower cluster (some also sprayed with color shine to match - the black and green flowers are sprayed ones), and my cute little black spiders from my stash.

You can find most of these supplies over at Flamingo Scraps!!


Now to just enjoy the goodies inside - all while the little coffin cackles at you for eating your sweets!!

Supplies
Wood Coffin
Flowers - Prima
Mist - Heidi Swapp
Mediums and Paint - Claudine Hellmuth
Spiders
Washi Tape
Stencil - Studio Calico
Enjoy!!

Wednesday, October 30, 2013

Mixed Media Gifting

Hey, Flock!  Genie here, and I'm starting to think about making Christmas gifts for my friends and family.  I probably should have started months ago, but I guess I'm just not that prepared.  ;)
If I can bear to part with it, this mixed media wood block will go to one of my aunts.  I come from a very crafty family, and we have quite a few talented sewists.  This idea has been bouncing around in my skull for a while, and the lovely colors in the Webster's Pages Spring Garden collection that came in my Flamingo Scraps Combination Warehouse Box were just what I needed to bring it to life.  A complete list of products used will follow.
 
 
I started with a 12x12 wood block and haphazardly placed a few pieces of an old pattern on it with Mod Podge (when I use a pattern up, or lose pieces, or whatever, they go into a drawer to be used in mixed media--I love the look!).  I tore a few pieces of the Webster's Pages and added those right on top, working them into the patterns for a lovely blend.
 
 
I mixed some teal Color Shine mist with some of the Mustard to make green, which I splattered on the Maya Road chipboard pieces with a paintbrush and then spritzed lightly on the surface of the patterns and papers.
 
 
It took some work to get the gorgeous, amazing, lovely, fabulous...(Oh, how I love those Webster's Trims!!) on the page, but with time and a LOT of Mod Podge, they stuck.  ;)  I wrapped some twine around my chipboard spools, stuck those down, added my text, and a Webster's fabric flower, and I was done.  I really love the simplicity and muted color palette of this one!  Thanks for looking, and I'll see you soon.  :)
 
Items used:
From the box, I used some lovely Webster's Pages papers, trims and twine, from the Spring Market collection.
From my stash:  alphabets, wood block, pattern pieces, and art mediums.

Tuesday, October 29, 2013

Pumpkin Pops - Fun use for your Heidi Swapp Mists!!

Every year for Halloween, I am always on the lookout for a cute little gift I can give to my kids' friends (school, neighbors, etc).  I have seen the ghost pops so many times (take a sucker and wrap a white paper towel the sucker, tie a black ribbon around the bottom, give it eyes, and you have a ghost) that i thought of trying to switch it up a bit.  I thought of pumpkins.  Invert them, make them orange, and poof pumpkin pops.


You could give these out as kid gifts, teacher gifts, as place cards for a table setting, and as plain pumpkins they work for Thanksgiving too!!
 

Pumpkin Pop Tutorial

1) Supplies - Some form of a sucker (sphere not flat), paper towel, quick drying craft glue, tape, twine, black pen, green pen, orange mist, black mist, green mist, cardboard, and a flower.

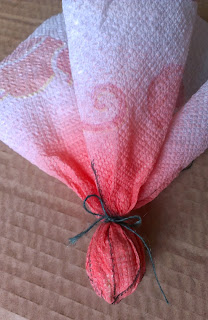
2) Open up the paper towel or napkin to make a large square.  Spray the center with orange mist.  I used Heidi Swapps color shine in Georgia Peach.  Let it dry completely.


3) Using a black pen or marker draw in the lines as seen below, make sure you napkin is dry first.  This creates the seems or ridges in your pumpkin.


4) Tape down the tops and secure the wrapper of the sucker before you cover it.  This helps the pumpkin not have lumps later, plus it gives the kids a bit more fun trying to open them up to eat them, lol.


5) Cover the sucker with the colored napkin and secure the bottom with twine, I used green, but any color you want will work.


6) Cut off the excess paper towel, but be careful not to cut off your twine or it will fall apart.  


7) After looking at the "pops" I thought the handle of the sucker acted as the stem of the pumpkin, and those are green.  So I colored the stick part with Chartreuse Color Shine and a green marker.  You should do this step before you wrap the napkin onto the sucker, so you don't mix your colors.


8) These would be cute just like they are at this point, but I thought pumpkins are not held stick "stem" down, but rather with the stem pointing up.  Alas suckers can't stand up on their own, so it needs a base!  Cut out squares of cardboard from a box, hey why not use the box your flamingo scraps goodies came in!!  Tear off the tops of the cardboard to expose some of the ridges.  Spray the cardboard in your choice of Mist   - black and green were my choices. I then glued down a flower to each of the squares and sprayed the same color again to the flower would match. The flower just acts as a "nest" so the sucker will not topple over when it is glued on to the base.


 9) Glue down your pumpkin pop to the center of the flowers, hold the stem for a sec so they will not fall over.  Leave your pumpkins "natural" or draw faces on them to make them Jack-o-lanters.  I even added a tag to one of the stems to make it a label with washi tape and wrote a name on it.


You can find the paper craft supplies at Flamingo Scraps, so head on over today and get yourself a fun Halloween treat!!


Supplies Used
Twine
Napkin
Pen
Washi Tape

Enjoy!!

Thursday, October 17, 2013

Fabulous Fall Fun with Persimmon

Hello Flock! Genie here today with a super cute layout of my littlest niece. :) I played some more with the new Basic Grey Persimmon collection--I really love these patterns and bits and pieces. I love the color combo best, I think--that blue is such a great accent for all these lovely fall colors.
I started with a metallic copper sheet of cardstock that has, literally, been in my stash for EIGHT YEARS.  Talk about hoarding! I used some chalk ink and a Heidi Swapp mask to put a little fun on the background (Flamingo Scraps can special order a lot of these masks that I love to use--just ask!). I cut strips from the 6x6 Paper Pad and turned those into arrows. Then I mixed in a border sticker and a die cut from the Die Cuts and Transparencies. 
 I used a couple more pieces from the Die Cuts and Transparencies package in the bottom left, and then used a piece from the 6x6 Paper Pad to mat my two photos.  Finally, atop the bottom, I added a couple of Maya Road Burlap Roses in Lemon and Sunset and tucked in a few leaves from the Prima Wood Icons collections--you can find them in Leaves and Mushrooms or get a variety of all the wood icons in the Sampler.  All of the leaves were inked with chalk ink (the Prima Chalk Ink Edgers would be great for this!!)
I hope you enjoyed my cute niece...erm....I mean my cute fall layout.  Until next time, Flock...thanks for looking!
Related Posts with Thumbnails