Showing posts with label distress inks. Show all posts

Monday, January 20, 2014

Birthday Wishes for Aunt Darlene

Hey all!  Hope you are getting some sunshine where you are.  We finally have had a least 4 days of sunshine. It sure makes everyone a little bit happier.  It was so nice that I got to work out in my yard.  I am blessed to live where we have spring starting the end of February.  I love all the spring flowers.  The colors and smells makes my heart sing.

On my last post I made a birthday gift for my aunt.  I am doing a follow up on the January 7th post.  I have finished up the mini photo book and made a birthday card.

I had ordered Marion Smith's Garment District and hadn't gotten a chance to use it.  As you may remember I used the Mad Tea Party and Nirvana papers for the gift box along with the the mini. I used the Garment District 6 x 6 papers to make the birthday card.  I love it when you can mix and match.  Awesome!


I cut a sheet of solid color 12 x 12  card stock in half, making it 6 x 12.  I then scored it at 6" to fold in half. I distressed the edges of the paper with my Prima distress tool and Tim Holtz Distress Ink in Pumice Stone.
I layered the paper along with a paper doily. Did you notice the pretty lace and trim from my stash. I used a digi image from Saturated Canary - Maxine (colored with Copic Markers).  Maxine reminded me of my aunt in her garden. The flowers are a mix of stash flowers and Prima flowers sprayed with Heidi Swapp Color Shine.  The little butterfly on the flowers is made from the Mod Podge line and colored with Tim Holtz pens.


On the inside of the card is another 6 x 6 sheet of Marion Smith's Garment District and another digi from Saturated Canary - Tea & a Book (colored with Copic Markers).  How many of you Skype?  My aunt and I spritzen (what my husband calls it) quite often over tea or coffee.  I don't feel so home sick when I get to talk and see her.


Here are a few shots of the completed mini that I promised.  Used my stash all the bling and flowers.   The little blue bird is Mod Podge colored with Tim Holtz pens.


Hope you enjoyed Aunt Darlene's birthday gift and card.  I hope she will love it.  But, most of all I hope I have given you some inspiration.  

Wishing you sunshine, warmth and flowers.

Until next time.

Luann


Tuesday, November 26, 2013

It's beginning to look a lot like Christmas!!

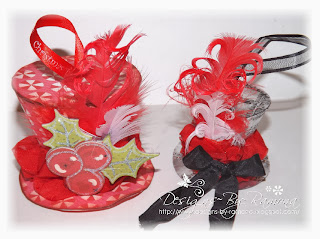
Hi all Flock followers... Ramona here to share a few projects I have been working on for my Flamingo Scraps DT project. I have used the Carta Bella and Lilly Bee Design papers that we had back in July. Which now might be found in the Warehouse Boxes for sale at the store. I had so much fun creating all these projects that would be great to put in stockings or on plates for your dinner guest. The patterns that I have used are some from Treasure Box Designs and Silhouette Store and cut on my Cameo. The patterns for the Mad Hatter ornaments can be found here. I used much of the paper that I had gotten between these and the Christmas book that I made. This paper is just so awesome not to waste one inch of it. Hope you like my projects as much as I loved making them.

I used Webster’s Pages Bloomers Red Sparkle. I also used a metal technique on the small one that I learned from Tim Holtz Creative Chemistry 2.

Who would not love this little mug full of Hot Chocolate on Christmas Morning?? I used a Prima Wood icon on the snowflake.

A little tea light on your Christmas Tree??

A present that contains a gift card. I used the new Platium Stickles on this and Love it.

Another Hot Chocolate Stocking Stuffer I so love this one with the snowman soup poem as in the above Coffee cup poem.

Hope you like my creations!!

Tim Holtz Distress Paints
Prima Chalk Ink Edgers — Set of 40 Original Colors
Seam Binding – Black
Seam Binding – Red

Remember Christmas is coming soon so grab you a Warehouse Box before they are gone. They have been marked down even lower then before.
Flamingo Scraps Warehouse Sale Box — Embellishment Box
Flamingo Scraps Warehouse Sale Box — Combination Box
And if there is somehting that I have used and you can not find it in the store. Do not hessitate to ask Suzanne and she can special order it for you.

Hugs and keep Scrappin!!
Designs~By~Ramona

Tuesday, September 17, 2013

Old vintage layout using the Flamingo Scraps Warehouse Box Papers

This layout was made with papers from the Warehouse Sale Box — Paper Box. These boxes are packed full of goodies and you may or may not get the papers used on this layout. It is the Toy Box Collection by Crate Paper. Be sure to check out the other Warehouse Sale Box — Combination Box and the Warehouse Sale Box — Embellishment Box these boxes are filled with all kinds of goodies. And be sure to check out Flamingo Scraps new products from CHA Summer.

I used several different medias on this layout. I actually added some Heidi Swapp Color Shine Tinsel and mixed it with Heavy Gel Medium and then used a stencil from Prima-Crackle.


Next, I fussy cut out one of the black and white graphics from the paper and used my Prisma colored pencils and Gamsol to blend the colors.


I used burlap and cut it in strips to add to the top and bottom of the layout and used Tim Holtz buckles to add some metal.


I also used some Fancy Pants Cork Shapes Arrows inking them up with Prima Chalk Ink Edgers Rusty Bucket. I also used a Tim Holtz Adornments Charms and some Prima Tiny Junkyard Findings Vintage Trinkets — Sampler.

After finishing this layout I thought I have these Melissa Frances 3 Flower Hanger — 4″ and Melissa Frances Double Flower Clip. I love the way they look on the wall and you can interchange your layouts with different ones.

Products Used:
Heidi Swapp Color Shine Gold
Tim Holtz Distress Paint Salty Ocean, Mustard Seed, Mowed Lawn and Picket Fence
Prima Chalk Edgers Rose Bud and Rusty Bucket
Golden Heavy Gel Matte
Prima Distress Tool
Tim Holtz Distress Ink Vintage Photo
Distress Crackle Paint Rock Candy

Hope you like my newest creation of my little man. Be sure to stop by Flamingo Scraps for all the newest products on the market.


Designs~By~Ramona

Friday, June 21, 2013

Clean or Dirty?

Good morning, Flockinistas!

Melissa, here, on what will be my tenth wedding anniversary! But, on to the real reason I'm posting about my anniversary on the Flamingo Scraps blog. Well, the answer is simple. My husband has been bugging me for just as long to make a clean and dirty sign for the dishwasher, so that we can know whether it needs to be run or if it needs to be unloaded to make room for more dishes. I figured having it on our anniversary will be a wonderful gift to him.

So, here's what I came up with:


It really looks way more simple than it went together, let me tell you! I started with a chipboard base, like what comes in a paper pack or when you receive scrapbook supplies in the mail from... well... Flamingo Scraps, of course. I cut it down to 6x6 and then painted it with gesso on both sides. At that point, I wasn't really sure what direction I was going. I didn't need to paint both sides, obviously, but I did have to wait for it to all dry. Next I took some Tim Holtz Distress Paint in Broken China, special ordered from Flamingo Scraps, and painted about an inch in on each side and let that dry. I then coated the entire thing with paper Mod Podge, and placed a 5.5x5x5 square of paper from the Pink Paislee Hope Chest collection down and then painted over it all again with Mod Podge, then left it to dry overnight.

The next morning, I did some masking with Prima masks, first the Static 12x12 over the whole thing, using Heidi Swapp Color Shine in Georgia Peach and then with the Checkers 12x12 mask in Tropicana Teal. Both masks are available via special order from Flamingo Scraps! Next, I got out some old foam stamps and used my Tim Holtz Distress Paints (available special order) in Walnut Stain and Spiced Marmalade to make the clean/dirty combo.

I lined each of the stamped letters with black ink and then distress Stickles to make them stand out a little better. 


Last, I poked holes a quarter inch off center on each side and strung some Maya Road twine through it and tied it in a bow. Then, just for some extra dirt on the dirty side, I took a distress stamp in my stash and some black distress ink and added a bit to the edges. Now all it needs is some magnets stuck to the back (I'm going to let the Mod Podge set for another night because it was all still a little tacky as I was finishing up), and it can be flipped as needed. 

So there you have it! Hope you have a wonderful day!

Until next time,
Keep scrapping!
Melissa

Monday, July 25, 2011

Great Friends Think Alike!!!

From the time Teresa moved to Crescent City in the fifth grade until high school graduation, we were practically inseparable!  We lived only blocks apart and did just about everything together!  As we grew older, college, family moves, marriages, children, etc. kept us from keeping in touch as we would have liked.  But through the miracles of Facebook and a class reunion last August, we reconnected and found that that bond we had forged all those years ago was still strong!!  We even found out that we were both scrapbookers!

Teresa and her hubby came through Palatka in May, a few days before my birthday for a wonderful, but all too brief visit on their way to a cruise vacay.  I had made a layout for her -- entitled Besties!
Supplies from Flamingo Scraps -- Lily Bee This and That collection paper and stickers; American Crafts Thickers; Tim Holtz Distress Ink;  Other Supplies -- vintage book pages, wooden button, embroidery floss, Sizzix die.
Inspired by a Becky Fleck Page Map sketch, the layout had pictures of us together at our High School Graduation and at Homecoming our senior year, along with a picture of us taken in the Flamingo Scraps storeroom last August!

Lo and Behold!!!  Teresa handed me a birthday gift and said, "you are not going to believe this!"  I opened it and tears came to my eyes!!!!


There we were -- the same picture from August and a picture of us when we were cheerleaders together our senior year!!!  She had even used some supplies she had gotten at Flamingo Scraps!!!!!

The This and That sticker on my layout reads "good friends are like stars, you don't always see them, but you know they're always there."  The journaling on Teresa's LO reads "a touchstone for my soul, a bridge across time, beautiful friend of my heart, I'm so grateful for you, days fly, months become years, and through them all, your friendship is with me."

I am blessed!!!

Monday, July 4, 2011

Altered Cigar Boxes

Naked Cigar BoxLately I have been participating in a monthly swap for altered cigar boxes, and I thought it would be fun to share them with you guys today. This is what the “naked” box looks like. This box is 8x8 and was in the unfinished wood section at your craft department stores. Flamingo Scraps has lots of yummy products for decorating them.


April - Shabby Chic

Shabby Chic
From Flamingo Scraps: Prima Annalee Poetry and Romance Papers, rose buds in peach, fairytale roses in aqua, monarch bling centers; Tim Holtz distress ink antique linen.
Other: Tim Holtz – Sewing Room die, Distress Crackle Paint Picket Fence; pearl floral springs, Cricut Cartridge Forever Young (mirror), String pearls, seam binding, vintage hymnal music paper and lace.


May – 1920’s Fashion Couture – color challenge jewel tones


From Flamingo Scraps: Webster’s Pages Hollywood Feather Fashion paper; Prima Alabaster Roses, Trellis Roses white, and pink rosebuds.
Other: Feathers, string pearls, bling, fabric, lace, Tim Holtz – Ornate Plate, Sewing Room Die and buttons.


June – Sewing Box – color challenge modern retro chic


From Flamingo Scraps: Tim Holtz distress ink Broken China, stick pins, Glimmer Mist Tutty Fruity, and trim
Other: Sewing kit, frame, felt, beads, sewing ephemera, buttons, frame, and fabric


These boxes are gorgeous keepsakes, and are great for storing mini albums, or fill them with goodies for a friend’s birthday or Christmas present. Christmas will be here before you know it. Start planning now to alter one of these cute boxes for a special someone this holiday season.


Wednesday, June 29, 2011

JRR Hill Family -- Pink Paislee Butterfly Garden!

I am really fortunate to have lots of vintage photographs of my family.  And when I first saw the shabby elegant Pink Paislee Butterfly Garden Collection, I just knew it would be perfect to highlight some of my treasured old photos!

Supplies from Flamingo Scraps -- Pink Paislee Butterfly Garden patterned paper, Pink Paislee Butterfly Garden Metal Butterfly Charms (sold out), Graphic 45 Staples Stickers, Prima Bling, Prima Bronte Blooms in Powder Blue, Ranger Black Diamond and Cinnamon Stickles; other supplies -- miscellaneous bling, Martha Stewart Butterfly Punch, miscellaneous glittered alphabet


The elderly gentleman with the long beard is my great great grandfather, James R R Hill.  We haven't yet figured out what the two Rs stand for!  The man in the long tie and the woman with the braid on her blouse are my great grandparents, Arthur H. and Della Dutton Hill, and the little boy standing to the left of the pram is my grandfather, Arthur Milburn Hill!  James and his wife Nancy Knowles had 12 children!  Bless Nancy's heart, I have a portrait of her and she looks like she had 12 children -- she is nicknamed the Ugly Lady!


This detail shows the double mat, inked in Tim Holtz Distress Ink in Peeled Paint and a cluster of punched butterflies punctuated with the Metal Butterfly Garden Charm.


This detail shows one of the gorgeous images from the patterned paper that I cut out, inked in Peeled Paint Distress Ink, and highlighted with Prima Bling and stickles!


I loved working with the colors and patterns of the Butterfly Garden Collection and will be sharing another vintage layout in the collection soon!

Thursday, June 23, 2011

Guest DT Celina Matthews: Father & Son

To celebrate Father's Day this June (19th), I wanted to create a page of my husband with our son. My hubby is such a wonderful dad and although our son is our third child, there is a special bond between them. Maybe it's because he's our only son or maybe it's because he is my husband's namesake, but whatever the reason, they are very close.


When I saw this Webster's Pages Time of My Life paper from the Ladies & Gents Collection, I knew it would be perfect for this project. I then chose a coordinating paper (Webster's Pages Framed Beauty) to go along with it. The title letters are from my stash, which I colored with Lettuce Alcohol Ink.


I fussy cut the clocks from the paper and glued it over the second paper then added the rest of the Time paper to the other side.

That side of the paper is inked using various masks by Tattered Angels and Tim Holtz, and Distress Ink in Tumbled Glass. I then stamped clocks using various stamps from my stash and Distress Inks in Peeled Paint, Vintage Photo, and Broken glass. The turquoise and green trims are from Webster's Pages as are the flowers, which I misted using homemade mist of water, Distress Ink re-inkers in Broken China and Antique Linen, and perfect pearl powders. The sparkler stones are from Webster's as well. I then finished up the page with some faux stitching with a Sharpie marker.


More of Celina's work can be seen here on her blog!

Thursday, June 16, 2011

Guest DT Celina Matthews: Man and Wife

Hello! This is my first layout as a Guest Design Team Member for Flamingo Scraps and I decided to take it into consideration that this is the month of June; the traditional month for weddings, Father's Day, the start of summer vacation, and my eldest daughter's birthday.

From Flamingo Scraps: Pink Paislee Parisian Anthology collection patterned papers; Antique Linen Distress Ink; Prima bling flourishes and flowers
Other Supplies: doilies; lace; white Perfect Pearls powder; Recollections flowers; Petaloo flowers; Tim Holtz flowers; White Opal Liquid Pearls; American Crafts Thickers in LAX

For my first page, 'Man and Wife,' I scrapped a vintage photo of one of my great-aunts getting married in the early 1950's. I love the cut of her dress and her groom's tuxedo. I got the inspiration for this page from a challenge asking for a crème monochromatic color scheme with a twist of being vintage. When I looked for photos to scrap, this one screamed vintage and softer colors to me. The papers I used are from the Pink Paislee Parisian Anthology Collection, which I then inked with Antique Linen Distress Ink. I then placed some similarly inked doilies under the photo mat. The lace strips are from a roll of lace I bought at a big-box retailer that are misted with a solution of Antique Linen Distress Ink re-inker, water, and white Perfect Pearls powder.

The lace flower is also misted with this solution. The flower was made by sewing a straight stitch on one of the lace trim's edges and pulling the string to make ruffles then adding a pearl button for the center with adhesive. The rhinestone flourishes are from Prima which I cut into sections to use around the page. The other flowers are from Recollections, Prima, Petaloo, and Tim Holtz.


Here is a close up of the lace and the White Opal liquid pearls I added over the doilies and throughout the page.

The title letters are Thickers in LAX and painted with the same White opal liquid pearls to give them a softer finish. I also accentuated the oval frame on the paper with liquid pearls.

This was such a fun opportunity to create a page for my family's heritage album. I hope that it inspires you all!


More of Celina's work can be seen here on her blog!

Friday, May 20, 2011

Mama and Me -- Graphic 45's Once Upon a Springtime

I will be 55 this month!!!  Clearly, I was born before the advent of  all the modern technology that allows prospective parents to see their babies and even know their gender before they are born!  But I do have this --
a picture of my mother, in 1956, when she was pregnant with me!

This year for Mother's Day, I was at a loss as to what to give my mother, until I remembered that picture!  I knew at once that I wanted to share it with her and that Once Upon a Springtime would be perfect to present it!


(sorry for the glare on the photo!)

I used a chipboard page from a Maya Road Large Tag Coaster Album as my base.  Layers of the beautiful, soft patterned papers of the collection were inked with Tim Holtz Distress ink in Peeled Paint and Dragonfly cat's eye ink to define the edges and rounded corners.  Fabulous green Prima lace edged the chipboard base and formed the accent flower.  Miscellaneous glitter letter stickers spell out the title You & Me.

Mama was more thrilled than I could have hoped for -- she did not remember that she had given me the photo.  She said at once, "I was pregnant with you, I always wore that violet corsage and the doctor loved it."  Then she said, "Look how happy I was!"  It was a wonderful and memorable Mother's Day for both of us!

Monday, May 9, 2011

Deckled Edges

I always rip and grunge up the borders of layouts. But lately, I have wanted a fresh new look. Something that is a little more sophisticated, but still gives the feeling of an uneven edge.

Once again, **DING, DING** Inspiration from Prima. When I pulled the products for the layout below, all that luscious Prima packaging and its deckled edges SCREAMED "Duplicate Me".


So I went to my tool grave yard, and resurrected these gyms.


I used the scissors around the border of the backing cardstock, and along the border of the photo mat. After looking at this layout, I’m sure you will agree, these scissors could make a comeback.


From Flamingo Scraps: Prima Trinket Collection Madeline, Flocked Rub-Ons-Reflections, Delightful DayCollection- Hush and Splash, Say It In Crystals - Vintage Rose Smoke, Accent Gem Studs, Madeline Paper Collection Beautima and STE Marie, Lace bleached Interlaced, Butterfly Kiss Collection Madeline; Tim Holtz Distress Inks Vintage Photo and Aged Mahogany; Glimmer Mist Rose Tea

Other Products: Cardstock, Deckled Edge Scissors.

Next time you are making a card or layout, and I stress ONLY IF IT IS APPROPRIATE, experiment with the deckled edge scissors in your own tool grave yard.


Related Posts with Thumbnails