Showing posts with label Cosmo Cricket. Show all posts

Thursday, December 26, 2013

Cosmo Cricket Project Hanger - Maya Road Mini Album Valentine Ideas Product Reviews

Hi everyone! Hope you all survived the holidays in one piece. With Christmas behind us and a new year ahead, I thought I'd get ahead of my scrapping game and start on my Valentine Day projects. I plan on making a mini albums using the Maya Road Chipboard Scalloped Mini Album kits. But, since everything with me is a "process", I wanted to look at my pages and display them before putting them into the album. What better way than hanging them from the Cosmo Cricket Project Hanger ?


I love this item. I didn't realize just how big it was, and was thrilled at the size. So many things I can use it for that don't even apply to scrapping. I can see this being used with pics for grandparents or a Mother's Day gift as well. I covered the CB mini album pages, both sides, with paper from my stash. The scalloped heart in the middle, which is one of the album covers, is painted with Tim Holtz paint and can be special ordered by contacting Suzanne. If you haven't discovered these great paints, make them one of your new year resolutions. They rock! The wooden phrase, "Best Day Ever", is from the Fancy Pants Artist Edition and is also painted with TH. I had some blue tulle in my stash from a Websters Pages kit and tied it on the hook, just because I could. The albums will be featuring my grandsons, Gabriel and Ethan, so blue was fitting. As I make the pages, I will hang them for viewing, then proceed to putting them into an album.


AS you can see, this hanger has great size to it. I'm pretty sure that by the time I finish this post that I'll be heading back to my fave LSS, Flamingo Scraps to get a couple more of these so I can display a new page project each month, or Gabe's art work. This is a quick and easy project that looks awesome and is even better to receive.

Be sure to stay tuned for the completion of this adorable mini album. I don't usually make them, but I'm pretty excited over this and can't wait to see the finished project.

This Friday is our last F4 (Flamingo Four) post of 2013 so be sure to check that out. Let's not forget Tonya Gibbs and her ever inspirational Ustream  tutorials on the first Monday of each month at 8:30 p.m.EST.

To all of our Flock Followers, have a safe, happy, and healthy 2014 !!!

Kathleen

Tuesday, December 17, 2013

Santa's Southern Helper

Hey all!  It's Luann.  I don't know about you, but I have searching for fun and fairly easy decorations for Christmas on the internet, in magazines, and on TV.  I love to buy the special Christmas editions of magazines and wish. Today I have a decoration I was inspired to make by a Christmas oranament I purchased in July and a tutorial I saw in a magazine. 

First off let's start with the magazine tutorial.  Christmas trees made from Carta Bella Winter Fun and Echo Park Merry Christmas lines.  I just love these papers for Christmas.  I found the tutorial in the December issue of Martha Stewart's Living.  For the base I used a  Maya Road wooden spool and a craft stick. Cut a circle using a punch in 3 different sizes (6", 7", 8") and cut it in half. Then spraywith Heddi Swapp Color Shine in gold and tinsel. The stars on top are Cosmo Cricket Glitter Sheets. If you love glitter and hate the mess .....you want these! 
 I finally found a bell dome that would work and a plate charger for the base. Added a little moss, snow, and water (aka Cosmo Cricket Glitter Sheets).

I searched and searched around my scrapping stash and Christmas stash to find a few trinkets and Santa.  Did you see the Prima plane and camera? How about the wrapped presents? I found a tractor and a mini sewing machine to add to the presents.  The little sign is from Heidi Swapp Believe Ephermera.

It looks like Santa is getting ready to load his sleigh!  Oh!......What does my wandering eyes see?  A helper?

It's......It's......Flamingo Scraps' Flamingo - Pinky going out to deliver the Christmas goodies you ordered!


I had a wonderful time making this dome.  I hope you try your hand at one.
Here is a picture of the whole Flamingo Christmas dome.


Wishing you joy and happiness.

Merry Christmas and Happy Holidays!


XO

Luann

Friday, December 13, 2013

Chip Board Mini Album Christmas Banner

I love mini albums, but so far, I haven't been able to make one that I'd show anyone! I look at the numerous albums carried by Flamingo Scraps, wishing I could do them justice. Then, while driving, I had a brainstorm. It was so good it almost hurt. I'd make a Christmas banner for my doorway or fireplace using mini album pages! I chose the Maya Road Chipboard Mixed Scallop Triangle Banner Mini album because the openings for the rings were the right size and shape to use with a ribbon, making sure that I bought two so  more than one banner could be made, not to mention "Christmas" is a long word.


I used a wide variety of papers, inks, mists, and paints to cover the triangles with. Since I had some of the Echo Park Christmas paper leftover from my Christmas in July project and some 25th-Pine from the Ustream December kit, that's where I started. Before I forget, the Ranger Claudine Hellmuth Sticky Back Canvas and the Cosmo Cricket Glitter Sheets, which NEVER shed glitter, are AWESOME to work with. You could actually save some time and trouble by just using those. My letters are Tim Holtz grunge board and painted with TH paints. I outlined them with red and green Stickles so they would stand out.


I used red seam binding to hang my banner. My trims are from my stash, which would have come from the Flamingo Scraps Embellishment Grab Box as well as the Maya Road Scalloped Satin Trim - Cream and the Tu Tu Tulle in Cherry. I love the cream mini organza rose trims the Big Pink Bird carries, so be sure to check them out. The roses come in many colors, and they hold mists very well. Mine are green to match my holiday theme.The black and white "R" is actually the package of a Heidi Swapp epoxy sheet with Christmas buzz words if I remember correctly. Just goes to show that you can buy great things from FS and even use the packaging.


I made mini rosettes / medallions for embellishments for the bottoms of each section using the die from Tim Holtz. It's a great way to use up scraps, not to mention fun. If you need these or any other items you don't see listed in the store, contact Suzanne and she'll try to fix you up.

You could leave the letters separate and hang the them around your tree, not to mention make yo-yos out of the medallions for Christmas ornaments. Want more versatility with you banner? Make "covers" for it. Simply make triangles a bit bigger than the actual CB triangle, make a cover by stitching or adhering two of them together. Be sure to leave a little wiggle room. Decorate, then slide them over the CB shapes,use ribbon or twine looped through the holes on top, or make your own in the middle tied in a bow and you can reuse it over and over. Just slide everything off of the binding or whatever you use to hang it with.

Well, I suppose I need to get into gear and start decorating. Especially since I have all of these great projects  created with goodies from Flamingo Scraps !!

Happy Holidays from me to you !

Kathleen


Tuesday, December 10, 2013

Mirror Christmas

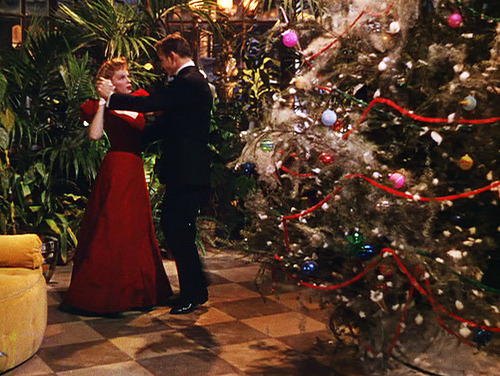
It's beginning to look a lot like Christmas - especially in the North!  They may just get a Bing Crosby Christmas.  Hey all it's Luann and yes I just aged myself.  I can hear the younger people say Bing who?  Please go and google Bing Crosby if you don't know who he is and what he is noted for.  Along those same lines....I love all the Christmas shows that are on this time of year.  One of my all time favorites is "Meet Me In St. Louis" with Judy Garland.  Esther's Christmas Ball dress is the inspiration for my project today.

I found a cute hand mirror at the Dollar Store and I just knew what I had to do.  I used Rub-n-Buff in Patina to tone the silver down.


Prima's Julie Nutting's Mix Media Doll Stamp was just the ticket. When I think of Christmas I think of glitter.  Yep, just the right paper was Cosmo Cricket Glitter Sheets in gold and red to make the dress (look how tiny her waist is).  I colored Esther's face, arms, and hair with Copic markers.  I used my Prima chalk edgers around all the edges. I scanned and made two copies of  Esther (the paper doll).  One was a copy and the other was a reverse copy. I layered the paper dolls and used pop dots to give her dimension.


The flowers were from my stash and touch of  Heidi Swapp Color Shine in gold added a little twinkle.  The little door is a Prima Shabby Chic Treasures sprayed with gold shine.  The crown was made from Mod Podge Crafts and colored with Tim Holtz Distress Paint. You can't go vintage with out a Cameo Stick Pin from Webster's Pages. The little buttons came in my Flamingo Scraps Warehouse Sale Embellishment Box and added a little extra. The rose button is from Glitz. Roses at Christmas are magical.  The little bird and other stick pin are from my stash.


Now for a look at the mirror side. (I was impressed I didn't get a reflection of the ceiling.)


If you have trouble locating the items I used on Esther's Christmas Ball Mirror just give Suzanne a shout via e-mail.  I can honestly say that Suzanne knows the meaning of customer service. You should stop by Flamingo Scraps...there's a fantastic sale going on.

Before I leave I wanted to show a picture of Judy Garland as Esther in her Christmas Ball gown.  I hope you get a chance see "Meet Me St. Louis".


Picture from media-tumblr-google


 Until next time...Enjoy everything about the Holidays! The shopping, the eating, and the best of all being with friends, family, and loved ones.

Luann


Monday, December 9, 2013

Baby in Fancy Pants

Hiya Flock, Genie here.  I've got another blast-from-the-past layout for you today.
This little cutie is now 10 years old, and about 4" shorter than moi.  She's still that cute, though.  ;)
I started with a sheet of kraft paper.  I love the Fancy Pants Corrugated Paper, and decided to play with its texture a bit more by ripping it.  LOVE!  I have really been into layering lately, and used a few sheets from the Fancy Pants Collecting Moments 6x6 Paper Pad and the coordinating Brag Pad.  I kept on with my ripping theme for one of the lower layer pieces.  I liked how the color tied in with the ripped corrugated (see how I did that?)  ;)  All of the unripped paper edges were inked with a medium gray chalk pad.

(omg.  Would you look at that baby face??)
I add some wood embellishments from Prima, Maya Road, Cosmo Cricket, and some teeny stars from my stash.  I completed the layout with a gorgeous oval frame (Webster's Pages, something you might find in a Flamingo Scraps Combination or Embellishment Warehouse Box!) and some Thickers from my stash.
Thanks for looking, and I'll see you next time!

Tuesday, December 3, 2013

Merry Christmas Layout

Last December, my friend took these wonderful pictures of my boys (plus some of me, my mom, and my daughter) when they were a week away from being 3 and 7 years old.  I just fell in love with the head shots of both boys, but could never find the inspiration to create a layout with them, until now!!


Putting pictures in Polaroid frames is huge right now, so I could not resist playing around with the idea and with the Maya Road frames.  My pictures were not the correct size, so I added a paper border inside and then added their names below.  I also wanted to try out my new circle punch (it made the doilies behind the pictures).  I then added in my own layers and clusters for lots of dimension and fun.  You can also see Heidi Swapp's file folder tucked in the layers!!


Here you can see some twine looped around to make a fun flourish behind the Prima flowers.  I then added in a fun charm, which is all stacked up on top of Fancy Pants chipboard, and Basic Grey 25th and Pine die cuts and paper.


Here you can see some I stamped on the May Road Chipboard  after painting it.   You can see Cosmo Cricket wood stars, Prima lace,  and some of my paint splatters and circle marks I made with Heidi Swapp Mists (here is a link to the tutorial on how I make them).

Supplies can be found at Flamingo Scraps - head on over to see them, lots of great sales to be had!!

Supplies used


Wednesday, November 20, 2013

Christmas Fish Bowl Mantle Lantern

Hello fellow Flocksters! It's me, Kathleen, with a new project idea for the holidays. I try to think of simple, quick project ideas that look very detailed, but aren't, since I'm sure that many of you, like myself, have busy lives. It's not easy to fit all those crafty  projects into everyday life while trying to juggle getting kids ready for school, work, homework, being a taxi service, and anything else life has to throw at you. This was pretty simple, once I decided what I wanted to do, and it can be changed for other holidays and events very easily. Personally I thought I was pretty creative on this one! I can't wait for my guests to see him on my mantle for the holidays !


 After I got my shop on at Flamingo Scraps, I headed to our local Dollar Tree for glass vases, a candle holder, and some battery operated tea lights. The marbles are from a previous fish tank, and the gems in the vase with the light are from my Flamingo Scraps Warehouse Grab Box - Embellishments, and I believe they are a mix from Prima and Maya Road. The red trim on the bottom is Maya Road Tu Tu Tulle in cherry red  and the cream colored satin scalloped trim is also from Maya Road. I used the green gingham fabric tape from my warehouse box to cover the side of the tea light, as well as the top of the fish bowl, just below the brass tape along the upper rim. Be sure to check out the other fab trims that will work equally as well from Maya Road and Websters Pages.


Before I put the fish in, I set up the bottom vase with white marbles and green stones, since I knew I was going to use a red fish in keeping with the Christmas colors. I decorated some Prima Christmas wood icons to fill in the front as I thought it looked a bit empty,other than the marbles. Contact Suzanne for those little bits of yumminess, as well as the latest Tim Holtz pens and paints I used to color them with.I pulled some bling from my stash to decorate the tree.  I used ATG tape, 1/4", to adhere the tulle trim, and did two layers of it for a fuller look, then the mini organza cream roses that I dyed green. The ATG allows me to remove the trim at a later date if I want to decorate Mr. Fish III's tank for another holiday. My grandson, who insists on naming my car, refuses to give our fish any other name. Maybe he'll change his name when he sees this one!


. The Cosmo Cricket mini mobile and show toppers are the greatest thing since indoor plumbing! They come in green or white with different style tops. Don't like green or white? Get white and paint it another color. It's just that darned easy. So many little goodies you can hang from them. The pearl drop decor and crystal gems on the bottom are once again from "THE BOX" so click the link!! I'm telling ya, if you haven''t gotten one of these boxes you're really missing out! The pearl and bling trim is from my ever growing stash. I'm pretty sure I'll ordering more of this satin trim. It's pretty awesome.


The adorable little trees are Fancy Pants Tiny Bottle Brush Trees-Traditional and are also available in Retro colors as well. There are six in a pack so you can get more than one project from them


This is my finished project. Mr. 3, as I am now calling him, seems quite happy with his new home. Pretty sure it beats the heck out of that tiny plastic container he was in at the store! Now, if I can just keep him out of reach and sight of the huntress, Lulu, our youngest cat.

Well that's it for now faithful flock followers. Remember...." BOX" !  Make a scrapper in your life happy for Christmas or a birthday. You can create a beautiful gift basket, or two, out of one of these. You can get a combo (embellies & paper), paper only, or just embellies. It's a win win for sure.

HAVE A SCRAP-TASTIC DAY !!
KATHLEEN

Tuesday, November 19, 2013

What's in the Match Box?

Hello,

It's Luann with the answer to the question you all are just wanting to know. What is in the Match Box that I blogged about on October 2nd.  Did you see the clue?
http://flamingoscraps.blogspot.com/2013/10/anyone-have-matchbox.html


Did you guess.....


Yep, bathroom tissue roll centers. (My husband kept asking why I was saving them!) Ever since I saw Arlene's Butterfly Kisses blog where she made a mini using them, I wanted to give it a try. BTW:  Who knew that they come in  different sizes?

I squished the rolls in half and used my bone folder to help crease the edges. I put them under a very heavy book for a few days.  I painted the outside and about a fourth of the way down on the inside using my Tim Holtz Black Soot Distressed Paint. I added a couple swipes of the Bronze and Broken China to break up the black.  Then I used a little Heidi Swapp in gold to make them sparkle. I also used Prima's Chalk Edger for added color.  Next came the grommets.  This was fun!


Then on to decorating the mini album.  Keep in mind that to fit in the match box you should use flat embellies.  Also, this is another way to use up your scraps.  I used the scraps from Theresa Collins Now & Then and Carta Bella Winter Fun for the background and journal cards.  For the embellishments I colored up Prima Wood Icons, Tim Holtz Idealology, Mod-Podge Molds, Prima Flowers, Cosmo Cricket Glitter Sheets (I used as the tabs for the pull out journal cards.), stash lace, binding tape, stash items, and charms. 


And here is the complete project! 


I know that my snow family is glad I got replaced the matches!


Until next time! 

Luann


Note:
Got the fun inspiration for my snow family from Bitz of Me blog (Suzanne Dean).


Wednesday, November 13, 2013

Fun uses of wood - Life is Good - layout

My sweet son Morgan started off 2rd grade two weeks late and at a completely new school (as we just moved).  He started off a bit rough, but he is now loving his new school, has great friends, and never even asks about his old school or house any more. Doesn't this kid take great pictures? I know I am a bit biased as his mom. Hehe.


I used the wonderful kit Hey Kid from Pink Paislee for the stickers and patterned paper, plus some other fun little bits and bobs. I used lots of ink and mists from Prima and Heidi Swapp to create the ring marks, spots, splatters, and sprays.  It just gives your layout such great dimension by adding in some great texture. 


Don't you just love this Fancy Pants wood title - it works with so many projects!!  I even took a Prima dot stamp with some Prima ink in light brown to give it texture.  I also used other little bits of wood items (stars and arrows) from Cosmo Cricket.  Plus you can see a little of the Corrugate paper from Fancy pants in grey peaking out!

You can find most of these supplies used for this project at Flamingo Scraps!!  Plus don't forget about the awesome warehouse box sale going on, tons of goodies stuffed into shipping boxes for a great low price - make a great present!!

Supplies Used
Cardstock -American Crafts
Patterned Paper - Pink Paislee
Corrugate Paper - Fancy Pants
Stickers - Pink Pasilee
Die cuts - Pink Pasilee
Mists - Heidi Swapp
Ink - Prima
Wood - Fancy Pants and Cosmo Cricket
Twine - other
Metal/Staples - Tim Holtz
Punch - Martha Stewart
Stamps - Prima and EK

Enjoy!!

Tuesday, November 12, 2013

Beautiful Packaging for Gifts from the Kitchen!!!

I'm trying so hard to start Christmas preparations early this year!  I'd like to break my cycle of waiting too late and frantically finishing up gifts at 2am Christmas morning!!  I'm especially glad to show you this project as nearly all of the supplies come from Flamingo Scraps!!!


Here's what you will need --


In stock at Flamingo Scraps --
Special Orders from Flamingo Scraps --
  • Tim Holtz Distress Markers
  • Tim Holtz Distress Paint
  • Ranger Liquid Platinum Embossing Powder
  • Tim Holtz Distress Embossing Ink
From Your Stash --
  • Large Eyelet
  • Safety Pin
  • Charm
  • Small Paper Doilies
  • Baker's Twine
  • Cropadile
  • Heat Gun

First, trim the handles off of each chipboard jar.  Paint both sides of your jars with Tim Holtz Distress Paint in Weathered Wood -- these will dry pretty quickly.  Ink the edges with the brush end of a Tim Holtz Distress Marker in Stormy Sky.


The Basic Grey Give Credit Stamp Set is a must have -- there is a stamp for every instance from "Crafted By" to "Photo By," and they are really well made.  I used the "from the Kitchen Of" and got a really clear image every time.  I stamped each jar using Distress Embossing Ink and added the Liquid Platinum embossing powder.  A blast with my heat gun finished the label.  I then folded a paper doily  over the top of the jar, gently gathering the border.  I found it easiest to put a rubber band around the top to hold the doily in place while I tied on the seam binding.  And here's a little secret about seam binding -- the crinkly ribbon everyone loves so much -- it is seam binding that has been wadded up, slightly moistened with water, and shaken out when dry!  I like to set an eyelet at the top of the jar for the baker's twine to guard against tears and fraying.


Finish off your tag with a charm and your name!

I couldn't resist combining the mason jar tags with the Show Toppers from Cosmo Cricket for a gift that lasts after the goodies have been eaten!


Thanks so much for stopping by!  The FAB Flamingo Scraps Design Team will be posting projects everyday to inspire you to create!  And don't forget the December Daily from the Tonya LIVE!! Ustream class -- craft along with Tonya and make good on that resolution to finish your December Daily this year!!!!


Tuesday, November 5, 2013

My Little Love

Hi, Flock, Genie here, today!
I recently received part of a Hey Kid kre8v Kit by Pink Paislee.  It is so much fun!  There are so many cute pieces, and the patterns are so bright and trendy.  It's perfect for my little girls!
I chose a photo of my littlest imp; it's one of my favorites because it just captured her 2-year-old self perfectly.  She's sweet and sassy, and the mischevious little grin says it all.  A complete list of supplies can be found at the end of the post.


I wanted a neutral base because the colors and patterns were so bright, but white, black, and kraft didn't seem right.  I finally found this bluish-grey, and I think it's perfect.  I fussy-cut along a line of circles in one of the sheets of patterned paper and layered cardstock stickers, another fussy-cut border, and some transparent arrow stickers over that.  I didn't like the unrelieved grey, so I splattered a big of gesso on the left of the page.  I love how gesso dries; it's solid white, like paint, but it maintains some dimension.
On the top left, I used more cardstock stickers, one of the cute chipboard pieces, and a cardstock speech bubble.  I wanted a bit more dimension, so I added some stars and arrows from the Wood Charms by Cosmo Cricket and the Cork Shapes (Hearts & Stars, Arrows) by Fancy Pants.
Thanks for looking, and I can't wait to see you next time!

Products used:
Fancy Pants Cork Shapes, Hearts & Stars
Fancy Pants Cork Shapes, Arrows
Cosmo Cricket Wood Charms
Pink Paislee Hey Kid kre8v Kit
cardstock, gesso, and adhesive from my stash

Friday, October 4, 2013

What Goes With What?! Marion Smith Designs!


Have you seen the latest goodies at Flamingo Scraps?!?!?!  Fancy Pants and Pink Paislee and Marion Smith, Oh My!!!  Today, I want to bring back a feature I have always loved that we call What Goes With What!!  Here at Flamingo Scraps, we love mixing different lines and What Goes With What is designed to highlight items which compliment each other, but are not from the same collection.  So here goes -- What Goes With Marion Smith's Mad Tea Party and Nirvana!!

First, here are the GORGEOUS collections designed by Marion!!
Marion Smith Mad Tea Party

Marion Smith Nirvana
Marion Smith Stamps  Of course, the FABULOUS stamps by Marion go with the papers!

Here are just two examples of the FabScraps chipboard that compliment the images in the collections.

FabScraps Chipboard


These adorable project hangers, well they go with anything!!
Cosmo Cricket project hanger
The Cosmo Cricket Glitter Sheets are compatible with nearly every die cut system -- how about a clock or doily in glitter!  Christie Tomlinson's Doily Rubons by Pink Paislee are too perfect!


Christie Tomlinson Doily Rubons


These Tim Holtz dies are both new releases and can be special ordered from Flamingo Scraps -- contact Suzanne at flamingoscraps@yahoo.com or suzanne@flamingoscraps.com

Prima Wood Icons

Maya Road Chipboard

Maya Road Keys

Top Hat

Wendy Vecchi bottle

Prima, Studio Calico, and Cosmo Cricket wood veneers are charming additions, and Maya Road and Wendy Vecchi items are just perfect touches!

How do think we did??  Thanks so much for stopping by -- let us know what you think goes with what!!

Related Posts with Thumbnails