Showing posts with label Webster's Pages. Show all posts

Monday, December 23, 2013

Resin me this...

My last box of Flamingo Scraps goodies brought me a new toy, and I was like a kid on Christmas morning when I finally got all moved in to my new studio and ready to scrap! It's been a while since I've actually got to sit down and do something creative, and I have a lot of lost time to make up. First and foremost, I decided to play with my new Mod Podge Mod Mold and Mini Mod Melts. And let me tell you, did I ever play!


First, let me tell you about the molds. They are available via special order. All you have to do is email Suzanne and flamingoscraps@yahoo.com and she can order any of them - they have 4 to choose from: ornamental, flowers, nature, or royal icons. I ordered Ornamental and I really wasn't disappointed with what I received!


There was a slight learning curve to creating your own resins. First, you definitely need a decent high-temperature hot glue gun. Mine was a cheapy, and I struggled with it a bit. Once I figured out what to do, I didn't have any problems from there! I made each of the mold items in each of the two Mod Melts availabe, Milk Glass White and Beach Glass Clear. I had the most trouble with the Beach Glass Clear, but the Milk Glass White came out near perfect! Here are each of them, side-by-side.


The best part is that these are customizable! You can ink them, paint them, mist them to your heart's desire. And, the other part, is that these aren't typical of resins you would buy from the manufacturers that Flamingo Scraps also carries, like Melissa Frances, Wendy Vicchi, or Marion Smith. These are a little more rubbery and flexible like any hot-glued item would be. After about 24 hours of sitting, they do harden a bit more, though, so if you want less flexibility it is best to wait and let them fully cure. My favorite and the easiest to work with was Milk Glass White. I had trouble getting Beach Glass Clear to a high enough temp that it went into the mold well, but my high-temp hot glue gun seemed to struggle to get hot enough, so that could be the problem!

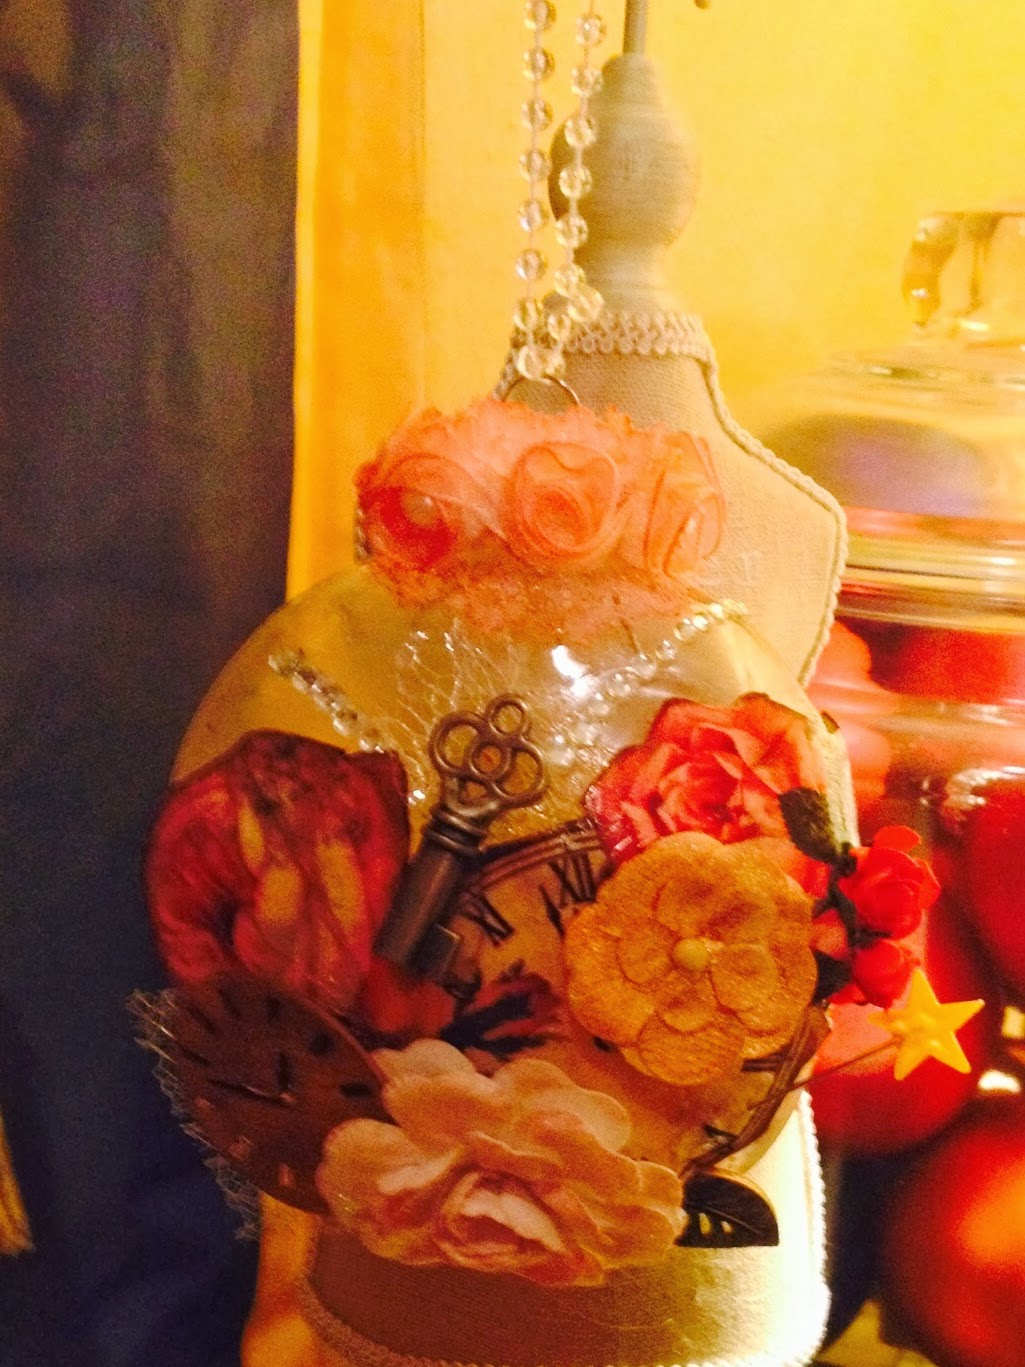
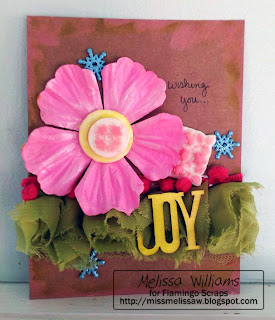
And in case you were wondering what you could do with these itty-bitty-pretties, here is a project to feast your eyes upon!


Products used:
Mod Podge Mod Melts
Mod Podge Mod Molds
Prima Chalk Ink

Until next time,
Keep scrappin!
Melissa

Friday, December 20, 2013

Ornament Duo

Here how to make these wonderful clear plastic ornaments in to a handmade work of art for you tree.


 The first thing you need is a clear glass or plastic ornament, then you let your imagination soar about what you create, fill, wrap, or decorate it with.


Bottle Brush Tree Ornament

In this tree I used the super cute bottle brush trees from Fancy Pants and some wonderful flowers from Prima.


First you add a tiny blob (yes that is an official term, hehe) of fast drying clear glue (like ZipDry) to the bottom of each tree and place them into the ball.  I used tweezers to help place the tree.  The trick is to let one tree dry and hold fast before adding in the second tree or anything else in the ball or they just fall over.  patience is key here.


 Now that your trees are dry I added in a bit of angel dust with make it look like the were nesteld in snow (it is like thick glitter or even glitter would work).


The I created a cluster of flowers from Prima from the wonderful Warehouse Boxes that Flamingo Scraps is offering (on sale too) and wrapped it around the top of the ball.  I then added the top hook of the ball back on (I glued it so it would not pop off and glitter would get everywhere), added a bow to cover up the topper, and strung up the top with a silver ribbon to hang on my tree.


Embellishment Ornament

Here I stayed with a single color of blue (in various hues) and created a ball of wonder, a fun little search and find ball for my kids full of odd bits and pieces from my scrapbook stash (left over from the Flamingo Scraps warehouse boxes).


Here is the stash of items I used to fill the ball.  I used buttons, flowers, charms, sequins, plastic bits and bobs, petals, and other fun items that would fit into the ball from left over projects and from Warehouse box items.


Here you an see the flower cluster I made prior to attaching it to the ball.  I took little flower buds on wire and threaded larger flowers under it.  I then took the wire stem and wrapped it around the top of the ball to secure it.


I then took ribbon and wrapped the top to cover the wire stems from the flower.  Then attached the ornament topper, added ribbon to string it up, and poof you have a wonderful search and find ornament ball.


Here you can see even more goodies, and as you shake it more items appear!


Supplies used can be found at Flamingo Scraps
Ornament ball
Flowers - Prima and other
Ribbon -Websters
Bottle Brush Trees - Fancy Pants
Embellishments  -Flamingo Scraps

Enjoy!

Monday, December 9, 2013

Baby in Fancy Pants

Hiya Flock, Genie here.  I've got another blast-from-the-past layout for you today.
This little cutie is now 10 years old, and about 4" shorter than moi.  She's still that cute, though.  ;)
I started with a sheet of kraft paper.  I love the Fancy Pants Corrugated Paper, and decided to play with its texture a bit more by ripping it.  LOVE!  I have really been into layering lately, and used a few sheets from the Fancy Pants Collecting Moments 6x6 Paper Pad and the coordinating Brag Pad.  I kept on with my ripping theme for one of the lower layer pieces.  I liked how the color tied in with the ripped corrugated (see how I did that?)  ;)  All of the unripped paper edges were inked with a medium gray chalk pad.

(omg.  Would you look at that baby face??)
I add some wood embellishments from Prima, Maya Road, Cosmo Cricket, and some teeny stars from my stash.  I completed the layout with a gorgeous oval frame (Webster's Pages, something you might find in a Flamingo Scraps Combination or Embellishment Warehouse Box!) and some Thickers from my stash.
Thanks for looking, and I'll see you next time!

Friday, December 6, 2013

Mad Tea Party Jewelry Hanger using Jenni Bowlin Hotel Key Holder

Ramona here sharing with you a Marion Smith Mad Tea Party Jewelry Hanger using Jenni Bowlin Hotel Key Holder. I had so much fun making this hanger with all the extra's from the paper line. The 12X12 has sold out from Flamingo Scraps. But, you can ask Suzanne if she could order some for you. I have added a tutorial at the bottom to show you how I transformed this Key Holder.

Here is the full project view
Here I fussy cut the 10/6 out and added feathers,Glossy Accents and a Webster’s Pages Heart Cameo Push Pins
Here I fussy cut and added Glossy Accents, added some chain from my stash, Maya Road Trinket Pins Pearl Flower
I used Tim Holtz Distress Glitter on this heart. I so love the way it looks.
I also added various tags to the bottom that I can change when I want to.

For this I have gone step by step showing you how I altered this project using the Jenni Bowlin Hotel Key Holder


Here is how I split up the Ruffled Bloomers
Webster’s Pages Ruffled Bloomers — Teal

And how I adhered the paper cut outs to the chipboard and making sure you add it on top of the paper to seal it.

Products used
Seam Binding – Red
Seam Binding – Mimi Brown
Seam Binding – Black
Maya Road Wood — Bird Cage Pieces
Prima Chalk Ink Edgers
Claudine Hellmuth Studio Kit: Mediums
Tim Holtz Distress Paint
Lindy's Stamp Gang Cream Brulee and Hootie Potottie Hot Pink
Studio Calico Wood Pieces
Tim Holtz Distress Ink-Vintage Photo

Some of the stuff that I used on this can be found in the Warehouse Boxes.
Flamingo Scraps Warehouse Sale Box — Embellishment Box
Flamingo Scraps Warehouse Sale Box — Combination Box

As I said above if you see something that I have used and can not find it in the store. Contact Suzanne and see if she can get it for you.

Happy Scrapping!!

Wednesday, November 27, 2013

Getting into the Holiday Spirit

Happy Hanukkah!

It's Luann in the frigid south Texas!  The cold is putting everyone in the Holiday Spirit and I hope the cold (30's & 40's) stays around 'till Christmas.

Being in the Holiday Spirit myself, I thought I would share with you a couple of Holiday ornaments.  Since it is Hanukkah, I found a dreidel that I could make out of paper.  I used the Carta Bella Winter Fun and Echo Park Paper Merry Christmas.  This would be a great project to do with kids and a way to use up some scraps.


I love decorating for Christmas (I wait until after Thanksgiving, though).  I also love to make ornaments to add to my tree and give away.  I used the plastic flat ornament for these.  The first one I started out with Marion Smith's Tea Party and fussy cut the roses and clock.  Then I layered using Prima wood embellishments, bling, and flowers.  I threw in a Tim Holtz key, May Road Star Trinket and stash ribbon.


The second ornament I used a clip art picture of Santa.  I Modge Podge the picture to cardboard.  I used the Antique Matte Modge Podge to help give the aged look.  The little tree is from Fancy Pants. Isn't it the cutest? Heidi Swapp Believe Ephemera helps with the layering. Vintage (since it's been in my stash for a while) Webster' Pages Christmas charm and ribbon add just the right touch.  I sprayed the cotton lace with Heidi Swapp Color Shine to match the Fancy Pants tree.


Ohhhh.....I forgot to mention.  Don't forget to decorate the inside.  I used some netting scraps, glitter, and sequins.  FYI:  Do not use your hot glue gun on the plastic ornaments.  I learned the hard way.


Wishing you a fantastic Thanksgiving and a safe one.  Now I'm off to get some hot cocoa to warm up.

Until next time....

Luann

Friday, November 1, 2013

My Favorite Saint

Happy All Saints Day!

Hi all! It's Luann, with a scrapbook layout of my favorite saint....My Mama.

When I saw the Mad Tea Party by Marion Smith Designs, I knew I had to use it with the picture of Mama when she was 14 years old. I've seen the layering technique being used for layouts and thought that I'd give it a try.

 I used the Roses R Red for the background then cut Spot Of Tea down about an inch or so for the second layer. I distressed the edges and added Prima Chalk Edger in Shabby Tote. White card stock was cut down and punched with a Martha Stewart edge punch to make it look like a doilie.  

I added a strip of Teresa Collins Now and Then Damask paper because Mama liked blue and it added  a little something. Again I distressed the edges and Prima Chalked it.  I used a Heidi Swapp Color Magic Paper Frame and sprayed with Heidi Swapp. I used a Webster' Pages charm that I had in my stash for the era of the picture. I also added some vintage ribbon and flat back pearls. The other elements I had in my mess...I mean desk, and thought the would look good. It also helped a little in using some of the stuff in my desk.


I tore an old sheet music paper, and chalked the edges. The other ephemera is a digital from Marion Smith. I colored some roses with spray from my stash, and printed the photo of Mom onto
4 x 6, glossy photo paper.


I love the look of the layering, Don't you? You can add as many layers and you like. Now my only decision is do I put this into a frame, onto a canvas, or into my scrapbook. So many options !


Until next time, when I'll show you what's in my match box !

Luann


Wednesday, October 30, 2013

Mixed Media Gifting

Hey, Flock!  Genie here, and I'm starting to think about making Christmas gifts for my friends and family.  I probably should have started months ago, but I guess I'm just not that prepared.  ;)
If I can bear to part with it, this mixed media wood block will go to one of my aunts.  I come from a very crafty family, and we have quite a few talented sewists.  This idea has been bouncing around in my skull for a while, and the lovely colors in the Webster's Pages Spring Garden collection that came in my Flamingo Scraps Combination Warehouse Box were just what I needed to bring it to life.  A complete list of products used will follow.
 
 
I started with a 12x12 wood block and haphazardly placed a few pieces of an old pattern on it with Mod Podge (when I use a pattern up, or lose pieces, or whatever, they go into a drawer to be used in mixed media--I love the look!).  I tore a few pieces of the Webster's Pages and added those right on top, working them into the patterns for a lovely blend.
 
 
I mixed some teal Color Shine mist with some of the Mustard to make green, which I splattered on the Maya Road chipboard pieces with a paintbrush and then spritzed lightly on the surface of the patterns and papers.
 
 
It took some work to get the gorgeous, amazing, lovely, fabulous...(Oh, how I love those Webster's Trims!!) on the page, but with time and a LOT of Mod Podge, they stuck.  ;)  I wrapped some twine around my chipboard spools, stuck those down, added my text, and a Webster's fabric flower, and I was done.  I really love the simplicity and muted color palette of this one!  Thanks for looking, and I'll see you soon.  :)
 
Items used:
From the box, I used some lovely Webster's Pages papers, trims and twine, from the Spring Market collection.
From my stash:  alphabets, wood block, pattern pieces, and art mediums.

Thursday, October 24, 2013

Mini for Mia, Maci, their Mama and Me

Today I have used the 6 x 6 mini pad from Rondelle by Prima from my Warehouse Box available from Flamingo Scraps Pink Bird Bargain Bin. I have chosen to do a chipboard mini album from Maya Road, also in my Warehouse box. You may or may not receive the exact items, but they boxes are loaded with product and will certainly inspire you to create awesome projects! Here is the cover of the mini. Diamond paper was fussy cut around diamond shapes, Say It In Crystals, black, trimmed and added to surround Cameo Tutu embellishment (more details below for cameo and journal ticket).


I started by painting the bare chipboard album with Tim Holtz Distress Paint in Black Soot (available through Flamingo Scraps, special order by contacting Suzanne)
I found it best to allow the paint to air dry, rather then try to help it along with a heat tool, it produces a smoother and more matte finish. I only painted the outside edges knowing I was covering the inside and outside with patterned paper.


I also painted the outside binding, and wanted to cover the rivets holding the three ring binder. I used TH Spun Sugar to paint the white flower trim. Before adhering the pink flowers, I formed a circle of Webster's Tutu trim on the binding to go under the top flower.


From a piece of vintage sheet music I cut a rectangle frame to surround the binder mechanism, glued it in place and dabbed a little more Black Soot paint to blend it to the inside cover, shown on left. 


The inside pages came next, painting with the TH Distress paints. 
L - R Forest Moss, Bundled Sage, Spun Sugar, Victorian Velvet.
The three on the left were still in the drying process, the far right had already fully dried.


Waiting for the paint to dry before adhering the patterned paper to the inside pages, I started working on the embellishments, I used a cameo from my Warehouse Box, dabbing a little Distress Paint on the raised edges to highlight the raised edges, and lightly added some lighter pink to the outer edge. left is untouched. Below is a before and after.


From my stamp stash I embossed a doily stamp on a vintage sheet music page. To mimic the shape of the doily stamp, I stretched the a square stamp into a diamond shape on an acrylic block and embossed this in black also on a piece of the Rondelle paper. (see next photo for comparison)


Stamp as is from carrier sheet.


Stamp stretched and formed to patterned paper under acrylic block.


Journaling block stamped with TH Distress Paint in Forest Moss.
As you can see, paint was on more than just the detail of the stamp, put it did not transfer to the final image.
(Tip: wash your stamp immediately, it dried very quickly when applied thinly!) This was cut out and added to the pocket on the front cover of the mini album.


Inside front cover and first page, embossed doily stamp on music sheet and inked with Tim Holtz Distress Ink, Tattered Rose.


Detail of first page. Fancy Pants Bulb Safety Pin with Tim Holtz Baubles attached to top ring of binder. Detail of embossed doily on vintage music sheet. and Webster's Tutu trim pouf. 


Piece of Webster's Tutu trim threaded through center hole on inside page, glued into place on front and back. All tulle was pulled through to the front, leaving a tail to be glued onto the back.


Inside pages of the remainder of the book, awaiting photos and additional embellishments from a recent photo shoot of two of my Granddaughter, my Daughter in Law and myself just before I moved away from them in NY. I just received the proofs via email last night, excited to get them in the mail! All papers were cut to size, corners trimmed by trimming rounded corners using chipboard as template, edges distressed and then glued into place. Tattered Rose ink used to add a little dimension to each page.


All products used have been listed in the description except stamps were taken from my stash.

Thanks so much for spending a little part of your day with the Flamingo Scraps Design Team today. We love creating for you, and we're always available to answer any questions you might have for any of us!!! Have a great day & Scrappy Smiles! Donna Sullivan aka paperfusionarts 


Related Posts with Thumbnails