I rarely scrap a picture of me, but last Christmas Eve we had
professional pictures done and this was one of the gems that came out of
it. I love this picture of my husband and I as we are truly this happy
together, married for 11 years this last November and I miss him so much
every day that he is away in Afghanistan.
I used various punches and layered them to give an ethereal look this to this layout, just really played and had fun with it.
I
used a mask, mixture of white paint and Snow writer by Decoart, inks by
Prima, and some spray mist (Clam Bake by Tattered Angels) to create
this texture on my paper. The snow writer has a grainy texture so it
looks fabulous when it dries. You can even see a little part of a Heidi
Swapp sticker in the top right corner.
For
the zipper flower I used the Maya Road zipper trim and used a rolled
technique to make it into a flower, I then placed two Maya Road trinket
pins in the center. I clustered this with some wonderful Prima flowers
and a cute little birds nest.
To buy most of these wonderful items please visit Flamingo Scraps.
Products Used
Cardstock
Patterned Paper - Teressa Collins
Flowers - Prima
Die cuts
Ink - Prima
Mist - Tattered Angels
Stickers - Heidi Swapp
Trim - Maya Road
Pins - Maya Road
Metal
Punches
Chipboard
Mediums - Ranger
Mask - The Crafters Workshop
Enjoy!!
Erin Reed
Thursday, January 31, 2013
Tuesday, January 29, 2013
CD Case Mini Album
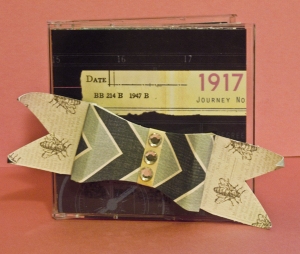
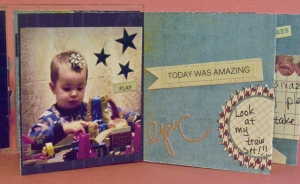
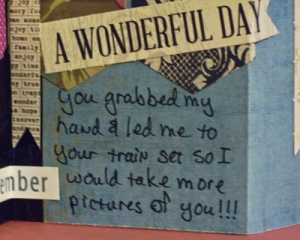
Abigail here to share a really different kind of mini album. I had some really cute pics of my nephew of the day he got his new train set and wanted to make a mini album. I also had a mini plastic case that came with some scrapbook journaling tags in it. It sort of resembles a CD Cover, but it's much smaller. I had it sitting out on craft table and it hit me that I could make an album with it!
I used some Heidi Swapp No Limits Paper to insert into the front section of the case. I also made a bow out of Teresa Collins Now and Then paper.
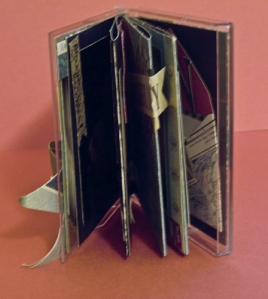
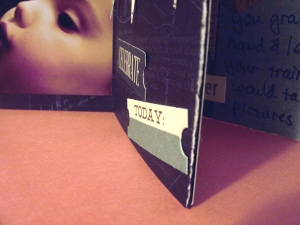
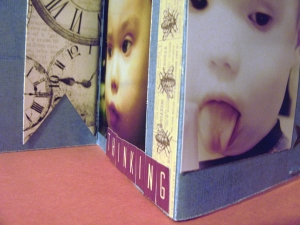
Here's a side view of when you open it slightly.
When you open it up more the accordion fold starts to pop out. I made this part by cutting the rest of the Heidi Swapp No Limits paper into long strips (about 3 inches wide to match the size of the case) and adhering them together and then folding them to fit neatly inside the case.
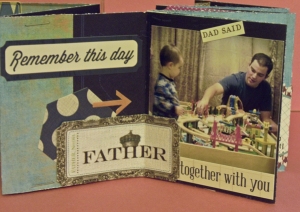
This is my nephew and his dad playing with the new train set. I love the stickers from the Teresa Collins Now and Then collection. The sentiments are great for family time photos.
He loved his train set and the wrapping paper, lol!
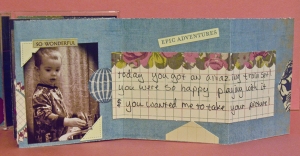
This journaling sticker from the Teresa Collins Now and Then collection leaves plenty of room to write up a cute story!
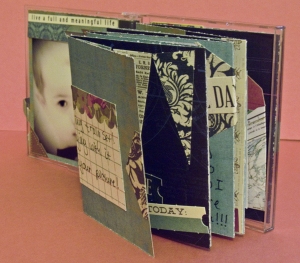
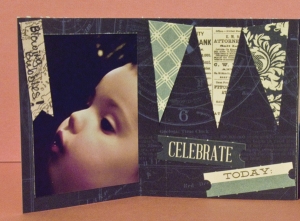
The colors and the pattern on the Heidi Swapp No Limits paper is perfect for little boys. These cute die cut pennants and tabs from the Teresa Collins Now and Then collection also coordinate well with the paper.
I love how mini books are so intriguing. It's like all the layers and pages are begging you to look thru them!
Sometimes journaling can be done right on the paper!
I love how versatile the Teresa Collins Now and Then collection is. These embellishments are neutral enough to go with any color scheme, yet they are timelessly elegant in true Teresa style!
If you would like to recreate this look please visit Flamingo Scraps Facebook page and blog for ordering information.
Please Pardon Our Dust!!! Flamingo Scraps is Growing Again! Stay Tuned For Our Updated Site and NEW Products!!!!
If you would like to recreate this look please visit Flamingo Scraps Facebook page and blog for ordering information.
Please Pardon Our Dust!!! Flamingo Scraps is Growing Again! Stay Tuned For Our Updated Site and NEW Products!!!!
Abigail--www.scrapbookista.com
Friday, January 25, 2013
January Flamingo Four
Ready for another Flamingo Four? This month, three other designers and I each worked with these products:


1. Graphic 45 patterned paper - "Well Groomed"
2. Tim Holtz Giant Tag
3. Pink Paislee Vintage Vogue buttons
4. pearl trim
Melissa's Take
This month's Flamingo 4 was a bit of a challenge for me! I don't normally do the vintage thing, but I was intrigued by what I could do to make it mesh with my style, and I really love what I came up with! First, I started with just the tag. I looked up pictures of tags to gather some inspiration and found some through several sources, which brought me to create many layers, and ultimately a work of art (if I do say so, myself) that could stand well on its own.
First, I used a mask and a couple different mists to create the background. I really liked a couple of the images on the paper, but I also really liked the striped side (I normally love the B side of most Graphic 45 papers). I fussy cut the bride and groom silhouette images and punched some of the striped side, and then I ripped and teared and layered along the top of the tag for visual interest. I decided to paint some gesso along the outside edge of the tag and layer on top of it with Shimmerz paint, and then added the buttons (some of which I already had in my stash and supplemented what was sent to make the final product). Then I decided that the pearls were best used like they were laid on the tag and left there, so I used some clear liquid adhesive to get them to set just so. Finally, I added a bit of washi tape, a heart I cut on my Cameo, and stitching to add even more texture.

Once that was completed, I loved it so much I immediately wanted to use it! I went through my wedding photos to find one I hadn't scrapbooked yet and printed it out on textured white cardstock, distressed the edges, and then added bits of paper, washi tape, the punched striped side of the Graphic 45 paper, the extra hearts I had cut out with my Cameo, some paint, some masking, and various other details to tie in with the tag. I really love what I came up with and am going to frame this in a shadow box to show off with my other framed wedding photos!

Alicia's Take
When I saw the "Well Groomed Man" paper, it reminded me of our wedding, and how handsome all of the groomsmen were! So I decided to make a mini-book using various elements cut from the paper, plus navy and lime green cardstock and ribbons that were actually used on items that I made for our wedding. The lace trim on the picture pages can also be found in the Flamingo Scraps store.
Here are the front and back covers to my album, using images cut from the G45 paper and accented with the button and the black pearl trim.

Here is a picture of my husband with the title "The Well Groomed Man" fussy cut from the G45 paper.

The inner pages show my husband with his groommen.

This inner divider page uses the reverse side of the G45 paper, the top hat fussy cut from the paper and strips of cardstock in our wedding colors.

A group shot of the guys.

Here's another divider page taken from the G45 paper.

A picture of our hands during the ceremony - I thought this went well with the sentiment from the divider page. It is attached to the Tim Holtz tag, which was trimmed to fit this album. I have put two hearts cut from the same cardstock that was on the top hat page to cover the reinforced hole because it did not go with the color scheme for this album.

Ramona's Take
I chose Graphic 45 Steampunk Debutante. With this project I backed the paper cut outs with chipboard to give this the pop-up that it needed to stand out. I used Multi Mat Medium to the fronts of all the pieces and distress inked with Vintage Photo after (so it would not bleed with the multi mat medium). Then I arranged it many times to get the look that I desired. I used the bead at the edge creating a charm look. The background I used the Proper Gentleman paper and then layered the tag on top hanging over the edge. Then I took and fussy cut the hat from the printed side of the paper, crackle painted it and added it to my Heart and wings from the Tim Holtz die. I colored the gem buttons with copic markers to make them match the motif of my project. Then the black button I used acrylic paint to brighten it up against the black background. The other button I just glued a thread label from the SteamPunk Debutante collection. I am pleased with the way it has turned out. I used several different items on this anywhere from Distress stains, Tim Holtz dies, Prima metal flowers, gears from my cousin in Idaho, Tim Holtz different metals. This project was so much fun...looking forward to creating another one of these with some of the new lines coming out from CHA.

Cindy's Take
I had a lot of fun with this month's items. I trimmed the paper and tag, did some folding, added a button, and accented with Stickles. Then I headed out into the garage, where I put on the shop glasses, grabbed a hammer, and started pounding on the trim.

I removed about 1/4 of the beads on each end of the trim, headed back to the craftroom, and glued everything together. When I was done, I had this:

So there you have it, another fabulous Flamingo Four! We'd love to see your take. If you make something using the same four supplies our designers had, please let us know and we'll feature it here on the blog. To find the materials we used (and so much more!) check out flamingoscraps.com!


Labels:
Cindy deRosier,
Flamingo Four,
G45,
pink paislee,
Tim Holtz,
trims
Thursday, January 24, 2013
Altered Canvas using Prima Romance Novel
This time for my Design Team Project I used the Prima Romance Novel line. And wanted to do an Altered Canvas using my Grandmother's baby picture from 1906. Wasn't she the cutest baby ever ? What a treasure this picture is to have. MyAunt Peggy gave it to me. I just love this photo and wanted a way to display it on my wall. I never use original photos, ever. So, I printed this out and tore the edges for the worn look. And then used Distress ink around the edges and crackle painted in spots. So then I started on this canvas. Using Gesso I painted the whole canvas. First , I used a mask with medium molding paste. Sprinkled with some glitter, and then let the molding paste dry...then the fun begins. Cutting out all the little papers from the Romance Novel 6 X 6 pad and inking.
When the molding paste is dried and I have some paper glued onto the canvas I started spraying different colors of spray to get the desired look I wanted with the same mask. Then started layering all my papers around the photo. Spraying the flowers with the pink mist and letting them air dry....Not in a hurry because I wanted to work on the photo. I just kept adding piece by piece until I got the desired look I was looking for. I do think that this collection was just perfect for this photo. My Grammy was one of the most special people ever. Hope you like my new creation of some of my vintage heritage. When I see this hanging on my wall I will smile every time!!
Supplies used that can be found at Flamingo Scraps.com
Maya Road Trinket Pins Crystals
Prima Bretton Vine Purity
Prima Cabachon Lace 1
Tattered Angels Glimmer Mist Clam Bake
Hugs~
Ramona
Monday, January 21, 2013
Happy Valentines Day Pink Paislee Style
Good Morning Ladies of the Flock!
Alicia here, back to show you a lovely little card that I created with the Pink Paislee Secret Crush Collection that you can find in the Flamingo Scraps store!
I started out with a blank white card and cut a piece of the doily paper that can be found in the paper pack to cover the front of the card. Then came the fun part! I used elements from the Secret Crush Photo Frames and the Paper Goods Die Cuts to layer on the cutest touches! To add a little texture, I added one of the vellum feathers from Jenni Bowlin. The little square with the sentiments on front is cut from another one of the great papers in the paper pack.
After all of the goodness on the front of the card, the inside looked way too bare, so I added a piece of another one of the papers in the pack and this cute "eye chart" from the die cuts pack.
This line is great, and doesn't just have to be used for Valentine's Day. Any time you need a shot of pink, this would be a great addition to any project!
Until next time!
Friday, January 18, 2013
Maya Road Mini Album
Every year, I make a little mini album for both sets of grandparents
of the kids. It is a snap shot of the year and I give them as Christmas
presents. This is the 7th year I have made them, and every year is
a bit different This year I went with an acrylic album by Maya Road.
I used Ranger Alcohol inks to color the acrylic of all the pages. I then used a stamp with Staz-on ink for the front and back covers.
For the front cover I added some pretty Prima flowers, Prima bling colored with teal alcohol inks, and some alpha stickers.
These little albums are too cute and super easy to work with and most of the supplies I used are found at the Flamingo Scraps Store so pop on over and take a look!
Products Used:
Album - Maya Road
Rings - Clear Snap
Inks - Ranger
Stamp
Flowers - Prima
Brad and felt
Bling - Prima
Stickers
Enjoy!!
Erin Reed
I used Ranger Alcohol inks to color the acrylic of all the pages. I then used a stamp with Staz-on ink for the front and back covers.
I added pictures just plainly matted to each coaster, except for the front cover.
For the front cover I added some pretty Prima flowers, Prima bling colored with teal alcohol inks, and some alpha stickers.
These little albums are too cute and super easy to work with and most of the supplies I used are found at the Flamingo Scraps Store so pop on over and take a look!
Products Used:
Album - Maya Road
Rings - Clear Snap
Inks - Ranger
Stamp
Flowers - Prima
Brad and felt
Bling - Prima
Stickers
Enjoy!!
Erin Reed
Tuesday, January 15, 2013
A little alteration...
Good morning, Flamingo fans! Melissa, here, with a fun new project to share!
So, I have this beautiful custom frame that I invested in as a focal point for a wall in my living room. You know, the fancy frame with the matting in my choice of color? Yeah. One of those. Now, I did wait until all of that stuff went on sale and bought it then, saving myself a pretty penny, but I still considered it an investment. I forgot to take one thing into account, however, and that is the fact that I have young children - boys - who like to clomp around, throw things, and shake my walls at any given opportunity. And this is why my investment fell off the wall, causing the frame to crack, the glass to fall out (but not break, thankfully) and the back to become damaged. What can I do about that? Not much, really. I can replace the frame, but I wasn't really excited about the idea of shelling out more money for something that my children can (and probably will) ruin again in the future. I can touch up the paint, and I did, but the crack is still noticeable. So, I did what any respectable craftswoman does when something goes awry - I decided to cover it up!
First, you will need a Maya Road canvas pennant album, available at the Flamingo Scraps store, some Glimmer Mist or Maya Mist, some masks or stencils, and a couple garbage bags.
I began by laying the garbage bags on my floor, laid my canvas page in the middle, a mask on top of it, and gave them a spray.
This particular mask had a lot of over spray, so I used a second garbage bag to do a second mask. I'll show you what you can do with that excess spray at the end of this post! You don't have to rinse your stencil in between sprays... of course you can if you want to, but I liked these to be a little messy (and it is all about personal preference).
I added some various embellishments and letters on each of the flags, and then on the two where I had no letters, I decided to make a few of my own rosettes using Glubers and a few strips from a sheet from the Teresa Collins Now & Then collection.
By the time I was done, I had an amazing final product!
In addition to what I've listed above, I used a Prima SIIP swirl that I cut into various pieces to use across the banner, some paint, a scrap border sticker that I had in my stash, and some stitching to bring more tactility to the piece. I used an uppercase alphabet from Maya Road and used alcohol ink for their coloring. Round this off with a Sharpie Marker to do the outlining and some random jute twine from my stash to tie them together and my project was complete!
I'm sure you're wondering how it looks on my frame, and have no fear! I used some double-sided tape to stick it up and cover that pesky cracked frame!
And, of course, I have a couple of close up shots so that you can see the individual banners a little better.
So, I know you're asking me what I did with my leftover mists that I promised to share at the end of my story. I pressed some white cardstock (and I'm sure you can use kraft or any other light color, as well) onto my garbage bags and stamped my masks onto the sheets, as well, and came up with some pretty cool backgrounds to use in future projects!
So there you have it! I hope you enjoyed checking out this project and to see many of your photo frames that you altered in the same way.
Until next time,
Keep scrappin'!
Melissa
Subscribe to:
Posts (Atom)


