Showing posts with label Luann. Show all posts

Monday, January 20, 2014

Birthday Wishes for Aunt Darlene

Hey all!  Hope you are getting some sunshine where you are.  We finally have had a least 4 days of sunshine. It sure makes everyone a little bit happier.  It was so nice that I got to work out in my yard.  I am blessed to live where we have spring starting the end of February.  I love all the spring flowers.  The colors and smells makes my heart sing.

On my last post I made a birthday gift for my aunt.  I am doing a follow up on the January 7th post.  I have finished up the mini photo book and made a birthday card.

I had ordered Marion Smith's Garment District and hadn't gotten a chance to use it.  As you may remember I used the Mad Tea Party and Nirvana papers for the gift box along with the the mini. I used the Garment District 6 x 6 papers to make the birthday card.  I love it when you can mix and match.  Awesome!


I cut a sheet of solid color 12 x 12  card stock in half, making it 6 x 12.  I then scored it at 6" to fold in half. I distressed the edges of the paper with my Prima distress tool and Tim Holtz Distress Ink in Pumice Stone.
I layered the paper along with a paper doily. Did you notice the pretty lace and trim from my stash. I used a digi image from Saturated Canary - Maxine (colored with Copic Markers).  Maxine reminded me of my aunt in her garden. The flowers are a mix of stash flowers and Prima flowers sprayed with Heidi Swapp Color Shine.  The little butterfly on the flowers is made from the Mod Podge line and colored with Tim Holtz pens.


On the inside of the card is another 6 x 6 sheet of Marion Smith's Garment District and another digi from Saturated Canary - Tea & a Book (colored with Copic Markers).  How many of you Skype?  My aunt and I spritzen (what my husband calls it) quite often over tea or coffee.  I don't feel so home sick when I get to talk and see her.


Here are a few shots of the completed mini that I promised.  Used my stash all the bling and flowers.   The little blue bird is Mod Podge colored with Tim Holtz pens.


Hope you enjoyed Aunt Darlene's birthday gift and card.  I hope she will love it.  But, most of all I hope I have given you some inspiration.  

Wishing you sunshine, warmth and flowers.

Until next time.

Luann


Tuesday, January 7, 2014

I must!...I must!...I must! Use my all my crafty stuff.

Happy New Year!

Do you make New Year Resolutions?

I did this year.  I, Luann, resolve to use all my crafty stuff that I have horded.

With that said, I have a mini album and a little wood box that I would like to share with you.  I have wanted to embellish this wood box for over three years.  My inspiration was my aunt who dearly loves hot tea, roses, and her birthday this month.  Flamingo Scraps carries the Marion Smith's paper lines Nirvana and Mad Tea Party and match made in Wonderland was made.


First, I gave the box a coat of gesso.  Then painted with a rose chrome metallic paint.  To give the some depth I used Ranger Gold Acryilic Paint and dabbed it on with a piece of towel. I cut the paper to fit by using the box as the guide.  I used Mod-Podge to glue the paper and let it dry over night.  I then gave the paper a top coat of Mod Podge and let it dry for a couple of hours.  I did use Tim Holtz Distress Inks in Vintage Photo and Vintage Jeans to finish the edges.

I used Prima roses, fussie cut a picture from Graphic 45 Ladies Diary paper line and the corset stamp on the Nirvana paper.  I sprayed the blue rose with Heidi Swapp Teal Color Shine for a pop of color.  I just love the way it turned out!


Now the what to in this little box?   I could put in some Rolo's candy (my aunt was telling me about a Rolo Cheesecake she is going to make for her birthday). However,  I went with the orginal idea - mini  


It is a mini 2 3/4" x 2 3/4" .  I used the cardboard I saved from my new 2014 calendar for the center.  I cut the Nirvana and Mad Tea Party papers to size and glued to the cardboard. The edges were distressed with my Prima distresser and inked with Tim Holtz Distress Inks.  I had a Prima Treasures window that just fit. I found a cameo in my stash.  Don't you think it looks like the girl is looking out the window? The clock charm is from my stash.  I'm going embellish the other pages after I find the photo's I want to use.  I'll give you a look when I'm done.


Let's see!  I did keep to my resolution. I used a few things that I had for a time.  I did use some new papers, Marion Smith, which I love. 

If you can't find some of the goodies in the Flamingo Scraps Shop that I used, drop Suzanne a e-mail.  She is awesome locating items for her customers.

Here's to keeping your resolutions and a fantastic 2014!

Until next time.

Luann

Tuesday, December 24, 2013

'Twas the Day Before Christmas...

And all through Flamingo Scraps, the Flockinstas were working on holiday greetings!

Genie Smith
Erin Reed
Suzanne Pickens
Cheryl Arbo

Special Guest, Cooper Alsabrook

Donna Sullivan

Kathleen Natale

Luann Ostrom

Melissa Williams

Ramona Downing

Tonya Gibbs


Have a safe and happy holiday, from our flock to yours!

Tuesday, December 17, 2013

Santa's Southern Helper

Hey all!  It's Luann.  I don't know about you, but I have searching for fun and fairly easy decorations for Christmas on the internet, in magazines, and on TV.  I love to buy the special Christmas editions of magazines and wish. Today I have a decoration I was inspired to make by a Christmas oranament I purchased in July and a tutorial I saw in a magazine. 

First off let's start with the magazine tutorial.  Christmas trees made from Carta Bella Winter Fun and Echo Park Merry Christmas lines.  I just love these papers for Christmas.  I found the tutorial in the December issue of Martha Stewart's Living.  For the base I used a  Maya Road wooden spool and a craft stick. Cut a circle using a punch in 3 different sizes (6", 7", 8") and cut it in half. Then spraywith Heddi Swapp Color Shine in gold and tinsel. The stars on top are Cosmo Cricket Glitter Sheets. If you love glitter and hate the mess .....you want these! 
 I finally found a bell dome that would work and a plate charger for the base. Added a little moss, snow, and water (aka Cosmo Cricket Glitter Sheets).

I searched and searched around my scrapping stash and Christmas stash to find a few trinkets and Santa.  Did you see the Prima plane and camera? How about the wrapped presents? I found a tractor and a mini sewing machine to add to the presents.  The little sign is from Heidi Swapp Believe Ephermera.

It looks like Santa is getting ready to load his sleigh!  Oh!......What does my wandering eyes see?  A helper?

It's......It's......Flamingo Scraps' Flamingo - Pinky going out to deliver the Christmas goodies you ordered!


I had a wonderful time making this dome.  I hope you try your hand at one.
Here is a picture of the whole Flamingo Christmas dome.


Wishing you joy and happiness.

Merry Christmas and Happy Holidays!


XO

Luann

Tuesday, December 10, 2013

Mirror Christmas

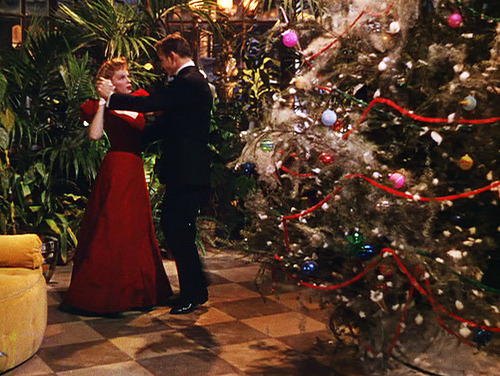
It's beginning to look a lot like Christmas - especially in the North!  They may just get a Bing Crosby Christmas.  Hey all it's Luann and yes I just aged myself.  I can hear the younger people say Bing who?  Please go and google Bing Crosby if you don't know who he is and what he is noted for.  Along those same lines....I love all the Christmas shows that are on this time of year.  One of my all time favorites is "Meet Me In St. Louis" with Judy Garland.  Esther's Christmas Ball dress is the inspiration for my project today.

I found a cute hand mirror at the Dollar Store and I just knew what I had to do.  I used Rub-n-Buff in Patina to tone the silver down.


Prima's Julie Nutting's Mix Media Doll Stamp was just the ticket. When I think of Christmas I think of glitter.  Yep, just the right paper was Cosmo Cricket Glitter Sheets in gold and red to make the dress (look how tiny her waist is).  I colored Esther's face, arms, and hair with Copic markers.  I used my Prima chalk edgers around all the edges. I scanned and made two copies of  Esther (the paper doll).  One was a copy and the other was a reverse copy. I layered the paper dolls and used pop dots to give her dimension.


The flowers were from my stash and touch of  Heidi Swapp Color Shine in gold added a little twinkle.  The little door is a Prima Shabby Chic Treasures sprayed with gold shine.  The crown was made from Mod Podge Crafts and colored with Tim Holtz Distress Paint. You can't go vintage with out a Cameo Stick Pin from Webster's Pages. The little buttons came in my Flamingo Scraps Warehouse Sale Embellishment Box and added a little extra. The rose button is from Glitz. Roses at Christmas are magical.  The little bird and other stick pin are from my stash.


Now for a look at the mirror side. (I was impressed I didn't get a reflection of the ceiling.)


If you have trouble locating the items I used on Esther's Christmas Ball Mirror just give Suzanne a shout via e-mail.  I can honestly say that Suzanne knows the meaning of customer service. You should stop by Flamingo Scraps...there's a fantastic sale going on.

Before I leave I wanted to show a picture of Judy Garland as Esther in her Christmas Ball gown.  I hope you get a chance see "Meet Me St. Louis".


Picture from media-tumblr-google


 Until next time...Enjoy everything about the Holidays! The shopping, the eating, and the best of all being with friends, family, and loved ones.

Luann


Wednesday, November 27, 2013

Getting into the Holiday Spirit

Happy Hanukkah!

It's Luann in the frigid south Texas!  The cold is putting everyone in the Holiday Spirit and I hope the cold (30's & 40's) stays around 'till Christmas.

Being in the Holiday Spirit myself, I thought I would share with you a couple of Holiday ornaments.  Since it is Hanukkah, I found a dreidel that I could make out of paper.  I used the Carta Bella Winter Fun and Echo Park Paper Merry Christmas.  This would be a great project to do with kids and a way to use up some scraps.


I love decorating for Christmas (I wait until after Thanksgiving, though).  I also love to make ornaments to add to my tree and give away.  I used the plastic flat ornament for these.  The first one I started out with Marion Smith's Tea Party and fussy cut the roses and clock.  Then I layered using Prima wood embellishments, bling, and flowers.  I threw in a Tim Holtz key, May Road Star Trinket and stash ribbon.


The second ornament I used a clip art picture of Santa.  I Modge Podge the picture to cardboard.  I used the Antique Matte Modge Podge to help give the aged look.  The little tree is from Fancy Pants. Isn't it the cutest? Heidi Swapp Believe Ephemera helps with the layering. Vintage (since it's been in my stash for a while) Webster' Pages Christmas charm and ribbon add just the right touch.  I sprayed the cotton lace with Heidi Swapp Color Shine to match the Fancy Pants tree.


Ohhhh.....I forgot to mention.  Don't forget to decorate the inside.  I used some netting scraps, glitter, and sequins.  FYI:  Do not use your hot glue gun on the plastic ornaments.  I learned the hard way.


Wishing you a fantastic Thanksgiving and a safe one.  Now I'm off to get some hot cocoa to warm up.

Until next time....

Luann

Tuesday, November 19, 2013

What's in the Match Box?

Hello,

It's Luann with the answer to the question you all are just wanting to know. What is in the Match Box that I blogged about on October 2nd.  Did you see the clue?
http://flamingoscraps.blogspot.com/2013/10/anyone-have-matchbox.html


Did you guess.....


Yep, bathroom tissue roll centers. (My husband kept asking why I was saving them!) Ever since I saw Arlene's Butterfly Kisses blog where she made a mini using them, I wanted to give it a try. BTW:  Who knew that they come in  different sizes?

I squished the rolls in half and used my bone folder to help crease the edges. I put them under a very heavy book for a few days.  I painted the outside and about a fourth of the way down on the inside using my Tim Holtz Black Soot Distressed Paint. I added a couple swipes of the Bronze and Broken China to break up the black.  Then I used a little Heidi Swapp in gold to make them sparkle. I also used Prima's Chalk Edger for added color.  Next came the grommets.  This was fun!


Then on to decorating the mini album.  Keep in mind that to fit in the match box you should use flat embellies.  Also, this is another way to use up your scraps.  I used the scraps from Theresa Collins Now & Then and Carta Bella Winter Fun for the background and journal cards.  For the embellishments I colored up Prima Wood Icons, Tim Holtz Idealology, Mod-Podge Molds, Prima Flowers, Cosmo Cricket Glitter Sheets (I used as the tabs for the pull out journal cards.), stash lace, binding tape, stash items, and charms. 


And here is the complete project! 


I know that my snow family is glad I got replaced the matches!


Until next time! 

Luann


Note:
Got the fun inspiration for my snow family from Bitz of Me blog (Suzanne Dean).


Friday, October 25, 2013

4 Products + 4 Designers = The Fantastic Flamingo Four !!!

It's that time again ! Time for the FANTASTIC Flamingo 4! I love to see what everyone comes up with each month. I call this the "bonus blog" post because you get four great new creative takes all at one time. For the October F4 , our designers, Erin, Melissa, Luann, and Cheryl were given these four items to get down and scrappy with.
1)  Prima "Rondelle" Designer Paper
2) Prima Banner Clip
3) two Prima flowers
4) Manila Tag (small)

Enjoy the creative journey, and let us help inspire you on your next crafty endeavor.


Luann’s Project


When I saw all the lovely papers I thought instantly that they would make pretty barrettes. I was right! I got out the barrette supplies and Mod Podge matte finish.  I cut the paper a little larger than the barrette so I could fold under. Slather the Mod Podge front and back.  While it was still tacky to touch I sprayed with Heidi Swapp Color Shine in gold or mustard.  Using a flower punch I made little flowers to go with the F4 flowers and I had to give them a little spray of Heidi.  I used my Prima Edgers for a highlight colors.  .


Originally, I thought about using the tag as flowers.  Then inspiration and I started playing.  I love humming birds and flowers.  Don’t you just the dimensional of the flowers?  Again, I used my flower punch with scraps from the barrettes.  I attached the cute paper clip and I will use it for the sediment.

I hope you like my challenge project with F4 items. Hope you will give making the barrettes a try.


CHERYL'S PROJECT
Hey guys...this is Cheryl. Today on the Flamingo Scraps Designer Team, there are four of us all working hard using the same scrappin goodies and doing our own thing making something pretty! We were given a generous supply of Prima "Rondelle" Designer Paper, a Prima Banner Clip, two Prima flowers, and a small manila tag to create our project. Our challenge was to see how each one of use uses the same materials. At first I debated on making a card, but having all of these nice papers, I wanted to create something where I could show off several of these pretty papers. So, I decided to make a A2 size card portfolio.


I started off with a piece of black 12" x 12" card stock, trimmed it down to 8.50" x 11".  It was scored at 5.25" and 5.75" on the 11" width and 6" and 6.25" on the 8.50" width. I trimmed away the 1/2" middle section from the bottom short end up to the top score line.

Using an assortment of patterns from the Prima Rondelle collection, I cut two at 5" x 5.75", two at 2" x 5", and one at 1/4" x 5.75". After inking all of the edges using Prima's Black Coal Chalk Ink, adhesive was applied to the back of each piece and adhered to the front cover and inside flaps.


Turning it over, I marked a 2.25" line above the top score line along the 11" width. From there I added a strong adhesive along this drawn line and then after folding a 30" piece of ribbon from my stash in half to find the center, I laid the center of a ribbon on the 1/2" area and attached it to the front cover of the portfolio.

At this point I creased my score lines and from the inside I brought both flaps forward and secured the outside edges with a tiny brad as a closure.

I covered the tag with another paper piece of the paper, and then cut two additional tags out from the collection, along with two other papers for two additional mats on the cover, and then tied some ribbon from the Seam Binding Sampler on the tags and used the Prima flowers to embellish the cover and I was done.


This was a fun project to make and a great gift idea to hold four handmade cards. This was a lot of fun and hopefully I have inspired you to make one for your cards.

As always, I appreciate subscribers of my blog, here. Also, like and subscribe to Flamingo Scraps on Facebook here and  be sure to visit the Flamingo Scraps store. Check out all of the latest products from Pink Paislee, Heidi Swapp, Fancy Pants, and Basic Grey.....just to tease you with a few!!
Happy scrappin!.......Cheryl

Erin's Project

I am always in need of cards, for lots of various reasons.  Right now it is a thank you for my son's teacher to show her how thankful we are to her (and the school) about his rough transition since the move.  They are helping him in so many ways, and we are grateful that they are supportive to his needs.


I used 3 different sheets of Prima paper and cut them into 1.5 inch squares.  I then inked and arranged them as seen in the pic.  I matted them onto black, then another Prima patterned paper, then on the card base of kraft paper.    I cut the tag down to make room for the stamp sentiment, which I added the clip and a punched out butterfly from another sheet of the Prima paper.  I added a couple of extra flowers to bulk up the Prima flowers from the kit, then added in the buttons.  I created the leaves and you can see the tutorial I made in a post from last week.

Melissa's Project

This month's Flamingo 4 came so easily for me, and for that I am thankful! I have been scrapping out of a suitcase for about a month now, as my family and I are preparing to sell our house and move to a new one soon. I didn't need much extra to complete this project! All I used in addition to what was sent was a single piece of Kraft cardstock, a couple of stamps from my stash, a Threading Water punch from Fiskars, some Prima black chalk ink, and Tim Holtz distress paint in black soot, available in the Flamingo Scraps store via special order.


I decided to make a non-folding card with a pocket for the tag. The sender could write on the back side of the card, or pull the tag out and write on the back side of it, or tuck a piece of paper in with the greeting to send their own little note! I painted the tag black with the distress paint and then adhered paper to it. I also punched the bottom of the tag with the threading water punch. For the cardstock tag that I added, I stamped it with a flourish stamp at the bottom, and then also punched it. The pocket on the tag is a single piece of patterned paper from the pack, adhered on three sides over another piece of patterned paper I cut to size. I used one flower on the little flourish in the corner of the paper and another on the banner paperclip.


Here's what each piece look like individually:


What awesome projects from four amazing designers! Be sure to follow the Flamingo Scraps blog and "like" our  Facebook page . Don't forget Amazing tutorials from Tonya Gibbs on the first Monday of each month at 8:30 p.m. EDT.You can also follow the link to Tonya if you missed and Ustream shows. They are recorded for those who missed them.  Thanks for visiting, and check out all of the great products in The Store. You'll  be tickled pink!!
Related Posts with Thumbnails