Monday, January 6, 2014

Ustream with Tonya has Moved to Tuesday

The Ustream has been rescheduled for TUESDAY, January 7, 2014.   We will begin our broadcast at 8:30 p.m. EST.   Make sure you join the crowd early: http://www.ustream.tv/channel/gibbst

This class is going to be a free spirit, grab your mediums and have some fun kind of night.   I will create a mixed media project filled with techniques using some of my Favorite products from 2013. 

I hope you guys can join us Tuesday night, but if not, we will do our best to record. 

Tonya

Suggested Supply List
  • Ranger:  
    • Distress Paints:  Antique Brass, Walnut Stain, and Antique Linen
    • Archival Inks:  Coffee, Black (You can substitute any permanent ink in black and dark brown.
  • Marion Smith Designs
    • Garment District
    • Nirvana
  • Crafter's Workshop
    • Brick Stencil
  • Faber Castell Design Memory Craft
    • Gelato - Gold
    • Grease Pencil
  • Golden
    • Gesso
    • Matt Medium
    • Modeling Paste
  • Misc.
    • Stamps
    • Chain
    • Locket
    • Vines
    • Flowers

Friday, January 3, 2014

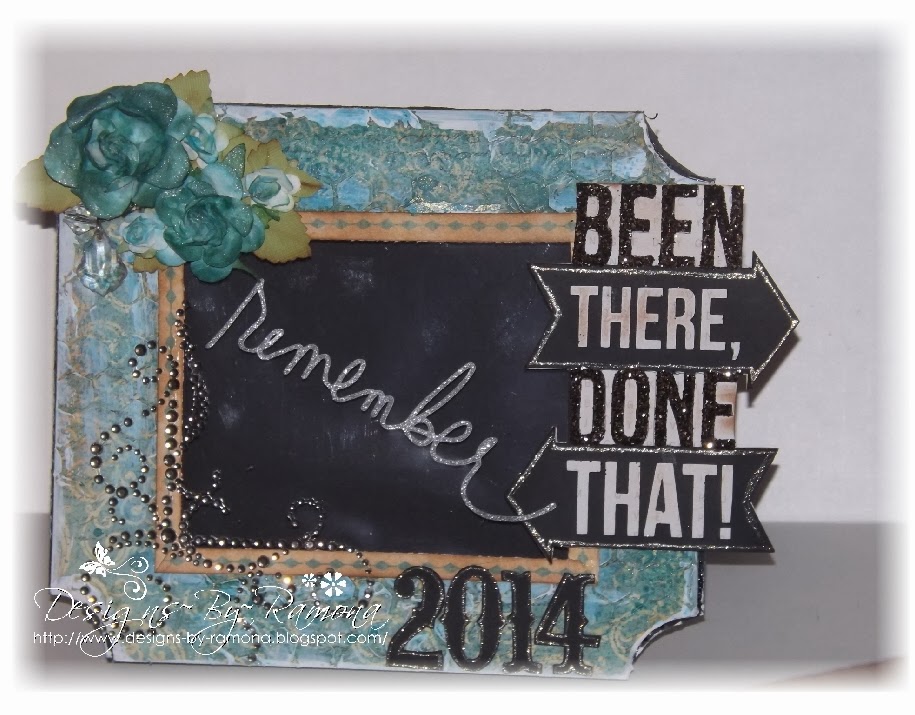
A new way to keep track of Ticket Stubs for 2014

Happy New Year all!! Getting the New Year off right I decided for this Design Team project to create a frame to keep all ticket stubs from thing I will do in 2014. I used the Frame and Easel file from the Silhouette store and added a tab at the top so that you can just drop your ticket into when you get home. This way I can look at it and think boy I sure have done a lot or I need to do more!! LOL I used Products from Flamingo Scraps Warehouse Sale Box — Combination Box. Which you may or may not get. If you can not find the embelishments in the store make sure you contact Suzanne at Flamingo Scraps to see if she can get it for you. Hope you like my creation as much as I enjoyed making it.

Here is the front view

Here is the front view with paper inserted where you can see the opening.

Here is the back with the easel bent and attached to the back of the frame

Products used
Prima Classic Cream Roses
Prima Chalks
Prima Bling
Prima Flowers
Tim Holtz Glitter- Black Soot
Flamingo Scraps Warehouse Sale Box — Combination Box
Flamingo Scraps Warehouse Sale Box — Embellishment Box

Thursday, January 2, 2014

Floral Hair Bow Holder

Now that my daughter's hair is getting longer and she is collecting bows for her hair, I wanted to make something that would display her bows and also act as a decoration for her new room.  The room itself was already painted purple, so I took that idea and went with it.


Here you can see the holder without and bows hanging from it (picture below of it in her room hanging on the wall).  I added in tons of Prima flowers and Crystal flourishes to really make this stand out.  You can also see the Webser's ruffled bloomers trim at the top as the hanger.


I used heavy duty chipboard for the letters and the circle.  I glued the floral paper to the chipboard with crafters glue, then covered the everything with multi-medium matte by Claudine Hellmuth to seal everything in.  After it dried I took Prima chalk inks in similar colors and inked the edges of all the chipboard items.


Here you can see the holder and up on the wall in my daughter's room with the bows attached the to the hanging ribbon at the bottom.  I like this because I can see all the bows, plus it adds to the decor of the room.  The "C" stands for Catherine and the "R" is for Reed.


All around the edges of the circle I added in about 5 yards of various colors of tutu tulle by Maya Road.  I cut up the yards and layered them going around the circle giving it a dimensional effect.


You can find almost all of these supplies at Flamingo Scraps - so head on over and take a look!!
Enjoy!!

Supplies used:
Chipboard
Paper

http://scraps-of-reflections.blogspot.com/

Tuesday, December 31, 2013

All Partied Out, but my Warehouse Box is Still Half Full!

Good morning, Flock.   I hope this post finds you all recovering nicely from a wonderful Christmas, and ready to rock 2014!

I have a simple layout to share with you today, full of paper and embellishments from my Flamingo Scraps Combination Warehouse Box.  Did you know that these boxes contain paper and embellishments valued at $150 or more AND are currently on sale for $45 EACH?  These medium flat rate boxes are stuffed to the gills and full of all kinds of amazing stuff!

 
I worked with my staple techniques--a bit of misting & dripping on the background paper (all Pink Paislee, Remarkable), inking the edges of some of the papers, a bit of chalk ink on the Pink Paislee Artisan Elements, some fussy cutting, and lots of layering.
 
To top it off, I added a couple of Fancy Pants Cork Shapes and doodled around the border.
 
Thanks for looking, and I wish you all a wonderful and SAFE New Year's Celebration!

Monday, December 30, 2013

Puzzle Piece Magnets Using the Warehouse Boxes

Hello all! Ramona here. Today I am going to share with you some magnets that I made for Christmas Presents. I got these awesome things from Flamingo Scraps in the Flamingo Scraps Warehouse Sale Box — Combination Box, from which you could get this awesome paper... but it is not guaranteed to receive this in your box. I cut these out on my cameo and made them 4 thickness, or you could get the larger puzzles and make them. But they were so fun to create!! Hope you like them as much as I had fun making them.


Here is my the assembly of the chipboard


Covered with paper


The back after decorated and magnet added


Products Used:
Fancy Pants Cork Shapes Arrows
Claudine Hellmuth Studio Kit: Mediums
Flamingo Scraps Warehouse Sale Box — Embellishment Box
Webster’s Pages Ruffled Bloomers — Teal
Prima Tiny Junkyard Findings Vintage Trinkets — Sampler
Seam Binding Sampler
Maya Road Wood — Bird Cage Pieces
Maya Road Trinket Pins Hearts & Pearls
Maya Road Trinket Pins Vintage Pearl
Tim Holtz Distress Paints
Tim Holtz Distress Stains
If there is anything that I used on this project that you do not see in the store. Contact Suzanne at Flamingo Scraps and she will be happy to try and get it for you.


I wish you all a Happy New Year filled with happiness!!

Hugs~
Designs~By~Ramona

Friday, December 27, 2013

December F4 with Canvas Buttons, Fab Scraps CB, Hinges, and Prima Flowers

This month our Merry Flockinistas were given the following products to create a beautiful and imaginative project. Hoping this last F4 of 2013 is as inspirational as it was fun.


1) Maya Road Canvas Buttons
2) Fab Scraps Chipboard Birdcage
3) Prima Flowers
4) Mini Metal Hinges


Erin
Every year, for the past five years, we have attended Burgers and Butterflies to help remember our little girl Kristen. We release butterflies to help us remember our little ones that are no longer with us. 

This is the first year Catherine was aware of the butterflies around her, and one little butterfly stayed on top of her head for about 30 minutes. We like to think it was her sister giving her kisses.


Ramona
Hi all! Ramona here with my F4 project. I was so stumped on this one, and had to think hard for this idea. After much thinking, I took the canvas route. I used many products to achieve the worn and tattered look. I really enjoyed these products. Enjoy !!


Luanne
When I saw the goodies for the December F4 I immediately thought of a garden. I used a paper box from my stash, and painted it with TH paints, Weathered Wood and Bundled Sage. First I put on a coat of gesso, and while that was drying I went to work on the bird cage chipboard element. I laid a brick walkway using a stencil and some light modeling paste.The gate is Maya Road vintage fences and doorways. The Prima flowers looked like a pink sun to me. Here's hoping  you have a wonderful 2014 and that all your dreams come true.

Front

Side

Back

Kathleen
Here in the Natale household, finding a good vet is probably more important than finding a good people doctor. Luckily we not only have a good vet, we have a GREAT vet! For this F4 I decided to make a birthday card from our pets,. The flowers pot is made with the Maya Road canvas buttons and I embroidered the stems. The naughty pet footprints are from a stamp I used TH distress paint on.


Front and inside of card. The sentiment reads, "Happy birthday to our favorite vet. From, the wonderful Natale Pets"

Inside flap sentiment , "Even the naughty ones".
Our youngest cat Lulu is the hunter/trouble maker so this was perfect for her. Ironically enough, there was a bird that went in the cage, but Lulu knocked it off of my table and my golden retriever ate it. So much for the cat that ate the canary!!

Thursday, December 26, 2013

Cosmo Cricket Project Hanger - Maya Road Mini Album Valentine Ideas Product Reviews

Hi everyone! Hope you all survived the holidays in one piece. With Christmas behind us and a new year ahead, I thought I'd get ahead of my scrapping game and start on my Valentine Day projects. I plan on making a mini albums using the Maya Road Chipboard Scalloped Mini Album kits. But, since everything with me is a "process", I wanted to look at my pages and display them before putting them into the album. What better way than hanging them from the Cosmo Cricket Project Hanger ?


I love this item. I didn't realize just how big it was, and was thrilled at the size. So many things I can use it for that don't even apply to scrapping. I can see this being used with pics for grandparents or a Mother's Day gift as well. I covered the CB mini album pages, both sides, with paper from my stash. The scalloped heart in the middle, which is one of the album covers, is painted with Tim Holtz paint and can be special ordered by contacting Suzanne. If you haven't discovered these great paints, make them one of your new year resolutions. They rock! The wooden phrase, "Best Day Ever", is from the Fancy Pants Artist Edition and is also painted with TH. I had some blue tulle in my stash from a Websters Pages kit and tied it on the hook, just because I could. The albums will be featuring my grandsons, Gabriel and Ethan, so blue was fitting. As I make the pages, I will hang them for viewing, then proceed to putting them into an album.


AS you can see, this hanger has great size to it. I'm pretty sure that by the time I finish this post that I'll be heading back to my fave LSS, Flamingo Scraps to get a couple more of these so I can display a new page project each month, or Gabe's art work. This is a quick and easy project that looks awesome and is even better to receive.

Be sure to stay tuned for the completion of this adorable mini album. I don't usually make them, but I'm pretty excited over this and can't wait to see the finished project.

This Friday is our last F4 (Flamingo Four) post of 2013 so be sure to check that out. Let's not forget Tonya Gibbs and her ever inspirational Ustream  tutorials on the first Monday of each month at 8:30 p.m.EST.

To all of our Flock Followers, have a safe, happy, and healthy 2014 !!!

Kathleen

Tuesday, December 24, 2013

'Twas the Day Before Christmas...

And all through Flamingo Scraps, the Flockinstas were working on holiday greetings!

Genie Smith
Erin Reed
Suzanne Pickens
Cheryl Arbo

Special Guest, Cooper Alsabrook

Donna Sullivan

Kathleen Natale

Luann Ostrom

Melissa Williams

Ramona Downing

Tonya Gibbs


Have a safe and happy holiday, from our flock to yours!

Monday, December 23, 2013

Resin me this...

My last box of Flamingo Scraps goodies brought me a new toy, and I was like a kid on Christmas morning when I finally got all moved in to my new studio and ready to scrap! It's been a while since I've actually got to sit down and do something creative, and I have a lot of lost time to make up. First and foremost, I decided to play with my new Mod Podge Mod Mold and Mini Mod Melts. And let me tell you, did I ever play!


First, let me tell you about the molds. They are available via special order. All you have to do is email Suzanne and flamingoscraps@yahoo.com and she can order any of them - they have 4 to choose from: ornamental, flowers, nature, or royal icons. I ordered Ornamental and I really wasn't disappointed with what I received!


There was a slight learning curve to creating your own resins. First, you definitely need a decent high-temperature hot glue gun. Mine was a cheapy, and I struggled with it a bit. Once I figured out what to do, I didn't have any problems from there! I made each of the mold items in each of the two Mod Melts availabe, Milk Glass White and Beach Glass Clear. I had the most trouble with the Beach Glass Clear, but the Milk Glass White came out near perfect! Here are each of them, side-by-side.


The best part is that these are customizable! You can ink them, paint them, mist them to your heart's desire. And, the other part, is that these aren't typical of resins you would buy from the manufacturers that Flamingo Scraps also carries, like Melissa Frances, Wendy Vicchi, or Marion Smith. These are a little more rubbery and flexible like any hot-glued item would be. After about 24 hours of sitting, they do harden a bit more, though, so if you want less flexibility it is best to wait and let them fully cure. My favorite and the easiest to work with was Milk Glass White. I had trouble getting Beach Glass Clear to a high enough temp that it went into the mold well, but my high-temp hot glue gun seemed to struggle to get hot enough, so that could be the problem!

And in case you were wondering what you could do with these itty-bitty-pretties, here is a project to feast your eyes upon!


Products used:
Mod Podge Mod Melts
Mod Podge Mod Molds
Prima Chalk Ink

Until next time,
Keep scrappin!
Melissa

Friday, December 20, 2013

Ornament Duo

Here how to make these wonderful clear plastic ornaments in to a handmade work of art for you tree.


 The first thing you need is a clear glass or plastic ornament, then you let your imagination soar about what you create, fill, wrap, or decorate it with.


Bottle Brush Tree Ornament

In this tree I used the super cute bottle brush trees from Fancy Pants and some wonderful flowers from Prima.


First you add a tiny blob (yes that is an official term, hehe) of fast drying clear glue (like ZipDry) to the bottom of each tree and place them into the ball.  I used tweezers to help place the tree.  The trick is to let one tree dry and hold fast before adding in the second tree or anything else in the ball or they just fall over.  patience is key here.


 Now that your trees are dry I added in a bit of angel dust with make it look like the were nesteld in snow (it is like thick glitter or even glitter would work).


The I created a cluster of flowers from Prima from the wonderful Warehouse Boxes that Flamingo Scraps is offering (on sale too) and wrapped it around the top of the ball.  I then added the top hook of the ball back on (I glued it so it would not pop off and glitter would get everywhere), added a bow to cover up the topper, and strung up the top with a silver ribbon to hang on my tree.


Embellishment Ornament

Here I stayed with a single color of blue (in various hues) and created a ball of wonder, a fun little search and find ball for my kids full of odd bits and pieces from my scrapbook stash (left over from the Flamingo Scraps warehouse boxes).


Here is the stash of items I used to fill the ball.  I used buttons, flowers, charms, sequins, plastic bits and bobs, petals, and other fun items that would fit into the ball from left over projects and from Warehouse box items.


Here you an see the flower cluster I made prior to attaching it to the ball.  I took little flower buds on wire and threaded larger flowers under it.  I then took the wire stem and wrapped it around the top of the ball to secure it.


I then took ribbon and wrapped the top to cover the wire stems from the flower.  Then attached the ornament topper, added ribbon to string it up, and poof you have a wonderful search and find ornament ball.


Here you can see even more goodies, and as you shake it more items appear!


Supplies used can be found at Flamingo Scraps
Ornament ball
Flowers - Prima and other
Ribbon -Websters
Bottle Brush Trees - Fancy Pants
Embellishments  -Flamingo Scraps

Enjoy!

Related Posts with Thumbnails