Thursday, December 22, 2011

Make it Work!

Earlier this year, I shared a layout with pictures I took at 1:11:11 on 1-11-11.  Of course, I couldn't resist taking pictures at 11:11:11 on 11-11-11!  Because it was Veteran's Day, Trevor was home from school.  We were leaving for Disneyland the next morning, so I was busy packing while Trevor was getting started on the work from his Independent Study.  I made sure the camera was nearby and set a timer so that I wouldn't miss 11:11.  I love this quick little glance at our life when the date and time were nothing but ones.

From Flamingo Scraps: Fancy Pants patterned paper (brown), Crate Paper patterned paper (red), Prima patterned paper (cream), Pink Paislee canvas border
Other: My Sentiments Exactly stamp, Rubber Stampede stamp, Staz-On ink, ColorBox ink, Stampin' Up pen, Sketch by Rebecca Peck


I wanted a casual, effortless look for this layout.  I decided to stamp the title, starting with a 1 and leaving spaces for the dashes and colons.  Only problem- I went through every single stamp I own and not a single dash or colon.  Definitely a 'make it work' moment.  The dash was easy- I found a smaller alphabet and turned an "i" on its side.  I didn't have a single stamp that would function as a colon.  I finally thought of something- I used my Crop-a-Dile to punch two tiny holes next to each other, then stenciled the colons. 


 I had another 'make it work' moment when it came to the banner.  Here's how it looked originally:

The "Old School Notebook" message seems really weird to me and not at all what I wanted on my page.  But there wasn't a good way to cut off just the alphabet that I wanted.  So I ended up using a pen to color the entire top brown, then laid a thin strip of the brown patterned paper over the center to cover the words.  The scan doesn't show it well, but I stamped some detail stitching on the brown. 

11:11:11 at 11-11-11 captured!

Thursday, December 15, 2011

12 Tags of Christmas - Part 2

Last week's post I shared with you my versions of the first 6 days of Tim's 12 Tags of Christmas. This week I would like to share the last 6 tags. It was a lot of fun playing along this year. I learned some new techniques, and it was fun trying to think of ways to improvise when the products he used were not available.

December 6, 2011

Today I didn't have the embossing folder. So I did the embossing the Old fashion way - with a stylus.


My Day 6


December 7, 2011
Well, on this tag I was missing all the stamps and the Kraft Glassine. I used a wax kraft bag that is often used to line trashcans. I will admit it was thinner and not as waxy as the Glassine that Tim sells, and but it worked in a pinch!


My Day 7


December 8, 2011

I was excited I had about 90% of the things Tim used in this tag. There were a lot of steps to this one, but it was a lot of fun, and I also loved the "steampunk" theme too!

I hand drew the architectural drawing in the white to match the one on the stamp, I substituted a ticket that Tim had given me in a class for the one on the original (I didn't have the stamp), and No red stickles so I used a red bling instead, and I used Lost & Found's Hand.


My Day 8


December 9, 2011
Today I was excited to share my journey with my 4 yr old nephew Cooper. He said "Aunt Tonya you have the coolest toys." And I believe he is right!

I used a stamp from Anna Griffin for the background and did the technique that Tim demonstrated. It is really cool because it has a nice orange peel texture to it. I didn't have the candlestick so I decided to use the lamp post and I think I really like that better.


Day  9


December 10, 2011

Today's tag was fairly easy. I didn't have the plastic letters, banner die, or the stamps. But I think this one turned out pretty good!


Day 10


December 11, 2011
I wish I had the glossy paper for this tag. I improvised and used "photo paper". Photo Paper is not the same as the Ranger Glossy paper. Photopaper is designed to absorb ink while Rangers is designed to repel it. So there were different reactions, but I wanted the "glossy" finish. I also added Glossy Accents to my "Merry Christmas". It was fun working with this tag because I never in a million years would have thought to use my melting pot with the shrink plastic - I loved the effect, and will definately be trying this again in future projects.

Day 11


December 12, 2011
It is sad to see this series come to an end. But wow - it was fun. I learned some new technqiues and enjoyed the challenge of Not having 'everything' needed. On today's tag - I didn't have the 12" tissue tape - so I stamped my image on tissue paper and applied it to the surface of the tag. I love this look, and again you will see me using this technique again. Thank you guys for following me along on my creative journey with Tim this year.

Day 12


Thank you for stopping in today,

Thursday, December 8, 2011

12 Tags of Christmas - Part 1

This is my first year of following along with Tim Holtz on his journey through the 12 tags of Christmas. WOW - it is a lot of fun. I have placed a personal challenge on myself - to NOT buy anything to do these tags. It really has forced me out of my box, and jumped started the brain into thinking creatively. Some days I may have cheated a bit with Photoshop - but I really wanted my tags to look like his. To follow Tim please visit his blog at http://timholtz.typepad.com

December 1, 2011

Today's tag was a killer for me. I only had the bobbles, seam binding, and pinecone die. I really had to think creatively to make this tag resemble Tim's version. Tim suggested that we use what we have on hand. Don't spend additional money if possible. I think this really helps to expand the creative process.


In my version - I mounted a blue cardstock to chipboard, then embossed it with a cuttlebug jacket that had flowers and swirls on it. I then cut Tim's snowflake dies from the colored cardstock, then embossed it with a clear halographic glitter, and placed them ontop of the flowers that were on the embossed design. I created the Noel using the Blackletter Cartridge and my Gypsy. I cut the word from chipboard then embossed it with silver and covered that with fine clear glitter. (I didn't have silver glitter, because I don't care for the look of glitter. I thought this was a great compromise. I also didn't have the holiday flourish spray die that Tim used for the flower swag. So I used the holly branch, and the holly from the lamp post die. I didn't have the banner either so I took a strip of music scrap paper, and tore the ends to resemble the banner, and distressed all the edges.

I know mine doesn't have the same "dirty distressed look" that Tim's has, but I'm super proud that I was able to achieve a similar tag without spending any money. I can't wait to see what tomorrow's tag looks like.

December 2, 2011
Today's tag was even harder than yesterdays. I spent the entire day thinking "oh no - he used his kraft resist holiday paper - I don't have it". Well I improvised using my Photoshop skills. Also - I didn't have the charm for the top so I used the imagine token instead. I hope you enjoy...


December 3, 2011

Today, I was challenged to find a way to create the embossed look without the embossing folder. I decided to emboss my design with the embossing powders like yesterday's tag. Also - again no I didn't have the die or coordinations paper, but I found a way to duplicate the look of the coordinations paper. I show how to do this technique on my YouTube channel.


December 4, 2011

Today, I was challenged to find a way to create the 25 in the center of the snowman and the Snowflake on the edge die. Also - I was missing the weathered wood distress ink and stain, and the stamps that Tim used. I had stamps that were similar so I used them. For the 25 I die cut the snowman, then added him to my Cricut Cutting mat, and cut the 25 from the Basecamp Cartride. I create the snowflake on the ege die using my cricut and the George and Christmas cartridge.


December 5, 2011

Today, was easy peasy.


December 6, 2011

Today I didn't have the embossing folder. So I did the embossing the Old fashion way - with a stylus.


Next week I will share with you the tags 7 - 12.

Thanks for stopping in today,

Tuesday, December 6, 2011

Wax-resist vs. Enamel Accents

Last week I shared my Snowman Gift Tags.  As you'll recall, I used black Enamel Accents for the face (a success) and initially used white Enamel Accents on the hats (definite failure).  For the final product, I switched to Decorative Snow for the hats.

This led me thinking- how can I use white Enamel Accents?  How about as snow?  Worth a try!  

I took a plain white tag and put little dots of white Enamel Accents all over it, then set it aside to dry.  Once the tag was dry, I rubbed blue ink over the top, then used sandpaper to reveal the white dots.  Cute!  I handcut an itty-bitty snow drift and snowman and glued them on.  The finished tag:


From Flamingo Scraps: Ranger Ink
Other: Bazzill cardstock, Enamel Accents, American Crafts pens

I love everything about it except for the long drying time.  I thought I might be able to achieve the same look using wax resist, which would have no drying time.  I took a white crayon and put little dots all over a plain white tag.  I covered it with blue ink and then scratched off the wax to reveal the white snow.  I cut out another snowman and added it to the tag.  Here's the wax-resist version:

Still cute, but not nearly as nice as the Enamel Accents.  The 'snow' is quite irregular and I missed a bunch of spots.  While it was easy to see the little dots of Enamel Accents while I was working, it was very difficult to see where I'd dotted the crayon.  And it was impossible to make consistently round dots.
 
If I were in a hurry, I'd definitely use the crayon version, but I think the Enamel Accents is the winner!

Thursday, December 1, 2011

Christmas Cards

I thought I would share with you a card that I created using Graphic 45's Christmas Emporium, and Spellbinder's Poinsettia die.


I rounded the corners of the wreath patterned paper from the collection, and sewed around the edges for a clean looking backdrop. The Santa Clause photo was a panel on the paper and I thought the stamp was a nice touch. The stamp is from Studio G.

I have a YouTube video on how I made the Poinsettias. To me they look so realistic.


I love making Holiday cards for those extra special gifts.

Thanks for stoppping in today.

Tuesday, November 29, 2011

Fun with Enamel Accents and more

Back in September, Tonya challenged me to make something from Glossy Accents (which had been sitting on my shelf untouched, as I didn't really know what I could do with it).  I made some acorn napkin rings and in the process I fell in love with Glossy Accents.  I've used it a couple of times since then.  As I was putting it back on the shelf, I noticed the untouched Enamel Accents sitting nearby.  Time to experiment!

I decided to make some snowman gift tags.  My plan was to use black Enamel Accents for the face and white Enamel Accents for the fur of hat.  I was half successful- the face worked perfectly, while the fur looked lousy.  I ended up redoing it with Decorative Snow, which looks a zillion times better.

Here are my finished tags:  

From Flamingo Scraps: Stickles
Other: Enamel Accents, Marvy punches + pens, Delta Decorative Snow, 
Pop Dots, and unknown cording.

And the side view:
I clearly need to do more experimentation with Enamel Accents!  How have you used it, especially the white?


Wednesday, November 23, 2011

Greatful for Family

This weekend we are celebrating Thanksgiving in the United States, and I know our friends abroad have a similar day in their countries. For me, Thanksgiving is a time to slow down, reflect on my life and give thanks for the blessings that God has given me.

I feel so incredibly blessed to have such a strong family unit. My kids and husband are the BEST! We are all so close. Do we argue and fuss? Absolutely, we are "Real, but we also laugh and play together. My husband Kenny and I have been together since high school. We married 21 years ago, and have two AMAZING children, Brittany 17 and Brighton 15.

I wanted to create a layout that shows my gratitude to them and reflect how blessed I feel. Webster's Pages' Sweet Cherry Pie Fly A Kite Paper was the perfect setting for this layout.


From Flamingo Scraps: Webster's Pages: Sweet Cherry Pie - Fly A Kite paper, Lace; Ranger: Picket Fence Crackle Medium; Maya Road: Love Mini Chipbaord Pieces, Rosette Trim; Prima: Fairy Tale Roses, Mini Roses, and Brown Trim 2
Other: I Am Roses: Sunflowers, and Wild Roses; Doily, Antique Book pages, Flower pearls; Sizzix: Tim Holtz Caged Bird Die; Felt birds.

Scattered around the paper are quotes that depict family. Like "The Secret Ingredient to good living is Family", "Fine Feathers Make Fine Birds" and "Embrace Time with the People That You Love"

I accented the photo with layers of lace and trims from some of my favorite companys, Prima and Maya Road. I scattered lots of mulberry flowers in Sunflowers, Roses and some fabric roses too. I aslo included some Prima packaging for a photo matt, Doilees, Antique book pages, Tim Holtz caged bird die from Sizzix, felt birds, and Maya Road Chipboard pieces.

I hope you have an amazing weekend and you find time to be with the people you love!

Thanks for stopping in today,

Thursday, November 17, 2011

December Daily

Ali Edwards started this holiday journaling concept a few years ago called a December Daily. The idea is to create a journal documenting every day in December. You don't have to write a lot, a simple quote is enough. Just jot down things that represent the holiday season to you. I have been wanting to join in for a few years, but the holidays always get here before I can blink. This year I got my game plan started early, and made my December Daily in Nov. so that I would be armed and ready for action.

I decided to use the Webster's Pages Wonderfall, Waiting for Santa and Sweet Seasons collections for my Journal pages. I used my bind it all to bind it, and printed some digital images on transparencies that I created from digital brushes available at Webster's Pages Website.

I wanted my book to start with the Thanksgiving and run through New Years.


Are you planning to do a December Daily. If so comment below with a link to your journal. I would love to see it.

Thanks for stopping in,

Thursday, November 10, 2011

Steampunk Mini Album

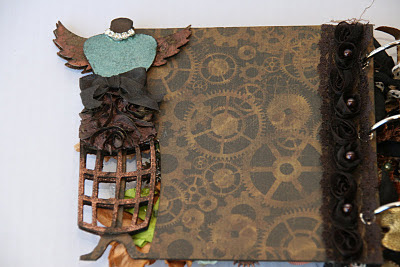
One of my dear friends, Amy Rodriguez, designs unique mini album dies and has shared her Hot Air Balloon and Dress Form Dies with me. I was so excited to get the opportunity to play with these dies. I wanted to share with you guys today the mini that I created.

From day one I knew I would use the Steampunk Debutant Line from Graphic 45 that I got from Flamingo on this mini. I wanted it to be tiered so that behind every dressform there was a hot air balloon. I also wanted the pages to be vibrant, elegant, but most of all interactive!


Here is a video with a complete walk through of the concepts and details on each page.

Thanks for stoping by today,

Thursday, November 3, 2011

Cards From Scraps

It is time to filter out the scraps again, and I wanted to share with you some of the cards that I have been creating.


I used half inch strips of scrap paper in random pastel colors to create the background of this card. It has a Pink Paislee frame on top, and the logo for my Secret Squirrel Swap that I colored with my Copic markers.


This card has a piece of scrap white card stock that was embossed with a sizzix folder. The wreath is made with crape paper, and of course MY Favorite Prima roses of all time, finish off the look of the wreath. The happy holidays is a metal brad from Making Memories (been in the stash for AGES).


This card is made similar to the wreath. For the tree, I made a huge ruffle from crape paper and snaked it around to form the shape of a Christmas tree, then added some bling rhinestones, and finished it with the Tim Holtz banner from the Regal Crest die.


This card is a nice size 6x6 card with an image from "Some Odd Girl" that I colored with my Copics. The stamp on the tag was from Stampendous.

Thanks for stopping in,

Related Posts with Thumbnails