This is my first post as DT member for Flamingo Scraps. This is the chance of a lifetime for me, and one that I have waited a longtime for. I'm very excited, and proud, to have been chosen to work with these talented women. Flamingo Scraps has some amazing products that you will love from all your favorite lines ,such as Prima, Tattered Angels, Maya Road, Tim Holtz, and MANY more !
You can find the store at http://stores.ebay.com/Flamingo-Scraps and also a new store opening up at http://flamingoscraps.blogspot.com/p/store.html. So fly on over and check it out !!
I created this project using the Graphic 45 Ole Curiosity Shoppe for my Design Team submission. I loved making this book with all the "fussy" cutting that I did, as well as all the little nooks and crannies to put tags into. I enjoy watching Youtube getting new ideas. Be sure to watch Tonya Gibbs on the first Monday of each month for the Flamingo Scraps Ustream event. You can get all the supplies needed to create the project that Tonya creates from Flamingo Scraps. http://www.ustream.tv/channel/gibbst
On this project I decided to use everything from handmade flowers, die cuts from the Cricut,and glossy accents. So, if you see something that you would like to know how to do....please let me know. Hope you like my project as much as I enjoyed making it!
Supplies used:
Ole Curiosity Shoppe 12 X 12 paper pack
Ole Curiosity Shoppe 8 X 8 paper pack
Black, brown and white cardstock
Various ribbons and trims from my stash
Cricut for the Ornamental Designs 1
Tim Holtz Distress Embossing Powders-Vintage Photo and Black Soot
Spellbinders Donna Salsar tabs dies
EK Sucess Large and Medium flower punch
Prima Trinkets for the chain to connect the book and some jewels to add that bling
Ranger Glossy Accents
Tim Holts Mini Clips
Tim Holts Scissors
Small binder clips
Score tape and Scotch
Stay calm, and SCRAP on !!!
Ramona
Wednesday, November 14, 2012
Tuesday, November 13, 2012
Chipboard Gingerbread House
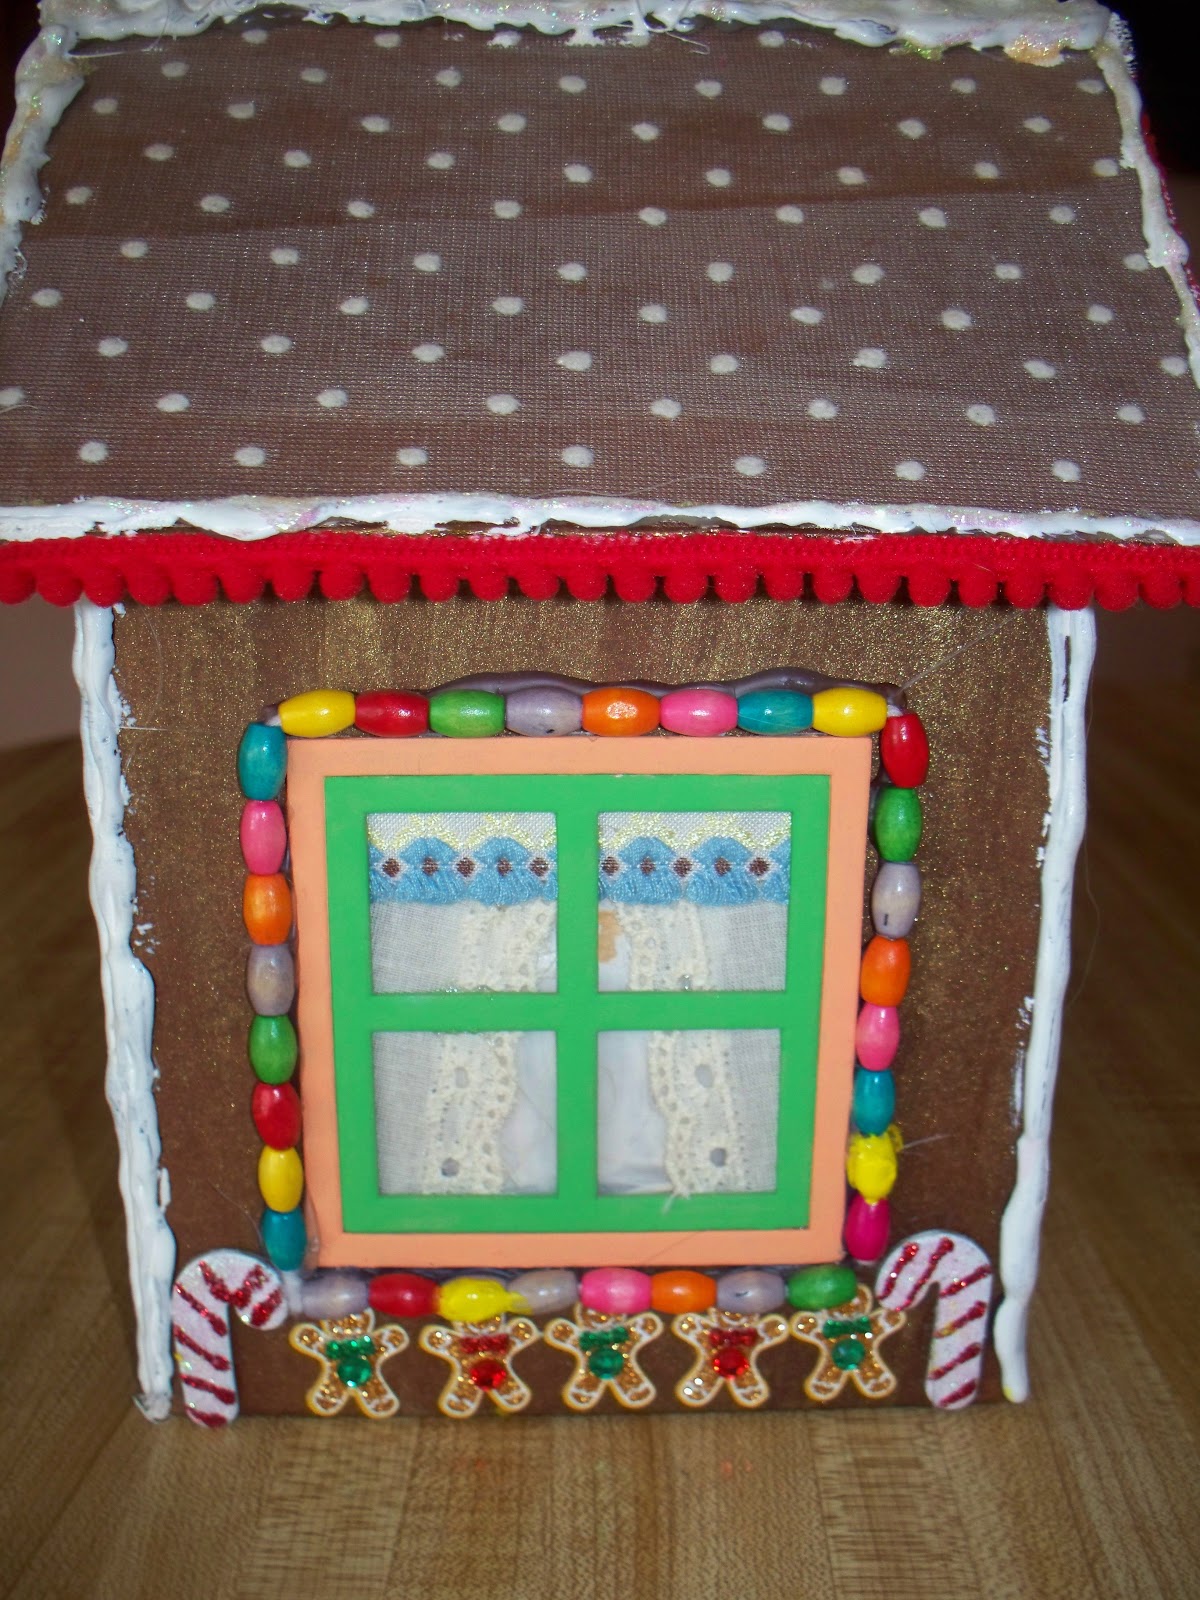
Nothing says Christmas is coming in my home more than the traditional building of the gingerbread house. My six year old grandson, Gabriel, and I have been making them since he was just a baby. We came up with some awesome houses, but then couldn't bear to part with them after the holidays. One house didn't get tossed out until Valentine's Day. And then, it hit me . Chipboard ! And we can use it year after year. So, I got this adorable Maya Road chipboard kit from Flamingo Scraps and went to work.
Before we put our "candies" on the house, I gave it two good coats of Tattered Angels Glimmer Mist (Suede), making sure it dried completely between coats. Next, I took a piece of Webster's tulle with dots on it to cover the roof. The "frosting" that usually holds the house together, is hot glue painted white after it cools. I used the crystal Stickles for an added frosted look on the painted glue. The best part about this entire project was that it didn't matter if everything was even or perfect. In fact, it actually enhanced the look. I had some Webster's trims and ribbons and decided they needed to go onto the house, making adorable curtains. From a Maya Road Christmas tree album kit, I borrowed the candy canes, striped them with Stickles, then used a wreath from the same kit.I used Glimmer Mist on the wreath, then coated it with the Distress Crackle from FS to give it a textured look. We used beads from my stash for the candy around the windows and door. Gabriel picked out all the colors for the windows. I KNEW I'd use the pom pom trim from Flamingo Scraps for something, and see ! I was right. The gingerbread people used for the bottom trim are from my stash, and the window on the door is from the larger windows on the side of the house.
Front view LOVE the tiny mini bottle cap we used for the door knob !
Side view Curtains made with Websters laces and trims with a piece of waxed paper behind it.
Before we put our "candies" on the house, I gave it two good coats of Tattered Angels Glimmer Mist (Suede), making sure it dried completely between coats. Next, I took a piece of Webster's tulle with dots on it to cover the roof. The "frosting" that usually holds the house together, is hot glue painted white after it cools. I used the crystal Stickles for an added frosted look on the painted glue. The best part about this entire project was that it didn't matter if everything was even or perfect. In fact, it actually enhanced the look. I had some Webster's trims and ribbons and decided they needed to go onto the house, making adorable curtains. From a Maya Road Christmas tree album kit, I borrowed the candy canes, striped them with Stickles, then used a wreath from the same kit.I used Glimmer Mist on the wreath, then coated it with the Distress Crackle from FS to give it a textured look. We used beads from my stash for the candy around the windows and door. Gabriel picked out all the colors for the windows. I KNEW I'd use the pom pom trim from Flamingo Scraps for something, and see ! I was right. The gingerbread people used for the bottom trim are from my stash, and the window on the door is from the larger windows on the side of the house.
Front view LOVE the tiny mini bottle cap we used for the door knob !
Side view Curtains made with Websters laces and trims with a piece of waxed paper behind it.
I was especially pleased with the way my little chimney turned out. I couldn't find a tiny paint brush in my collection, so being the creative genius that I'd like to think I am, I opted for a toothpick, and simply drew the lines for bricks.
The little chipboard book that came with this kit went to Gabriel so he could create something for his mother. But, being of the mindset that I might need more than what comes with the kit, I bought two of these adorable houses, and decorated the book pages to use recipe cards. Each card measure 4.75 inches x 4.75 inches. I can store my Christmas cookie, candy, and dessert recipes in the house, and pack it all away with the ornaments, while keepingmy recipes in one place.
We now have fond, permanent reminders of our gingerbread houses for years to come. Maybe even pass them down to Gabriel to share with his children. Although, I'm pretty sure we'll continue to make those edible houses and look at them in awe when we finish .
This particular house has been discontinued by Maya Road, but you can find them at your local craft store around the holidays, or better yet, contact Suzanne at flamingoscraps@yahoo.com for the Melissa Frances chipboard houses. They make several designs that can be special ordered!
Follow us on facebook.com and check out all the fabulous items at Flamingo Scraps http://stores.ebay.com/Flamingo-Scraps
Don't forget the new store that will be opening any day now at http://flamingoscraps.blogspot.com/p/store.html
Have a Scrap Happy day !!
Kathleen
Friday, November 9, 2012
Vintage Finds!
Hi Everyone! Just wanted to show-off one of my latest layouts using some of the great papers you can get at Flamingo Scraps.
My name is Alicia - wife of Eddie, and stay-at-home mom to a great little two year old boy named Sam. We live in Houston, TX. and love getting out for adventures as a family (and I love to take pictures to preserve the memories, which gives me lots of material to scrapbook) !
I recently scrapped a weekend trip my husband and I took for his 35th birthday. We left Sam with my parents and took off for the New Braunfels area for a tubing trip with some old friends. Along the way, we found this cute little winery called Three Dudes and A Dog so we made a pit stop for a quick tasting.

Here are some specifics for what I used to get this look.
Throw in a little dark brown cardstock, pop dots and adhesive and there's the whole thing. :o)

I am really excited to be working with Flamingo Scraps and can't wait to show you what I come up with next!
Until next time!
Alicia
My name is Alicia - wife of Eddie, and stay-at-home mom to a great little two year old boy named Sam. We live in Houston, TX. and love getting out for adventures as a family (and I love to take pictures to preserve the memories, which gives me lots of material to scrapbook) !
I recently scrapped a weekend trip my husband and I took for his 35th birthday. We left Sam with my parents and took off for the New Braunfels area for a tubing trip with some old friends. Along the way, we found this cute little winery called Three Dudes and A Dog so we made a pit stop for a quick tasting.

Here are some specifics for what I used to get this look.
Patterned papers: Heidi Swapp Vintage Chic line
"Handwritten,"
"Bookingkeeping,"
"B" side of "Worldwide"
“B” side of “Beautiful Songs."
Title plaque: Heidi Swapp's Vintage Chic
Other embellishments: Pink Paislee's Portfolio ephemera collection.
Throw in a little dark brown cardstock, pop dots and adhesive and there's the whole thing. :o)

I am really excited to be working with Flamingo Scraps and can't wait to show you what I come up with next!
Until next time!
Alicia
Thursday, November 8, 2012
City Sidewalks Ustream - Part 2
Thank you to everyone for their support at the Ustream on Monday, Nov. 5. We had a fabulous turn out. Ustream was misbehaving, but it did manage to record 90% of the class. It did so in 5 parts, but at least it is there. If you were unable to watch the show live there are multiple parts on the channel at http://ustream.tv/channel/gibbst
Join us on Monday, Nov. 12 at 8:30 p.m. EST for Part Two of the City Sidewalks mini album. In this class we will embellish the book, and learn ways to use the scraps in creative ways. There will also be time for questions since the Ustream Monday night was so choppy.
There is still 1 kit available for purchase. If you are interested, please email Suzanne at Flamingoscraps@yahoo.com. For full kit details - please visit this blog post.
Thanks for stopping in today,
Join us on Monday, Nov. 12 at 8:30 p.m. EST for Part Two of the City Sidewalks mini album. In this class we will embellish the book, and learn ways to use the scraps in creative ways. There will also be time for questions since the Ustream Monday night was so choppy.
There is still 1 kit available for purchase. If you are interested, please email Suzanne at Flamingoscraps@yahoo.com. For full kit details - please visit this blog post.
Thanks for stopping in today,
Wednesday, November 7, 2012
Things Are Gettin' "Sketchy" At Flamingo Scraps !
Hello Flamingo Fans!
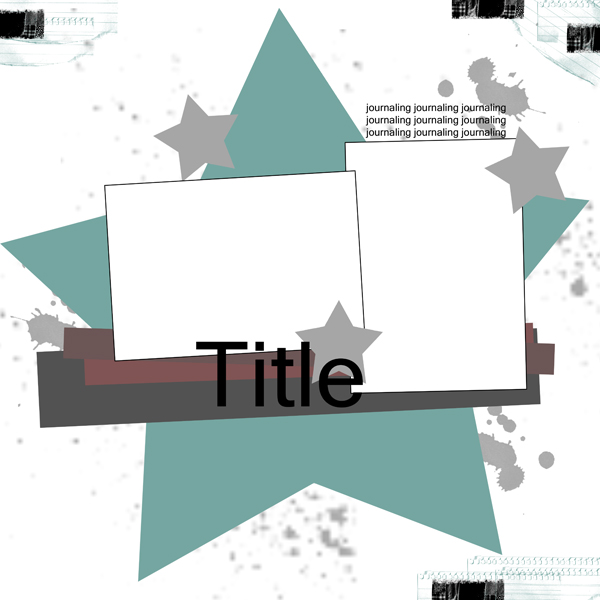
Today, I have a new sketch to share with you, designed by yours truly.
I had tons of fun putting this one together, leaving you room to do whatever you’d like with the bits and splatters. Get out some paint and give your page some splatters, or try better yet, try some of the great Glimmer Mists you can find at Flamingo Scraps !. You can die cut, washi tape, and technique this one until you’ve had your fill, that’s for sure! Or, skip that altogether and play with the bare bones and no techniques. It’s all up to you.
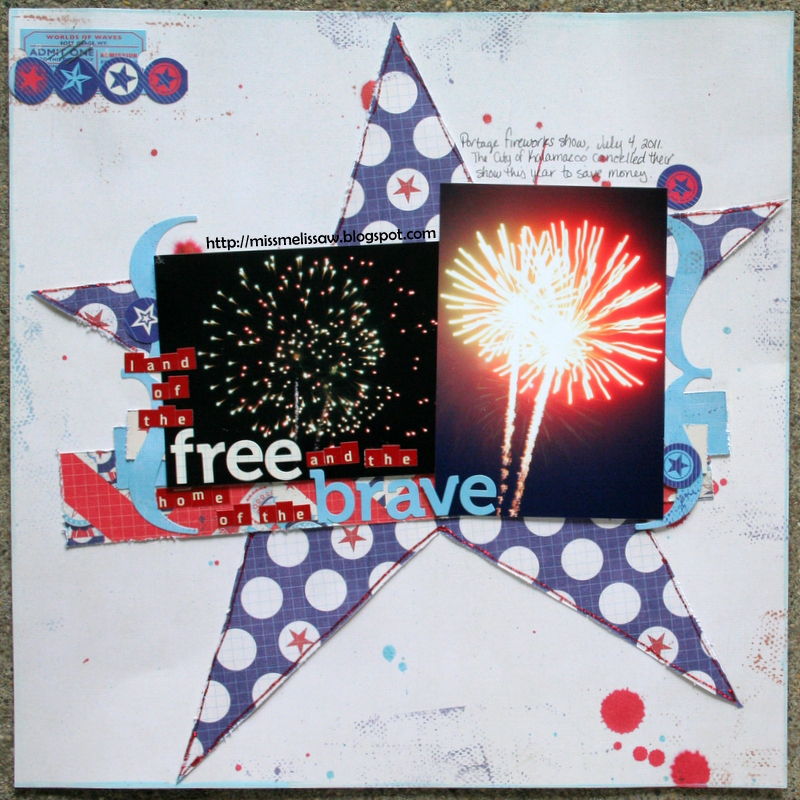
Take a look at what I came up with!
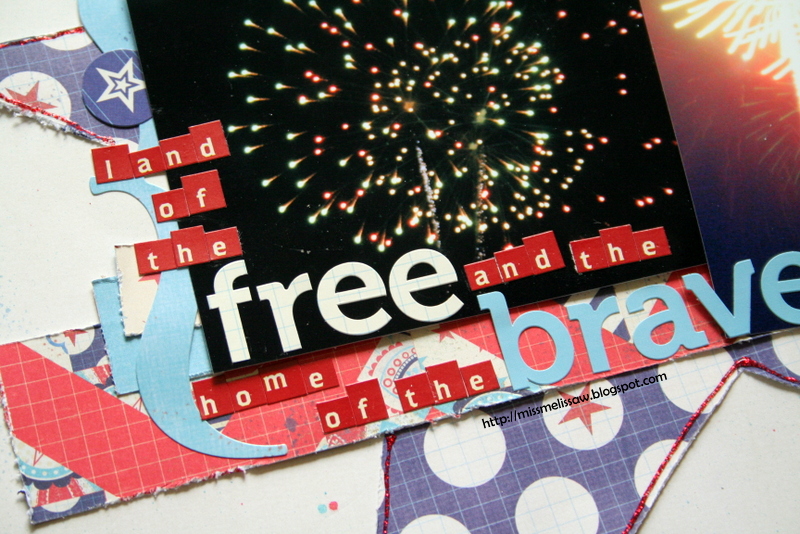
What can I say? This sketch really brought out the patriot in me. I started each lay out I've done of our local fireworks with a line from the Star Spangled Banner. Eventually,my family will be able to piece it together and have the entire song in fireworks photos. Here’s a closer look at the title work and some of the details with it:
I hand drew the star in the background, but you can use any die cut shape to create this page. To draw it, I traced a circle on the background and then measured out five points on the circle and connected those points via lines and then cut the drawn star out of the paper.
If you’re overwhelmed by the thought of using a sketch, remember , this is just a jump-off point for inspiration. I intended the sketch to use two 4x6 photos; one landscape, and one portrait. Here are a few variations you can use :
It’s important to remember that the sketch is there to inspire you,and that there are no rules to where your inspiration can take you! Use all or parts of it -- that is all up to you!
Have fun with this, and be sure to share what you’ve created when you’re finished! You can leave a link, here, in the comments, or you can post it directly to the Flamingo Scraps Facebook page! Also, don't forget to visit the Flamingo Scraps store at http://stores.ebay.com/Flamingo-Scraps and coming soon, a NEW store Flamingo Scraps. com.
Until next time! Keep scrappin’!
Melissa
Today, I have a new sketch to share with you, designed by yours truly.
I had tons of fun putting this one together, leaving you room to do whatever you’d like with the bits and splatters. Get out some paint and give your page some splatters, or try better yet, try some of the great Glimmer Mists you can find at Flamingo Scraps !. You can die cut, washi tape, and technique this one until you’ve had your fill, that’s for sure! Or, skip that altogether and play with the bare bones and no techniques. It’s all up to you.
Take a look at what I came up with!
From Flamingo Scraps: Pink Paislee: Declaration papers, alphabet stickers, Element Stickers: Cosmo Cricket: Tiny Type. Ranger: Stickles. Tattered Angels: Glimmer Mist. Making Memories: paint. Other: staples.
What can I say? This sketch really brought out the patriot in me. I started each lay out I've done of our local fireworks with a line from the Star Spangled Banner. Eventually,my family will be able to piece it together and have the entire song in fireworks photos. Here’s a closer look at the title work and some of the details with it:
I hand drew the star in the background, but you can use any die cut shape to create this page. To draw it, I traced a circle on the background and then measured out five points on the circle and connected those points via lines and then cut the drawn star out of the paper.
If you’re overwhelmed by the thought of using a sketch, remember , this is just a jump-off point for inspiration. I intended the sketch to use two 4x6 photos; one landscape, and one portrait. Here are a few variations you can use :
- Print out smaller photos, or use two different sized photos.
- Instead of a star in the background, use a scalloped circle or any other die cut paper shapes that you have at your disposal.
- Instead of the star embellishments, like are in the sketch, you could use flowers, buttons, brads, or any other embellishment! In fact, I substituted the stars for portions of the Pink Paislee Declaration Element Stickers.
- Use a border punch on the paper strips to give it another variation.
- Swap the journaling and title positions, or omit either one or both!
It’s important to remember that the sketch is there to inspire you,and that there are no rules to where your inspiration can take you! Use all or parts of it -- that is all up to you!
Have fun with this, and be sure to share what you’ve created when you’re finished! You can leave a link, here, in the comments, or you can post it directly to the Flamingo Scraps Facebook page! Also, don't forget to visit the Flamingo Scraps store at http://stores.ebay.com/Flamingo-Scraps and coming soon, a NEW store Flamingo Scraps. com.
Until next time! Keep scrappin’!
Melissa
Tuesday, November 6, 2012
Cute and Bright "Thank You" Cards
I always like
to keep some thank you cards on hand for and every day thank you to
someone. I find it better than just buying a stacking of thank you
cards from the store, it means more if it is made from the heart.
With that in
mind I do not want to spend 2 hours making one card for one person, I
want to spend my time wisely and make a batch at a time, using similar
products, but with the same feel. I can change out flowers,
embellishments, stickers, paper, and colors but make then faster if I
use a similar layout.
For these cards
I used the same paper and flowers, but different metal embellishments
to change it up a bit, or lack of embellishments.
Products Used:
Prima Flowers
Cardstock
Patterned Paper
Metal Flowers
Rub-Ons
Ranger Black Soot Distress Ink
Enjoy!
Monday, November 5, 2012
A NEW LOOK AND A NEW ADDRESS FOR FLAMINGO SCRAPS!!!!!
As if a new Design Team weren't enough, Flamingo Scraps has MORE exciting news!!!! Flamingo Scraps is moving to a new location -- www.flamingoscraps.com!! We are THRILLED to announce our new online store and website!!! This has been a dream for a long time and we hope you will be as excited as we are! The site will be live within the next week or so, just in time for the holiday rush!
The eBay store will remain open for a while, hosting the Big Pink Bird Bargain Bin and guiding people to the new site. FlamingoScraps.com will have a bevy of new features including a Gallery, Product Videos, Special Orders and Preorders, Gift Certificates, and our favorite -- a Wishlist function!
Keep the Wishlist in mind ladies (and gents) for the upcoming gift giving season as well as birthdays, anniversaries, etc. Flamingo Scraps will be your Personal Shopper; just tell your hubby (or anyone else) that you have a Flamingo Scraps Wishlist. We will put together a package of goodies, gift wrap, and ship it and you will have a scrappy surprise waiting under the Christmas Tree!!! Best of all, it is sure to be goodies you WANT!!!! Perfect for Secret Santas and Scrappy Sisters -- you only have to pay postage once!!!!
Go to the site now and signup to be notified as soon as we go live!!!
And speaking of LIVE -- don't forget our live Ustream class with Tonya Gibbs at 8:30pm EST tonight!! Tonya's latest project is an ADORABLE December Mini with Pink Paislee's City Sidewalks and lots of other goodies! Check out the project and the kits at http://flamingoscraps.blogspot.com/2012/10/ustream-nov-5-at-830-pm.html and the class at http://flamingoscraps.blogspot.com/2012/10/ustream-nov-5-at-830-pm.html.
Hope to see you there!!!
The eBay store will remain open for a while, hosting the Big Pink Bird Bargain Bin and guiding people to the new site. FlamingoScraps.com will have a bevy of new features including a Gallery, Product Videos, Special Orders and Preorders, Gift Certificates, and our favorite -- a Wishlist function!
Keep the Wishlist in mind ladies (and gents) for the upcoming gift giving season as well as birthdays, anniversaries, etc. Flamingo Scraps will be your Personal Shopper; just tell your hubby (or anyone else) that you have a Flamingo Scraps Wishlist. We will put together a package of goodies, gift wrap, and ship it and you will have a scrappy surprise waiting under the Christmas Tree!!! Best of all, it is sure to be goodies you WANT!!!! Perfect for Secret Santas and Scrappy Sisters -- you only have to pay postage once!!!!
Go to the site now and signup to be notified as soon as we go live!!!
And speaking of LIVE -- don't forget our live Ustream class with Tonya Gibbs at 8:30pm EST tonight!! Tonya's latest project is an ADORABLE December Mini with Pink Paislee's City Sidewalks and lots of other goodies! Check out the project and the kits at http://flamingoscraps.blogspot.com/2012/10/ustream-nov-5-at-830-pm.html and the class at http://flamingoscraps.blogspot.com/2012/10/ustream-nov-5-at-830-pm.html.
Hope to see you there!!!
Friday, November 2, 2012
Mini Flip Frame Album
Hello everyone! I'm Abigail Stoops and I'm a proud member of the
Flamingo Scraps Design Team. Welcome to my first official blog post for
the Big Pink Bird.
If you like what you see here, then you'll LOVE the selection of items you can grab up at Flamingo Scraps! Papers, to embellishments, and EVERYTHING in between! Be sure to follow our blog and visit the store to get your scrap on!
This was really such a fun project to make! I love how the Petite Papers reflect the feeling and vibe of the Webster's Pages usual 12 x 12 papers. The best thing about this mini-album is that I can change out the pages or add to it.
If you like what you see here, then you'll LOVE the selection of items you can grab up at Flamingo Scraps! Papers, to embellishments, and EVERYTHING in between! Be sure to follow our blog and visit the store to get your scrap on!
This is from Websters Pages Petite Pages. I decided to add it to a frame
then add the pages.
![]() |
| I added some Teresa Collins Bling to this sweet little butterfly from the Teresa Collins Tell your Story collection. |
![]() |
| I love the pink trim that comes in the Webster's Pages Palm Beach trim pack. I used some Heidi Swapp pennant banners and the "fabulous" sticker to add some flair |
![]() |
| Hidden journaling in the envelope. Love this!!! |
This was really such a fun project to make! I love how the Petite Papers reflect the feeling and vibe of the Webster's Pages usual 12 x 12 papers. The best thing about this mini-album is that I can change out the pages or add to it.
Wednesday, October 31, 2012
Ustream Nov. 5 at 8:30 pm
Join us LIVE, November 5, 2012 at 8:30 p.m. EST on Ustream, as Tonya Gibbs creates this vintage chic Holiday Mini using Pink Paislee's City Sidewalk Collection. Kit details are below.
USTREAM INFO:
http://www.ustream.tv/channel/gibbstPlease join the crowd early to insure easy access.
PROJECT DETAILS:
Video showing more details of the book:
KIT DETAILS
We are excited this month to bring you two kits for this project. Both Kits have shipping costs within the contential US included in the price. If you are International, please ask about your discounted shipping costs. Last month kits sold out fast, so be sure to reserve yours today!
KIT 1 - DELUXE - $49
Includes whole packages of items used: 1 set Teresa Collins Christmas Cottage Clear Stamps
1 package 8x8 single sided Pink Paislee City Sidewalks Paper (24 sheets)
1 package PP City Sidewalks Parcel Tags 16 pcs
1 package PP City Sidewalks Ephemera 47 pcs
1 package PP City Sidewalks Collage Cards 8 pcs
1 package PP City Sidewalks Garland 31 pcs
3 Teresa Collins Mini File Folders
Prima Vintage Tote Chalk Ink
Christmas Washi Tape
Crate Paper Bo Peep Wood Veneers 19 pcs
White Lace suitable for dying
3 Manila File Folders (end tabs)
1 yd Twill Ribbon
Green Bloomers (approx. 4 blooms)
2 Transparencies
1 Recipe Card
Exclusive Tonya Designed Download Sheet
Embellishment Pack – bells, Prima Flowers, Webster’s Pages Cameo, Studio Calico Wood Veneer camera, Maya Road Shaped Paperclips, MR Cabachon Flowers, small pearl beads, Artist’s Pin, PP mistable chipboard.
Email Suzanne at flamingoscraps@yahoo.com for an invoice!!
KIT 2 - STANDARD - $27
Includes partial packages of items used:1 set Teresa Collins Christmas Cottage Clear Stamps
12 sheets 8x8 single sided Pink Paislee City Sidewalks Paper
5 PP City Sidewalks Parcel Tags
15 pcs PP City Sidewalks Ephemera
2 PP City Sidewalks Collage Cards
10 pcs PP City Sidewalks Garland
3 Teresa Collins Mini File Folders
3 Manila File Folders (end tabs)
1 yd Twill Ribbon
Green Bloomers (approx. 4 blooms)
2 Transparencies
1 Recipe Card
Exclusive Tonya Designed Download Sheet
Embellishment Pack – bells, Prima Flowers, Webster’s Pages Cameo, Crate Paper and Studio Calico Wood Veneers, Maya Road Shaped Paperclips, MR Cabachon Flowers, small pearl beads, Artist’s Pin, PP mistable chipboard
Email Suzanne at flamingoscraps@yahoo.com for an invoice!!
Additional items needed to complete the project:
Acrylic Paint (red, white, 2 shades of green)
Thumb – anyone’s will do
Toilet Paper roll
Yarn/twine
Cookie Cutter
Washi Tape
Lace
Stamps
1 sheet 12x12 chipboard
Labels:
City Sidewalks,
Daily,
December,
Gibbs,
Holiday,
Howto,
Kit,
Live,
mini album,
November,
pink paislee,
Psychomoms,
Scrapbook,
Tonya,
tutorial,
Ustream
Wednesday, October 17, 2012
Creating With the Stars!!!!
Today, Flamingo Scraps is pleased to have as our Guest Blogger, one of our FABULOUS customers, Laurie Morris!! Laurie was fortunate enough to take classes recently with Tim Holtz and Dyan Reavely on their swing through the Sunshine State!! We asked Laurie to share this fantastic opportunity with all of you! Take it away Laurie!!
Two of the brightest stars in my universe, anyway!
In September I took the "Patchwork Pandemonium" class with my idol, Tim Holtz.
It was the only one of Tim's four classes at She Scrapbooks in The Villages that I could get into. Tim is a great teacher,
Mario is a blast,
and everyone had a ball in this 5-hour class. Patchwork Pandemonium teaches several techniques using grunge paper as the substrate and then small pieces of grunge paper which we subjected to various products such as Distress Inks, Crackle Paint, rubber stamps, tissue tape, and more.
Creating With the Stars!
Two of the brightest stars in my universe, anyway!
In September I took the "Patchwork Pandemonium" class with my idol, Tim Holtz.
It was the only one of Tim's four classes at She Scrapbooks in The Villages that I could get into. Tim is a great teacher,
Mario is a blast,
and everyone had a ball in this 5-hour class. Patchwork Pandemonium teaches several techniques using grunge paper as the substrate and then small pieces of grunge paper which we subjected to various products such as Distress Inks, Crackle Paint, rubber stamps, tissue tape, and more.
As great as "Patchwork Pandemonium" was, my 3-day immersion in all things Dyan Reavely was even more amazing.
This took place at Whim-So-Doodle in St. Petersburg, October 8,9, and 10. With a focus on Ranger Paint Dabbers and Dylusions sprays, we created layered backgrounds that we used for creating small books and tags. Stamps and stencils were employed along with paint and Dylusions spray inks.
Dyan is all about simplicity and getting the most out of every product, so we learned about more than one way to use Dylusions, for example, and how to use all kinds of papers and tags as "mop-ups" to sop up all that colorful goodness and create, almost accidentally, beautiful background bits to be used however we wanted. Dyan's new blank journal takes her inks and paint beautifully. Watercolor paper was used, too, and the way the colors showed on the watercolor paper were divine.
If you love color, you'll love Dyan's way of doing things and you'll love Dylusions.
This took place at Whim-So-Doodle in St. Petersburg, October 8,9, and 10. With a focus on Ranger Paint Dabbers and Dylusions sprays, we created layered backgrounds that we used for creating small books and tags. Stamps and stencils were employed along with paint and Dylusions spray inks.
Dyan is all about simplicity and getting the most out of every product, so we learned about more than one way to use Dylusions, for example, and how to use all kinds of papers and tags as "mop-ups" to sop up all that colorful goodness and create, almost accidentally, beautiful background bits to be used however we wanted. Dyan's new blank journal takes her inks and paint beautifully. Watercolor paper was used, too, and the way the colors showed on the watercolor paper were divine.
If you love color, you'll love Dyan's way of doing things and you'll love Dylusions.
Tim says to embrace imperfection! Dyan says to live life in color!
So say the stars!
Laurie
Labels:
class,
Dyan Reaveley,
Ranger,
Tim Holtz,
Watercolor
Friday, October 12, 2012
Rondelle - Card from Scraps
Thank you once again for joining me on my Ustream a few weeks ago. If you missed it - you can view it here.
For my project share this week, I decided to make a card with the scraps left over from the Rondelle Mini Album kit used in the Ustream earlier in the month.
I used a sheet of the Rondelle paper as my base. Then made some little fishtail banners from strips of the left over toile fabric. Fab Scraps' flat back pearls accented the banners perfectly. Then I added a few of flowers and a Rondelle leaf to the base of a Hexagon that was die cut from another sheet of the Rondelle. I thought this "hello" stamp from Pink Paislee was perfect for the top of the torn tag that was laying on my desk.
This simple little card used so many of the left over supplies from the mini album project I created live.
If you have created something inspired by my Ustream, please share it on Flamingo Scraps Facebook Wall. Make sure you tag me so that I see it. I love seeing your creations.
Announcements:
Don't forget the Design Team Call that ends on October 20. Details can be found here!
Save the Date - our next Ustream is set for November 5 at 8:30 est. Be sure to join the crowd so you can easily log in the night of the show. Next class we will be using the awesome City Sidewalks from Pink Paislee to make a holiday album. Kit information will be available soon. Make sure you are in the "know" these kits sell out FAST! Subscribe to the Newsletter, Like us on Facebook, and follow us here on the blog for the most up to date information.
Thanks for stopping in today,
For my project share this week, I decided to make a card with the scraps left over from the Rondelle Mini Album kit used in the Ustream earlier in the month.
From Flamingo Scraps: Prima: Rondelle Flowers, Leaves, Paper, and distress tool. Spellbinders: Hexagons, Fab Scraps: flatback pearls, Pink Paislee - Portfolio Stamp, Maya Road, toile fabric: Stick Pin. Other: pearls, black card stock.
I used a sheet of the Rondelle paper as my base. Then made some little fishtail banners from strips of the left over toile fabric. Fab Scraps' flat back pearls accented the banners perfectly. Then I added a few of flowers and a Rondelle leaf to the base of a Hexagon that was die cut from another sheet of the Rondelle. I thought this "hello" stamp from Pink Paislee was perfect for the top of the torn tag that was laying on my desk.
This simple little card used so many of the left over supplies from the mini album project I created live.
If you have created something inspired by my Ustream, please share it on Flamingo Scraps Facebook Wall. Make sure you tag me so that I see it. I love seeing your creations.
Announcements:
Don't forget the Design Team Call that ends on October 20. Details can be found here!
Save the Date - our next Ustream is set for November 5 at 8:30 est. Be sure to join the crowd so you can easily log in the night of the show. Next class we will be using the awesome City Sidewalks from Pink Paislee to make a holiday album. Kit information will be available soon. Make sure you are in the "know" these kits sell out FAST! Subscribe to the Newsletter, Like us on Facebook, and follow us here on the blog for the most up to date information.
Thanks for stopping in today,
Wednesday, October 3, 2012
Stamping, Stickers and Stripes
I've been having so much fun with Pink Paislee's Declaration collection! Here's a layout from the two days our family spent at the Solano County Fair in August. Other than the title, everything is from Declaration.
From Flamingo Scraps: Pink Paislee papers, stickers, and border
Other: BasicGrey letter and number stickers, Rubber Stampede stamps, Clearsnap ink
There are a few features on the layout I'd like to point out. First, notice that I stamped the title words "County Fair" DIRECTLY on the layout. I almost never do that, since the possibility of messing up is fairly high when it comes to me and stamps! Not only that, but it was the absolute last thing I did, meaning that if I messed it up, there was no scooting things over or transferring the whole thing to another piece of background paper. Fortunately, the stamping came out just fine.
Second, notice the tickets on the left hand side. They are stickers that came with the collection and say things like "Music Fest" and "Drive-in Theater." Neither of those fit my fair theme, so I carefully tucked the stickers under the focal photo so that the words were hidden.
Finally, take a look at my journaling strips. I didn't have an extra sheet of the background paper and couldn't cut a big enough piece from behind a photo to make journaling strips like I usually would. None of the paper in my stash coordinated acceptably, so I found the only other paper in the collection that had the same off-white... the B side of this paper, with the diagonal stripe.

Subscribe to:
Posts (Atom)