Thursday, August 30, 2012

Flamingo Scraps is Going Live!!!!

Flamingo Scraps is thrilled to announce we have partnered with Tonya Gibbs, Psychomoms, to bring you live Ustream classes the first Monday of the month at 8:30 p.m. EST.   Tonya has been a designer for Flamingo Scraps for the past 2 years and contributes to our blog weekly.   So many of you have expressed interest in Tonya's signature style, that teaming up for online classes seems the natural next step in our creative journey.

Our first class will be Monday, September 3, at 8:30 p.m. EST.  Tonya will create this lovely  Mixed Media layout, sharing tips and techniques with style and smiles!!!!


Future classes will include pre-ordered kits in limited supplies. Additional information will be available soon.

All classes start at 8:30 pm EST

Save the dates:
Sept. 3, 2012
October 1, 2012
November 5, 2012
December 3, 2012

To access the class please visit:  http://www.ustream.tv/channel/gibbst

Please join Flamingo Scraps and Tonya Gibbs on Monday, Sept 3, at 8:30pmEST!  Take a break from cleaning up after your Labor Day cookout, grab your fave beverage, and tune in to the fun!!!   We look forward to seeing you there!!



PS  We HOPE we will be recording, so the show will be available later!

PSS  A big pink birdie told us there might be some giveaways!!!!

Monday, August 20, 2012

Forever In My Heart

Saturday I received word that my friend Liz had passed away after a long battle with Leukemia. She was a follower of mine on YouTube and we had chatted a lot online. I had spent quite a bit of time getting to know her through the last few years. Liz  was one of those people that despite her problems, she was always positive and fun. She had an infectious spirit about her, that was a testimony of her faith.

My way of dealing with emotional things is through Art. I love to create as I talk to God and meditate on my feelings. I find that it helps me to focus my energies and clear my head. I feel like God is guiding the creativity, instead of myself.

Brittany, my daughter, saw that I was emotional, and she joined in to help me create this piece as a tribute to Liz. It was so nice to have her finger paint with me.

From Flamingo Scraps:   Prima Build A Swirl Stamps, Ranger: Distress Ink - Picked Raspberry, Claudine Helmeth Matt Medium. Other: Paint, Molding Paste, Hymnal, Sizzix Wings die Cut, Faber Castell PITT artist pens in light Cobalt Turquoise, and Black, Windser Newton Irrodescent Medium.


Liz will forever be in my heart, and written around the heart are some thoughts I had of Liz and the way she lived her life.  The clouds are made with molding paste, and the wings were cut from a sizzix die from hymnal pages I used "Beyond the Sunset" and "Sweet By and By", Then blended them into the canvas with irredescent medium.

Do you create when you are feeling emotional?  I felt at peace when this was finished, and Liz got her "Momma Tonya Original."

Thanks for stopping in today,


Tuesday, August 14, 2012

Distress Markers - How To

I have had a ball playing with my distress markers.  I decided to make a card for my niece's 7th birthday that is the first week of Sept.
I colored two images of the Ms. Anya Hats from - The Greeting Farm, and cut pieces of her out and popped them up on pop dots to giver her more depth.  She was colored with the Tim Holtz Distress Markers, then placed on a sheet of the Celebration's Paper from Webster's Pages.  

From Flamingo Scraps:  Webster's Pages Celebration 6x6, Trims, Roses, Tim Holtz Distress Markers.  Others: Making Memories #7, Baker's Twine, Washi Tape, The Greeting Farm -  Ms. Anya Hats, and Inkadinkadoo - Birthday Stamp.


For a complete step by Step of me coloring Ms. Anya.  Please watch this video.


Here is a video of me making the card:


Wednesday, August 8, 2012

Scrapping it 'Old School'

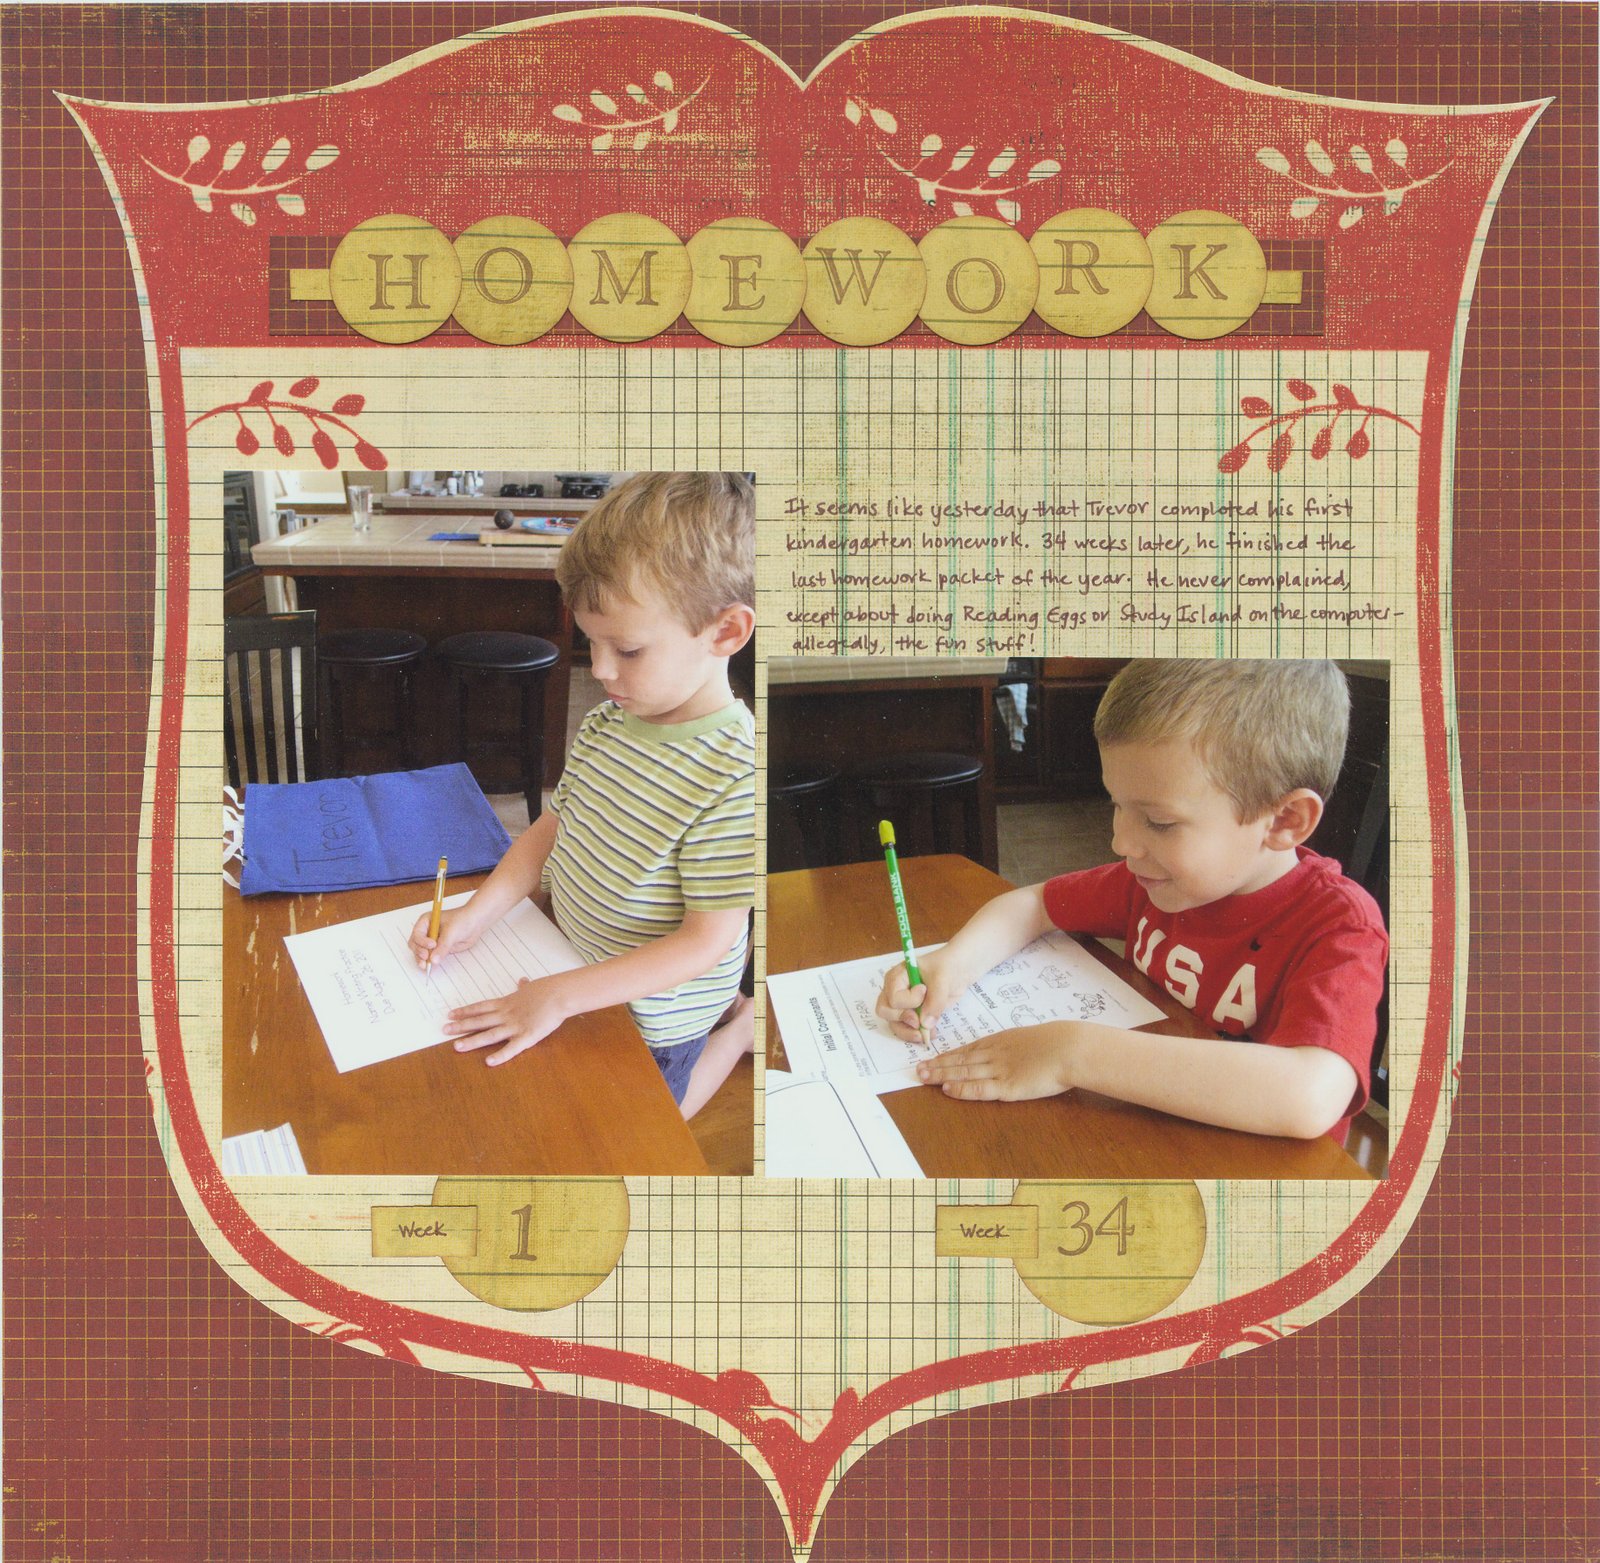
I really love 'then and now' type layouts.  Even though I already scrapped Trevor completing his first-ever homework assignment, I used the same photo again with a picture of him 34 weeks later, completing the final kindergarten homework assignment.

I dug deep into my pile of Flamingo Scraps goodies for Pink Paislee's "Old School" line.

 
From Flamingo Scraps: Pink Paislee patterned paper
Other: Fiskars circle punches, JoAnn stamps

This isn't quite a Young-Me-Now-Me, but it is still fun to see the different a year makes!

Monday, August 6, 2012

Distress Markers - With Flowers

I love playing with my Tim Holtz Distress Markers.
I wanted to share with you today a simple tutorial on how to use these markers to recolor your white mulberry flowers.
Supplies needed: I'm using the Prima Cabbage Roses, Tim Holtz Worn Lipstick Distress Marker, a broad tip water brush (you can substitute a paint brush and water), and a heat gun.


Using the brush tip - begin painting stripes on the flower. 

There is no need to completely color the flower.  Leave some of the base color showing like I have in the next photo.  


Using your water brush begin spreading the color around the surface of the flower.

I love how this technique leaves your flower variegated and more naturally colored.

You can let the flowers dry natural or use a heat gun to dry them quickly.  Another added touch - is to singe the edges with the heat gun by placing the gun close to the flowers.  This will make the flowers look aged.


Thanks for stopping in today,


Monday, July 30, 2012

Scrap Cards

I've been making cards with scraps again, and I know a few weeks back I shared a few projects I've made lately with the Fairy Belle and the Sunkiss papers from Prima.  Today I thought I would share with you the cards I made from the scraps.


I find that making cards with my scraps is so rewarding.  Since I participate in a lot of swaps I usually stuff one of these in the box before I mail it.    What do you do to control the scrap population?
Thanks for stopping in today,

Friday, July 27, 2012

Mixing the Old with the New

There's nothing I love more than getting a big box of Happy Mail from Flamingo Scraps! (Can I get an amen?)

I've been having such a great time with everything from my last box, especially the Heidi Swapp 'No Limits' collection! I love that the line is themed enough to be great for travel stuff (like my vacation planning folder), but versatile enough to work for other things too (like my '1st Field Trip' layout).

When I was looking at the papers I still had left, I noticed that one featured navigational tools. I dug through my older Flamingo Scraps stuff and came up with some wood grain letters from Crate Paper. Two photos, a few ancient stickers, and some journaling... and then I had this.


From Flamingo Scraps: Heidi Swapp patterned paper, Crate Paper letters
Other: It Takes Two stickers, Clearsnap ink, Recollections brads

Of course, getting out my older Flamingo Scraps goodies inspired me to push aside the newer stuff and use some of that stash.  Here is a layout featuring Fancy Pants stickers and die cuts from several years ago, plus some even older rub-ons.  I used some newer Thickers for the title.

 
From Flamingo Scraps: Fancy Pants patterned paper and die cuts, BasicGrey rub-ons (heart, dots)
Other: American Crafts Thickers, K&Co. rub-on (amazing)

How fun to mix the old with the new!

Friday, July 20, 2012

Heidi Swapp 'No Limits'

Remember the vacation planning folder I made using the Heidi Swapp 'No Limits' collection? Here's the latest project I made with that line:


From Flamingo Scraps: Heidi Swapp patterned paper
Other: BasicGrey letters, Fiskars punch, Clearsnap ink

It was perfect for a layout about Trevor's first field trip.  Actually, it was my first field trip too, in a way.  I led around 50 field trips as a teacher, but this was my first field trip as a parent.  Much easier!

Heidi Swapp's 'No Limits' is in stock- you can get it here.  Stay tuned for more projects from this awesome collection!

Friday, July 13, 2012

Oldies But Goodies - Tools of the Past

With CHA right around the corner – I know there are going to be heart stopping products that will become must haves.  We will replace yesterday’s must haves with these latest and greatest products.  It is a vicious cycle.  We have a lot of money invested in these tools, and they are still very useful.  I found myself resurrecting a few of them this week, and thought I would share with you how I showed them some love.

1.     Eyelet setting hammer  -  Remember having to BANG BANG BANG your eyelets into your projects.  Then the Crop-a-dile, from We Are Memory Keepers, was released and the hammer was tossed to the side.  Recently, I pulled the little hammer out of hiding and used it to distress a wooden cigar box. 


2.    The Grommet Setter from Making Memories had my toes tingling.  I HAD TO HAVE IT! It was like the coolest thing with the ginormous flower grommets.  I recently pulled it out to set an Eyelet too big for my crop-a-dile.  Also - Now that I'm thinking about it, I may just use it again this week to add a few of those flowers to a canvas. SO FUN.


3.     Dekled Edge Scissors  - GASP – you say.  Well, if used properly, these scissors can be a lot of fun.  I wanted a really tattered edge on an envelope  and decided to use these scissors.  I’ve also used them to cut fun shapes for mixed media projects.


4.     The old old Sizzix Dies remember the ones with crazy frames – no one ever shows them love anymore.  However,  I’ve been going through my stash of dies lately and found some great oldies to include in my mixed media projects and journals.   Example:  This frame was so popular,  but I haven't used it since 2007.  I recently cut some packaging with it, then dry embossed it and used alchol inks to give it new life.


5.     Remember this guy? I never could get this to cut properly. I have hurrled that little tool into the air so many times out of frustration.  I recently used the cutting plates as a stencil to spray interesting patterns on a project in my art journal.    Take your distress applicator tool and use the sides of the stencils to make beautiful borders on your journal pages.


Do you have tools that you have put away and forgotten about?    I challenge you to pull them out and find a new use for them.

Next week I want to explore products of the past that are making their way into my current proejcts.
Thanks for stopping in today,

Thursday, July 12, 2012

Pink Paislee - Declaration

I loved Pink Paislee's Declaration line the first time I saw it.  It has classic colors and a timeless feel.  Somehow it is both vintage and modern at the same time.  I had this idea to make a welcome banner to hang on our back fence during our next BBQ.  

I fussy-cut two shapes from the "Pinwheel" paper to hold my banner.  I attached them to a piece of twine and taped it to the fence.  So far, so good!


My idea was to make the letters in the shape of oven/grill mitts and hang them from the twine using mini clothespins.  Cute, right?  I cut out my mitts, added the letters and pinned them onto the banner.  Adorable! Totally BBQ and perfect for hot summer days!

 
Or.... maybe not.  Both my husband and 6 year old son asked why I had made a mitten banner during the summer.  In my mind, they were grill mitts.  It never occurred to me that they look exactly like winter mittens.  Sigh.


Flamingo Scraps has Declaration in stock... perhaps you can think of a more appropriate use than a mitten banner for the summer!  :)

Thursday, July 5, 2012

Once Upon A Springtime - Cigar Box

I guess you could say I've been on a Fairy kick lately.  Graphic 45's Once Upon A Springtime is one of my all time favorite paper collections.   I have been wanting to alter a cigar box with it for a long time now.   This past weekend I finally had the chance.


From Flamingo Scraps: Graphic 45: Once Upon A Spring Time: Pixie Post and Once Upon A Spring Time, Ranger: Claudine Hellmuth Matt Multi-Medium and Forest Moss Distress Stain, Prima: Rose buds, Mini Roses and Trellus Roses; Tattered Angels:  Gold Glimmer Mist, Mist Fits Glimmer Chalks. Other:  Floral Vine, Gelly Roll Clear Star Pen.

The base of the box was painted with the Ranger Forest Moss Stain then I sprayed Gold Glimmer Mist on top so that it has a nice shine to it.  I cut out the book and Fairies from the paper collection and flanked it with some Roses from Prima. Then I fussy Cut Fairies and birds from the paper collection and nestled them into the floral spray.

I love the way this box turned out, and I hope that my friend likes it too.

Thanks for stopping in today,

Friday, June 29, 2012

Prima - Fairy Belle Canvas

Please meet my beautiful niece, Emily. She is the newest addition to the Gibbs clan, born on June 15. She had her first photoshoot with Aunt Tonya last week, and now to drive everyone crazy with project after project.

I decided to create a canvas to hang in my  living room. There are a lot of mixed media techniques used on this canvas.  I wanted it to feel like a woodsy glen.   I used the Fairy Belle paper from Prima as my accent paper. 


The background has several layers of paint, glimmer mist, texture medium, and crackle medium.  I wanted this canvas to sparkle, but maintain a rustic feel. 


Then a cut out all the flowers from the paper collection to add as a base layer to the canvas. They wrap around the outer edge of the canvas. I added a spray of Prima Lilac Rosebuds (many of which I opened and painted the bulb gold, so that they would favor the magnolias in the paper collection.


 Suzanne shared with me some tiny purple Prima flowers that favor baby's breath. They were so delicate and spindly that I thought they made the perfect filler for the rose spray. Then  I sprinkled a few crystal flower spray around, and dusted the entire thing with golden fairy dust (a.k.a. glimmer mist).

I just love how Ms. Emily looks like she is nestled in a garden with Fairies.

I hope you have enjoyed this project. Thanks for stopping in today.

Vacation Planning Folder

When I opened my latest package from the wonderful ladies of Flamingo Scraps, I was thrilled to find the Heidi Swapp 'No Limits' collection and the Studio Calico 'Abroad' Wood Veneers - my #1 pick from the CHA Winter tradeshow! 


The timing of the package couldn't have been better.  My parents are taking us on a Hawaii cruise toward the end of this year, and quite a few family friends are coming too.  We all got together recently to share tips, coordinate our shore excursions, and plan details.  I desperately needed a place to store all of the paperwork and information for our trip. The 'No Limits' memory file would be perfect.

I wanted to dress it up a bit to make it say 'Hawaii', but I wanted to be able to use the folder for other vacation planning once the Hawaii trip had passed.  I decided to the solution was to use an old-school library pocket.  I used a bunch of stamps and ink to match the style of the folder.  Here's the Before and After:

 
Next, I made a card to fit in the pocket.  I started with a blank white background and added two scraps of orange paper.  To hide the seam, I used a strip of white and blue, accented with a sticker from my stash.  I used a pen to color the Hawaii wood veneer blue, attached it to the card, and added a title.  After I took this picture, I filled in details, like the dates and names of our traveling companions on the top section.  The bottom section can hold special memories after the trip.
 
Here's how my vacation planning folder looks now!

 
When the trip is over, I can easily remove the card and create a new card for whatever trip we plan next.  And I can save the Hawaii card for use on a layout or keep it as it is as a momento from the trip.


From Flamingo Scraps: Heidi Swapp Memory File, Studio Calico 
wood veneer, Pink Paislee patterned paper
Other: Fiskars stamps, Clearsnap ink, Prismacolor pen, Mrs. Grossman's sticker


What do you think?!

Monday, June 25, 2012

Chust for Pretty -- Spring Jubilee Mini Album!!!

I have this long ago memory, I think from a juvenile book set in the Amish Country of Pennsylvania, of the reason hex signs are painted on many Pennsylvania Dutch barns.  Queried about the symbolism of the hex signs -- were they to ward off evil spirits?  did they have religious significance?  were they some kind of special code? -- an Amish farmer replied in his thick German accent -- they are "Chust for Pretty!"  That really had an impact on me -- an object doesn't have to have deep symbolic meaning to justify its creation -- being pretty is enough. 

This is my new mantra for crafting!  I shall no longer put off creating things until I have a reason or someone to give it to.  It makes me happy to craft so, I give myself permission to do it "Chust for Pretty."  And my first project is this Pink Paislee Spring Jubilee mini album.

Pink Paislee was spot on with its collections released at Winter 2012 CHA.  Sugar Chic and Spring Jubilee are easily among my FAVORITE collections ever!!!  Having quenched my desire for Sugar Chic with a little purse mini, I turned my attention to the gorgeous color palette, patterns, and embellishments of Spring Jubilee!  I started with a Maya Road acrylic album --
Front Cover -- Pink Paislee
Spring Jubilee 6x6 Paper Pack & PressOns;
Maya Road Trinket Pins; Prima Flowers;
FabScraps Charms

Page 1 -- Spring Jubilee Chipboard Stickers;
Seam Binding; PressOns;
 Maya Road clear packaging; vintage sheet music
Page 2 -- PressOns; Maya Road Chandelier Beads;
Webster's Pages Perfect Accents bird; Wide Venice Lace
Page 3 -- Sizzix Library Pocket Die; Webster's Netting
Remember the lace dyed with Easter egg dye?  The colors were perfect with Spring Jubilee.

Page 4 -- Webster's Pages Flower; black lace; Prima Trinkets; garment pin
Page 5 -- PressOns; Maya Road Rubons
Page 7 -- Spring Jubilee Shipping Tags; Graphic 45 Brads;
Tim Holtz bird and stickpin; Maya Road Tea Garden Organza Trim in Rose

Page 6 -- Tim Holtz Dressform Die; Maya Road Sew Cute Chipboard spool;
 Christy Tomlinson She Art Tissue; Cosmo Cricket Tiny Type Life;
Webster's Pages Bird;  jeweler's tag; resin flowers

Page 8 -- Spring Jubilee Chipboard Stickers;
Venice Lace;  FabScraps Charms;  doily
Page 9 -- Shipping Tags; Chipboard Stickers; Tim Holtz bird


Page 10 -- Miscellaneous vellum envelope; note card;
 Prima Dangling Photo Trinkets
Back Cover -- KaiserCraft stamp

Different technique for me on the binder rings.
Made a tube of some stash fabric using Fabri-tac-


Gathered the fabric sleeve over the 2" binder rings.
Binder Rings

Spring Jubilee Mini Album


I hope you will make something this summer Chust for Pretty!  Thanks for stopping by!
Related Posts with Thumbnails