So you got your Webster's Pages Best Friends Collection pack from Flamingo Scraps and are wondering what to do with it. Let me start off by saying that it is a truly inspiring collection! I knew right away what I was going to use it for.
One of the girls at work is the kind of girl that you respect, admire and love instantly! I came in as the graphic artist and Spanish speaking customer service telephone person. It was a rough beginning for me. But, Chris was just so sweet from the start. So, welcoming and kind. It is not easy to relocate, get married and start a new job, but she made the transition amazingly wonderful!
So, I decided to make her a special gift that she could keep on her desk at work. It is a photo box!
Here's the how to:
Step 1.
 |
| Take one of the 12 x 12 papers from the Websters Best Friends pack collection and cut out 4 inch squares from each corner to make a giant plus sign shape. Don't forget to save your 4 inch squares and use them as photo mats, journaling spots, etc. |
Step 2.
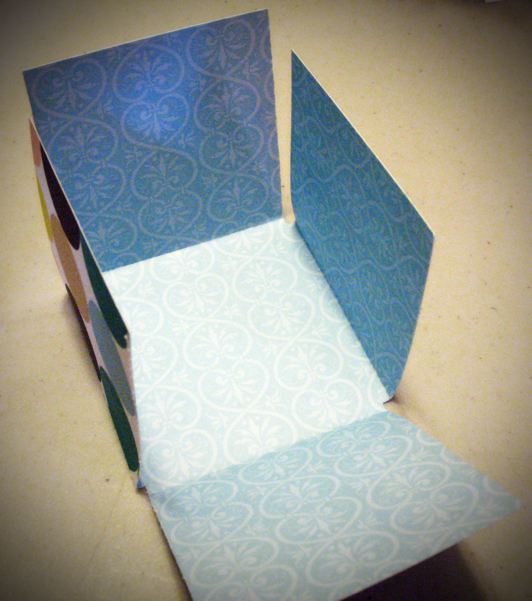
 |
| Fold the flaps up to make a sort of box shape. |
Step 3.
 |
| On your next paper, cut off 1/2 inch from the paper on top and 1 side to make an 11 1/2 x 11 1/2 paper. |
Step 3.
 |
| On your 11 1/2 x 11 1/2 paper (this is the same as in step 2, it just shows the pattern on the back side), cut out four 3 3/4 inch squares from each corner to make another plus sign shape. |
Step 4.
 |
| Fold the flaps up to make a sort of box shape. |
Step 5.
 |
| Take a third piece of paper and cut 3/4 inch off the top and one side to make an 11 1/4 x 11 1/4 paper. |
Step 6.
 |
| Again, cut out four 3 3/4 inch squares from each corner to make a plus sign shape and fold up the flaps to make a box like shape. |
Step 7.
 |
| On the fourth paper, cut off an inch from the top and one side to make an 11 x 11 paper. |
Step 8.
 |
| Again, cut out four 3 3/4 inch squares from each corner and fold up the flaps. |
Step 9.
 |
| Stack all your papers from largest to smallest, adhering them to each other on the bottom of the box shapes, but leaving the flaps loose. |
Step 10.
 |
| To make the box top, fold a corner in to the very center of the 12 x 12 paper. |
Step 11.
 |
| Continue folding all the corners in. |
Step 12.
 |
| Fold the top and bottom in to meet in the middle. |
Step 13.
 |
| Unfold the top and bottom and fold in both sides to meet in the middle. |
Step 14.
 |
| Unfold everything and turn the paper so that one of the corners is pointed toward you. Cut both sides of the corner pointing at you using the fold lines as a guide. Cut in until you reach the inner most creases that form the square in the middle of the paper. Now rotate the paper so that the opposite corner is facing you and cut the same way on that corner. |
Step 15.
 |
| Start folding and tucking, following the creases and using adhesive to keep it in place. |
Step 16.
 |
| This is what the lid of the box should look like. |
Now for the fun part, adding embellishments and photos!
 |
| I used one of the strips that I cut off to make the 11 1/2 x 11 1/2 paper to make a sweet bow on top. This cute photo cube doesn't need any gift wrapping! |
 |
| I added some photos of Chris's children and grandchildren to the front and back of several of the flaps. I also left some blank spots for her to add more photos that she really liked. I finished it off with trims, stickers and cameos. Flamingo Scraps has a great collection of cameos,Prima bling, and other great embellies for your projects, so be sure to check those out ! |
These would make the perfect
gifts for grandparents, teachers, or anyone else on your gift giving
list. Be sure to order early so you can get your scrap on and be ahead
of the gift buying rush!
Don't forget to visit Flamingo Scraps at
http://stores.ebay.com/Flamingo-Scraps for all your scrappy goodness. Also, their new store will be opening VERY soon, and you can visit them there at
http://www.flamingoscraps.com/.
Need a little help with motivation or projects ideas? Don't forget the Ustream projects with the amazing Tonya Gibbs
http://www.ustream.tv/channel/gibbst on the first Monday of each month. You can find the dates for Tonya on the Flamingo Scraps blog.
Until next time, happy scrapping !!
Abigail


What a great project! Who wouldn't love to get one of these?
ReplyDeleteJust LOVE this -- a great tutorial on the box and beautiful details!!!! Suzanne
ReplyDeleteAbigail, I so want to try one of these!! You did an awesome job on it and I would love to get one of these!!! Hugs!!
ReplyDeleteLove it!
ReplyDelete